Welcome to another edition of “Customer Stories”. This is a series in which we feature in-depth testimonials and interviews with companies who use photogrammetry and bullet time applications – analysing their work to help other multi-camera setup owners.
Today’s interview is with John Archibald, the Data Processing Engineer at Structural Technologies. He specialises in capturing images of structures and processing them into data which is used to facilitate virtual inspections for clients.
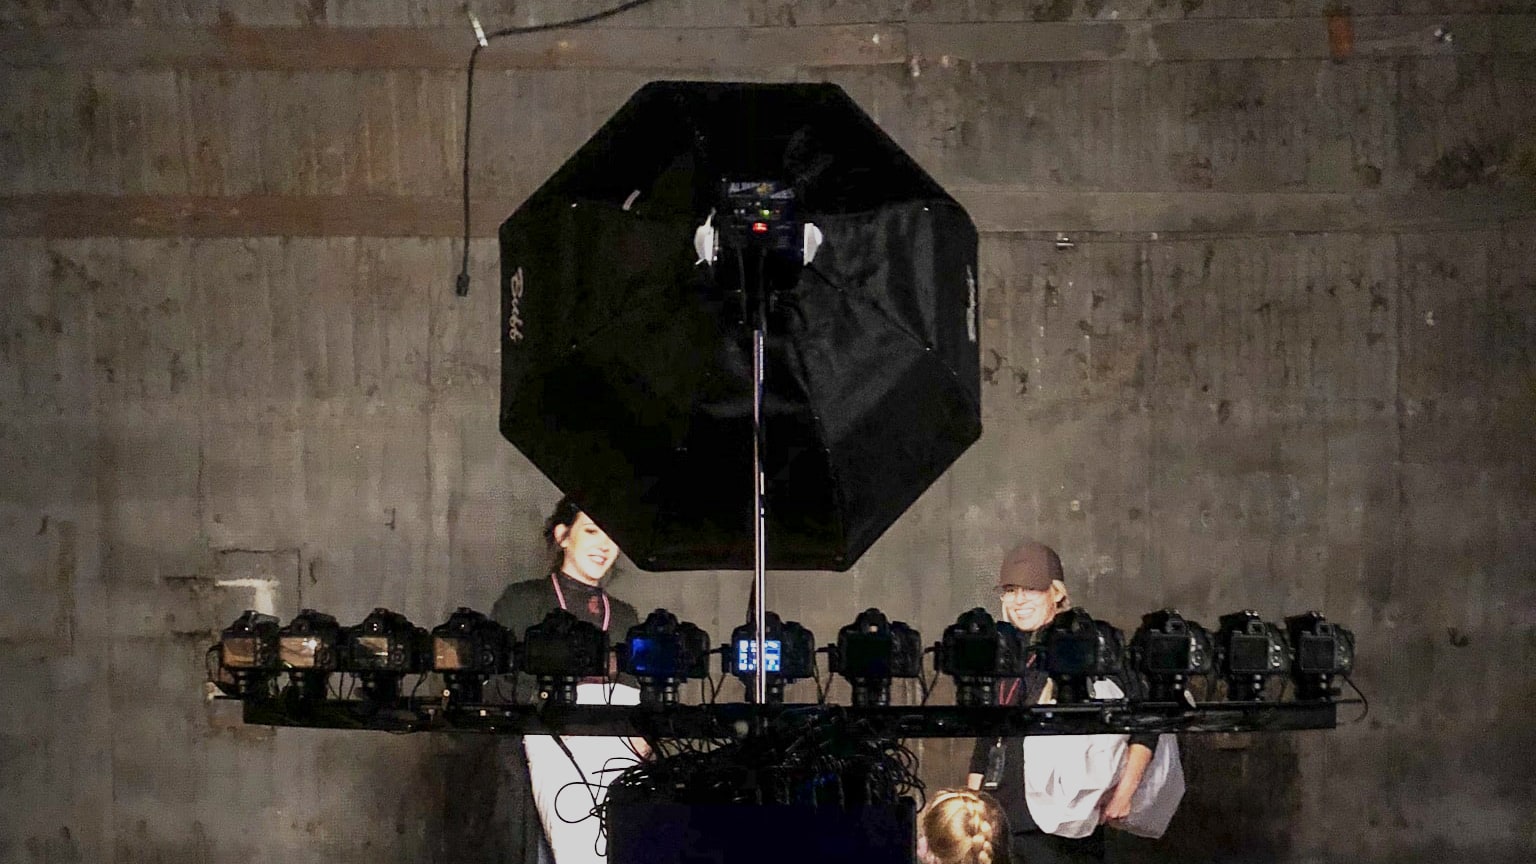
John bought ESPER triggering and powering hardware to build a specialised photogrammetry setup design for scanning in very confined spaces.

Structural Technologies develops and integrates products, engineering support, and repair and maintenance services to provide value-added solutions throughout the construction industry. We work on various structures from skyscrapers to universities to nuclear power plants.
Our mission – making structures stronger and longer lasting.
I work in the research and development division. We specialise in the data acquisition of a structure’s concrete to perform a strategic inspection for repair work.
The better the image capture, the better the data we can extract. This makes it easier for us to get the best understanding of potential construction repair and thus puts us ahead of the competition.
Because data acquisition is crucial we needed a photogrammetry setup that would provide the client with really high-resolution virtual inspections. These haven’t been possible in the past and this is a market differentiator for us.
First, I needed hardware that would allow us to remotely trigger all of the cameras in the array.
And we had two options…
Making it in-house by fabricating an electronic circuit, or buying something already available on the market.
The price of the readymade product was comparable to a day, or a few days, of our team’s work. But there are always a bunch of risks involved that could end up consuming more man-hours by trying to pursue a solution.
So we decided to try the solution available on the market – the TriggerBox.
We were really excited to test it. Once it arrived and we tested it I immediately knew it was the right decision. There was certainly no need to spend any more time thinking about homemade solutions.
This gave us great peace of mind.
Everything worked; the interface was super easy to use and overall it was an amazing out-of-the-box solution.
“Software interface is really well designed, intuitive. Hardware works really well to the point where my boss said “When (4 cameras) fire simultaneously it sounds like a single camera!” Saved my team time, effort, and money. Very nice product – I feel lucky to have found this company.”
JOHN ARCHIBALD – DATA PROCESSING ENGINEER | STRUCTURAL TECHNOLOGIES
We no longer had to worry about anything going wrong. We know that the units have been tested by you and there is a guarantee and support in case we need it. One less headache with these neat little boxes!
But there was a hardware communication aspect which worried me.
Our photogrammetry setup needed to integrate with a computer during the data capture so I was concerned that I would need to learn an API or learn how to create a custom interface.
But it turned out to be as simple as learning 6 commands and putting a separate microcontroller to communicate in the serial codes to have full control of the TriggerBox.
Your controller software was super convenient and very simple to use for me. It already had all the necessary functions built in so it only took me an hour to set everything up.
Powering a convenient mobile photogrammetry setup of expensive cameras was a challenge.
We work in remote places that are dirty and hard to access. Bringing cameras in for an extended period of time necessitates different ways to power them simultaneously.
When first searching for the remote triggering mechanisms that led me to the TriggerBox, I quickly realized the usefulness of the PowerBox – this is exactly what we need.
But I was super hesitant to use anything other than the factory supplied batteries because I didn’t want to damage the cameras. I was also worried that a 9V power capability on PowerBox would not be good for a camera with a 7.4V battery.
“I needed a way to conveniently power multiple expensive cameras. I was super hesitant to use anything other than the factory supplied batteries because I didn’t want to damage the cameras. A little reassurance from the ESPER staff and initial experimentation showed me that I had no need to be hesitant because this product works flawlessly.”
JOHN ARCHIBALD – DATA PROCESSING ENGINEER | STRUCTURAL TECHNOLOGIES
Customer service has been very friendly and helpful.
A little reassurance from the ESPER staff and initial experimentation showed me that I had no need to be hesitant because this product works flawlessly. All of the cameras in the array are supplied with constant regulated power.
There are not really many other products like it that I’ve found.
Getting hands-on with the TriggerBox and PowerBox was one of the first steps that we took to make this photogrammetry setup a possibility and not just something that was kind of imaginary or a vague idea.
Once we had your hardware and tested it we knew that we could actually get this system made which will open new opportunities for us. Our prototype launch was very successful and this was a big step forward for us.
It has allowed us to create something new that our company has never used before (scanning with multiple cameras in these hard to access locations), which will allow us to appeal to more clients and win work that we otherwise may not have been able to win.
Click here to learn more about ESPER TriggerBox and PowerBox.
Read more interviews:
In our “ESPER Customer Stories” series we speak with the owners of multi-camera and photogrammetry setups to see how they improved performance with ESPER hardware.
Today’s interview is with Anel Lazcano, Product Manager at HCG Technologies, a leading supplier of multi-camera solutions and motion capture equipment in Latin America.
His team found new clients by making their photogrammetry setups mobile and more effective, which improved the creation of digital doubles and props in CGI production pipelines.
Let’s dive in.
HCG Technologies specialises in providing innovative multi-camera technologies such as motion capture and photogrammetry for the entertainment, engineering and health sciences industries in the Latin American market.
With over six years of experience, we have supported major educational institutions such as UVM, brands including Mercedes Benz, and several movie producers.
Our goal?
To provide the most innovative and productive multi-camera systems in the industry to clients looking for new ways to get CG production projects done more effectively, but who lack the internal departments to do so.
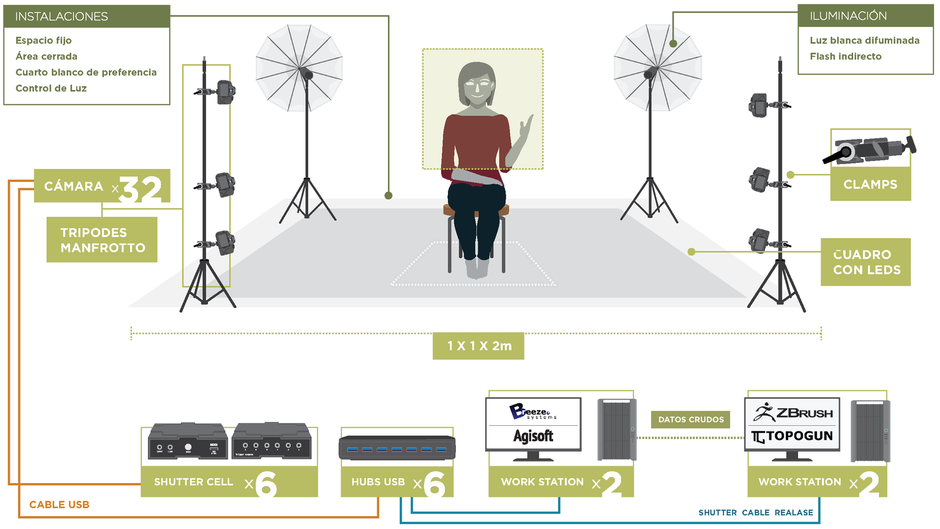
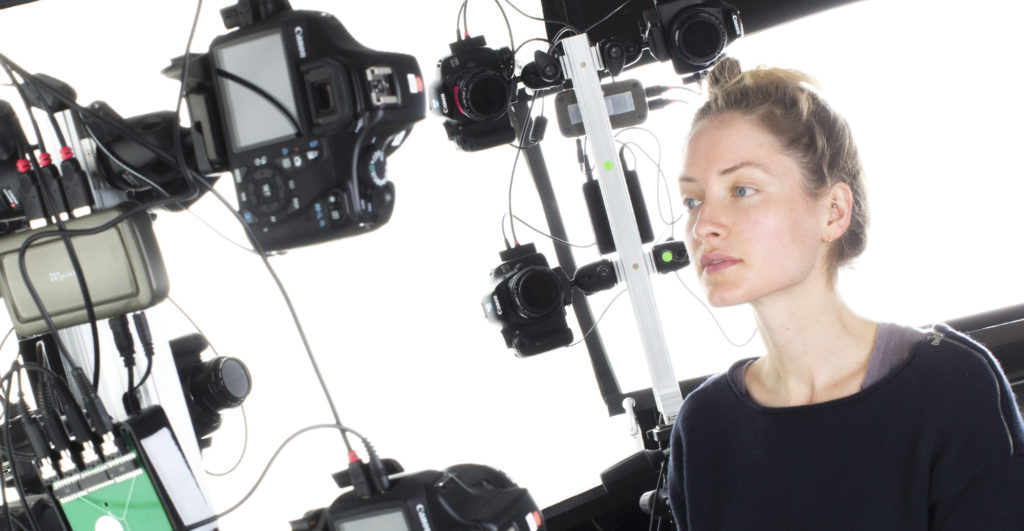
Typical projects involve the creation of face, body and object 3D models using photogrammetry setups, but we are also involved in brand activations using bullet-time effect.
So our 64 Canon Rebel T6 setup is often reconfigured depending on client requirements.
Before getting our hands on ESPER equipment we used PC software to fire all of the cameras at the same time through USB – this wasn’t ideal.
What’s more, we had to create a mobile solution since we often travel to different universities around Mexico and within Latin America to showcase our product. Carrying so much gear to different locations can be frustrating!
These were some of the objectives we needed to achieve:
1. Reliability – Shooting all cameras through the software wasn’t too bad, but we had a lot of delays and irregularities which we couldn’t allow to happen when distributing the system.
2. Professional Look – There was no other company that offered a “plug-n-play” solution for triggering and powering multiple cameras. A homemade solution was an option but since we work with different clients that are very strict on how our systems look we needed something more slick and professional.
3. Time Efficiency – I wouldn’t say that setting up a photogrammetry system is too complicated, but it can be very time-consuming since we have to connect hundreds of cables every time we install the system at a new location.
“We realized that there was no other company that offered a “plug-n-play” solution for triggering multiple cameras. We considered manufacturing our own homemade solution but since we work with different clients that are very strict on how our systems look we needed something more slick and professional. ”
ANEL LAZCANO – PRODUCT MANAGER | HCG TECHNOLOGIES
This was the first time we’ve used products like this!
At first we were a little concerned about the price. We didn’t doubt the quality of the product but the cost of importing goods to Mexico can be expensive.
But we wanted something compact, powerful and modular at the same time.
ESPER hardware has helped us to develop a complete photogrammetry setup that we can carry easily whilst being reassured that everything will work when showcasing it to our clients.
The TriggerBox has eliminated all of the lags we previously experienced when shooting all cameras.
The set up for the boxes is very user-friendly and straightforward and I love how compact they made the setup!
The PowerBox has freed up so much space in the setup by getting rid of the unnecessary power supply cables required to operate the cameras in the setup. This also makes our systems look neater and more professional.
ESPER allowed us to deliver a ready-to-use solution.
We carry many different technologies and have been setting up photogrammetry systems for over three years now.
Multi-camera hardware helps us simplify our methods for assembling photogrammetry setups. Our clients have also benefited from a much more effective process when creating 3D models.
We have seen an increase in growth.
Our clients love our setups and now we have new complete systems waiting to be delivered to more universities than ever before. In fact, we’ll soon be placing an order for an additional 12 PowerBoxes and TriggerBoxes!
Click here to learn more about ESPER Multi-Camera Hardware.
More interviews:
How often do you think about increasing your photo booth rentals and attracting more clients?
Have you ever tried to master the bullet time effect using a multi-camera array?
Felt frustrated by the lack of information on the web?
It’s not surprising.
If you’re serious about renting equipment for a huge event with thousands of guests, you need to carefully consider how you set up your multi-camera array.
In this article we’ll tell you how to set up a successful bullet time booth that wows!


So, if you want to:
… this guide is for you.
Keep reading to learn how!
After collecting first-hand knowledge from, and responding to, hundreds of enquiries from photo booth owners we realised that the bullet time effect was becoming more and more popular and resulting in greater success for companies by…
…generating more revenue:
“Being able to do bullet time photography and multi-camera work gives us a unique selling point that most other photo booth businesses do not have. We’ve made money and we’ll continue to make money doing bullet time photography this year! In fact, we made more money last year than we ever have before.”
BILL HAMWAY | MAMMOTH BOOTH
…adding value to the business:
“In Singapore, we are the only company that can do 360 Time Stop photography which has given us a great competitive advantage. It’s opened up a lot of opportunities and significantly increased revenue as a result!”
EWAN SOU | INSTANTLY.SG
…shocking guests (in a good way!):
“The bullet time effect and array really create amazing reactions.
When guests couldn’t see all of the cameras they were like “Okay that’s a nice thing”, but when they walked around to look at the array from the front, almost everybody was shocked! “ROLF MOOIBROEK | FOTODOOS
Plus there’s the engagement it creates:
View this post on Instagram
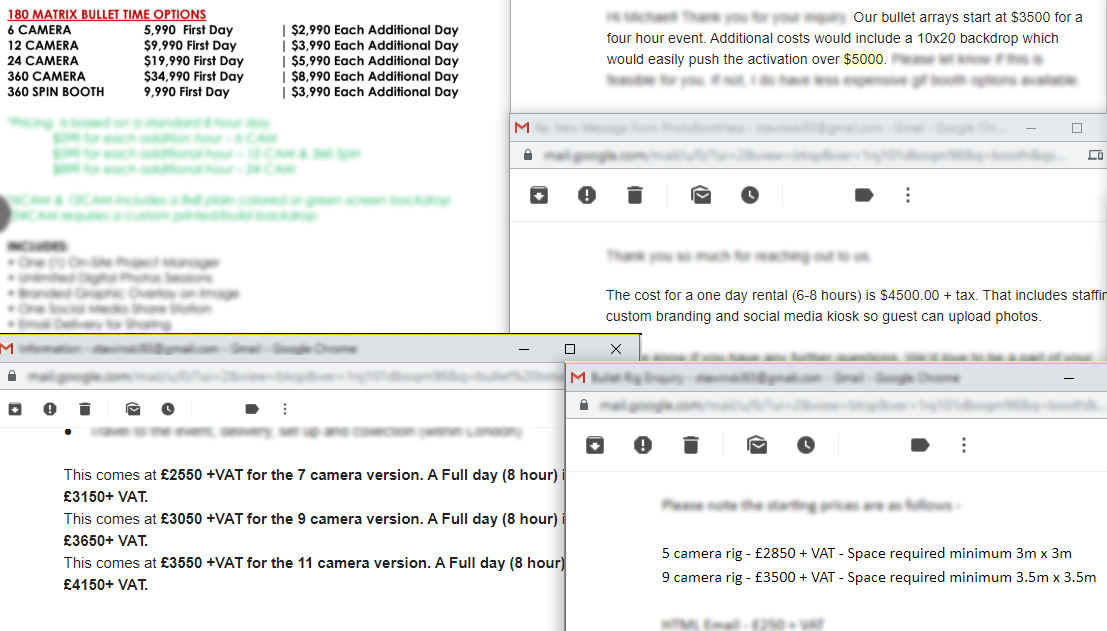
Not to mention that you can charge between $600 – $1,000 per camera in your array for the first day, and that’s not including extras!
Which leads to…
It might seem a little complicated at first as there are a lot more things involved than just grabbing a few cameras! But don’t worry, we’ll explain everything step-by-step in this guide.
Over the years we’ve been studying the photo booth market, have spoken with many experts, and we’ve solved a variety of issues that will help you to create truly amazing bullet time results.
This guide will help you understand the principles of an effective camera array. In addition, you’ll learn about the right equipment that’s needed, how to connect everything together, the importance of camera calibration and what settings to use when firing all cameras.
First let’s learn the basics of bullet time photography and the way in which it works.
Once covered you’ll be ready to move onto the next stages such as getting the right equipment and setting up your camera array.
Many of you will probably associate bullet time photography with the famous action scene in the Matrix movie (1999) where Neo effortlessly dodges one bullet after another.
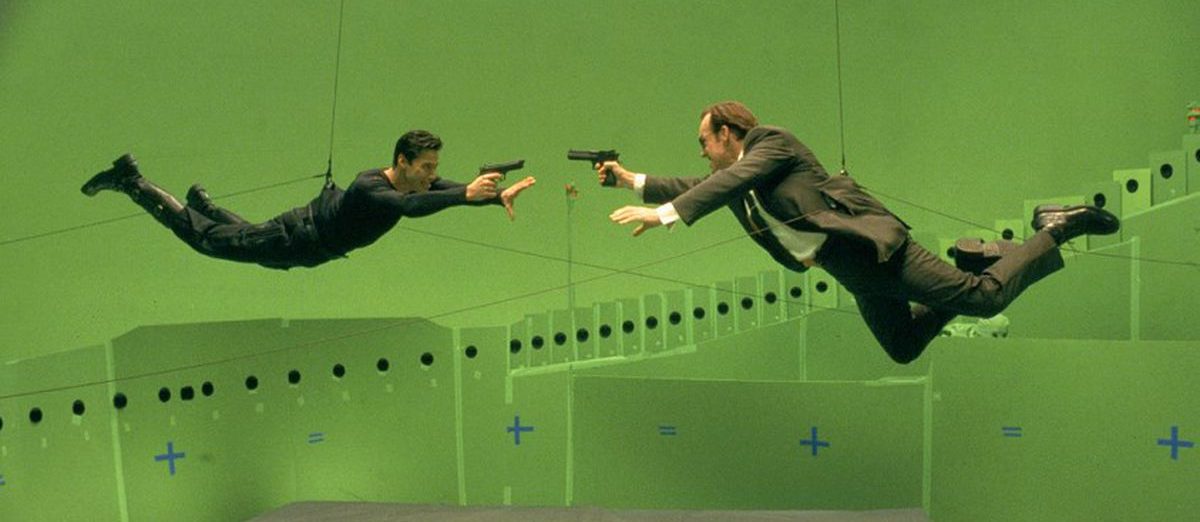
Source: The Verge
That’s cool – but what exactly is bullet time?
It’s an effect in which audiences are given the impression of circling around an action sequence which is frozen in time, and at a speed which wouldn’t be possible in real life.
In actual fact, the bullet time effect didn’t make its first appearance in the Matrix. Its origins date all the way back to 1878 when an Eadweard Muybridge used it to capture the motion of a horse. Just over one hundred years later in 1980, director Tim Macmillan also started experimenting with bullet time, creating videos that used the time slice technique.
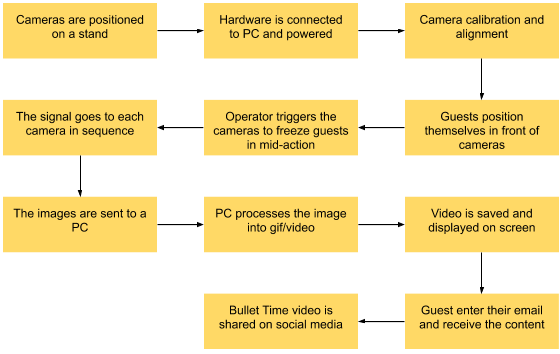
A number of synchronised cameras are physically separated from each other and positioned around the subject, commonly in curved or rig positions.
Cameras are either typically fired at the same time or one by one to introduce movement. Then all the images are transferred to a PC and stitched so that the final outcome forms a movie, or GIF, of a moving image sequence. This gives the impression that a camera was spinning around the subject at very high speed.
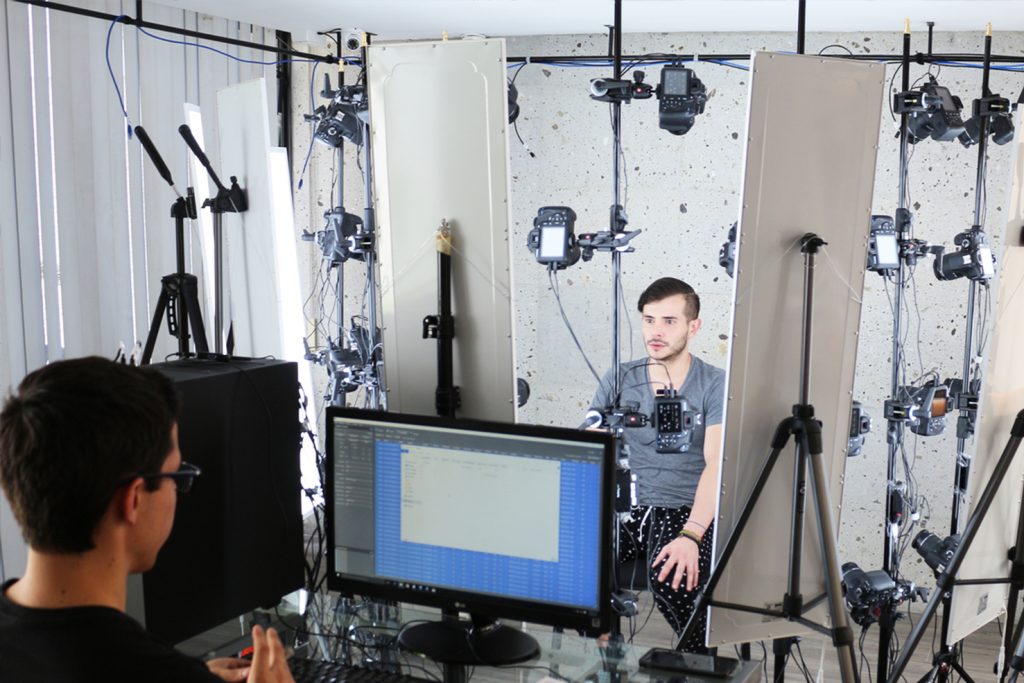
Here’s an example of the process in a typical photo booth scenario…
…and here’s a real-life example from an actual event:
Just knowing what you need to build a camera array can feel like a huge task alone. But finding each piece of essential (and compatible) equipment without breaking the bank can be even more difficult!
You don’t need the best equipment to create high-quality bullet time videos. However, you’ll need to use hardware that is reliable and won’t let you down in the middle of an event.
There are several essential things, from camera model to light and triggering mechanisms which will contribute to the reliability, quality and compatibility of your array.
Let’s get started.
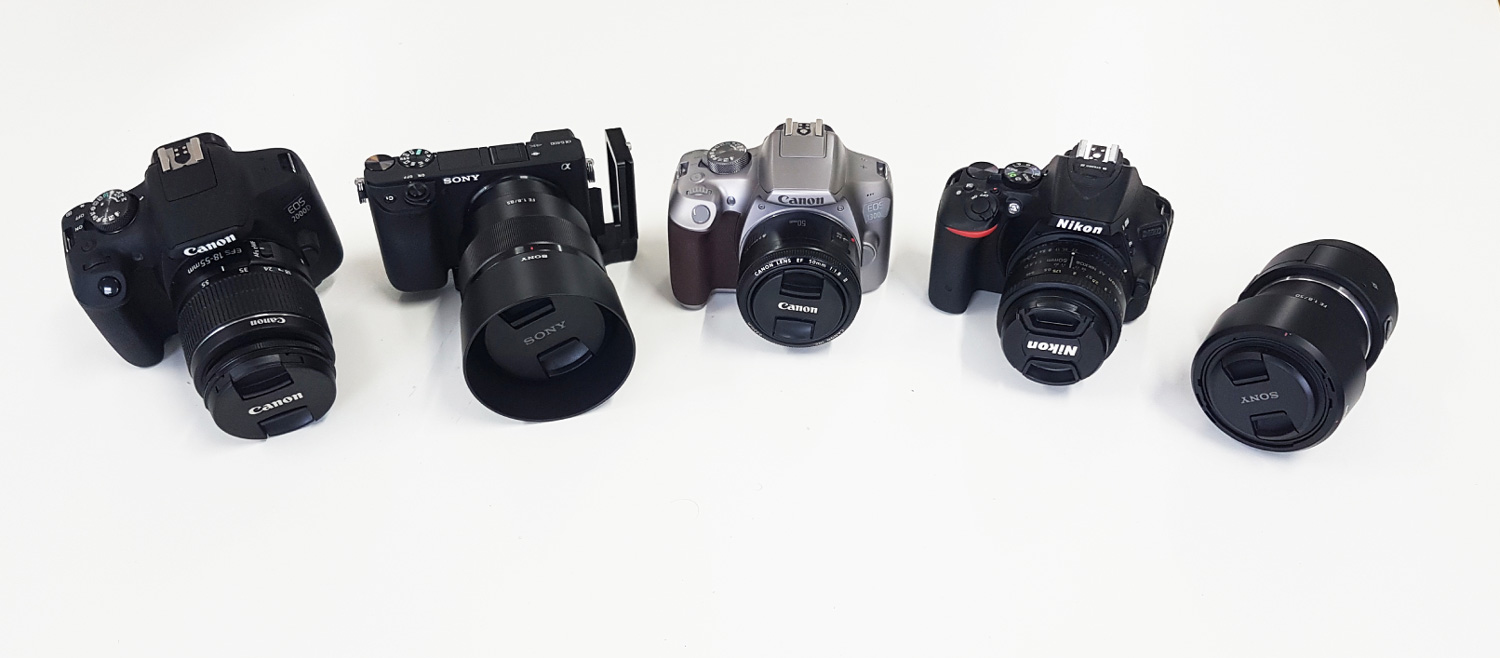
We are often asked which camera is best for a bullet time booth.
There are thousands of camera models to choose from.
And if you are serious about bullet time then you will want to use a DSLR or mirrorless camera.
That’s because you’ll need a piece of hardware that offers features and settings, produces quality photos, is designed to sync with other cameras and flashes, and is capable of remote capturing.
So, when selecting the best camera for a camera array there are three important factors to keep in mind:
First, compatibility. Not all cameras are recommended for use in multi-camera arrays as some cannot be triggered remotely.
Second is the price. The camera in your array will likely be your main expense so you need to choose your model wisely as the price scales with each camera.
Third is the size. Transporting the whole setup to different locations could be affected by the weight and dimensions of all the cameras.
To make your decision easier, we’ve collected data from over 1,600 multi-camera users.
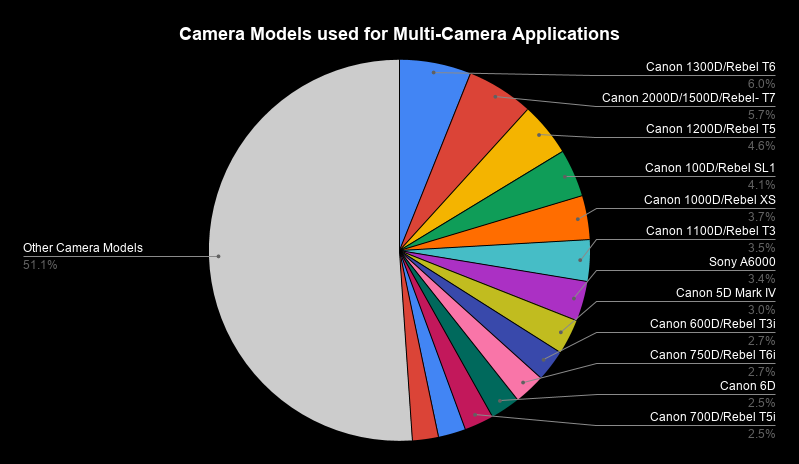
Photo booth multi-camera software packages mainly support Canon cameras, which explains their popularity. However, other camera models are still being used in multi-camera arrays, albeit usually for other applications.
For now, let’s focus on the three most popular camera models commonly used in bullet time camera arrays:
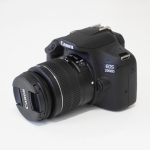
| CANON 1300D (T6) | CANON 200D (SL2) | CANON 2000D (T7) | |
|---|---|---|---|
 |
 |
 |
|
| Amazon Price | ~$419 | ~$549 | ~$449 |
| Resolution | 18 MP | 24 MP | 24 MP |
| Release Date | Mar, 2016 | Jun, 2017 | Feb, 2018 |
| Remote Control | Yes | Yes | Yes |
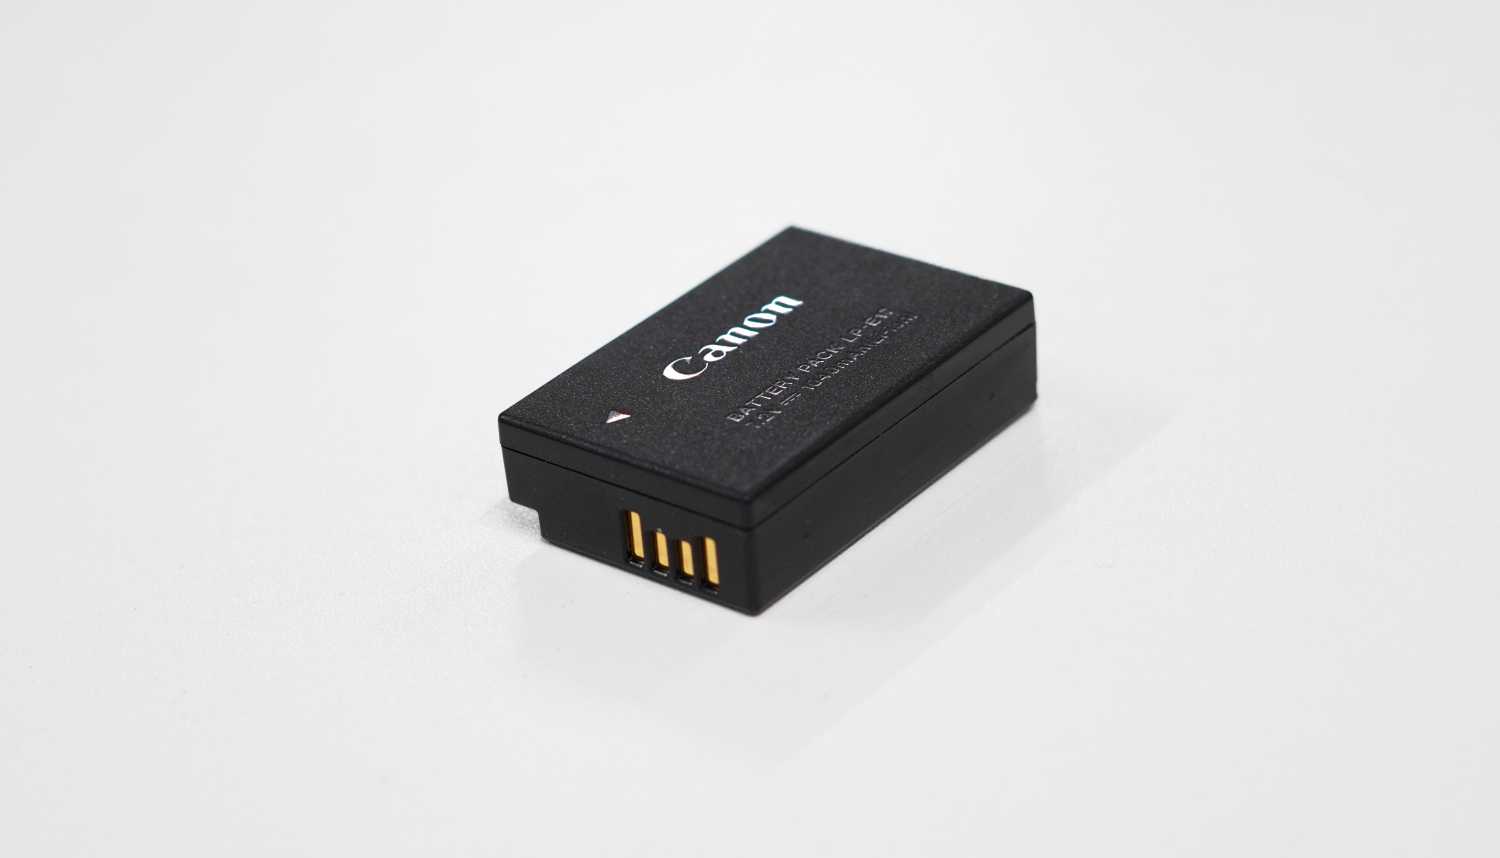
| DC-Coupler Compatible | Yes | Yes | Yes |
| Weight | 485g | 453g | 475g |
| Dimensions | 129 x 101 x 78 mm | 122 x 93 x 70 mm | 129 x 101 x 78 mm |
In summary, choose the 1300D if your budget is tight. Note that it’s an old camera which may not be available in every country. Therefore the 2000D is a newly-released alternative with a better resolution. Go for the 200D if you’re looking for a compact camera with mirror lockup function for more accurate triggering.
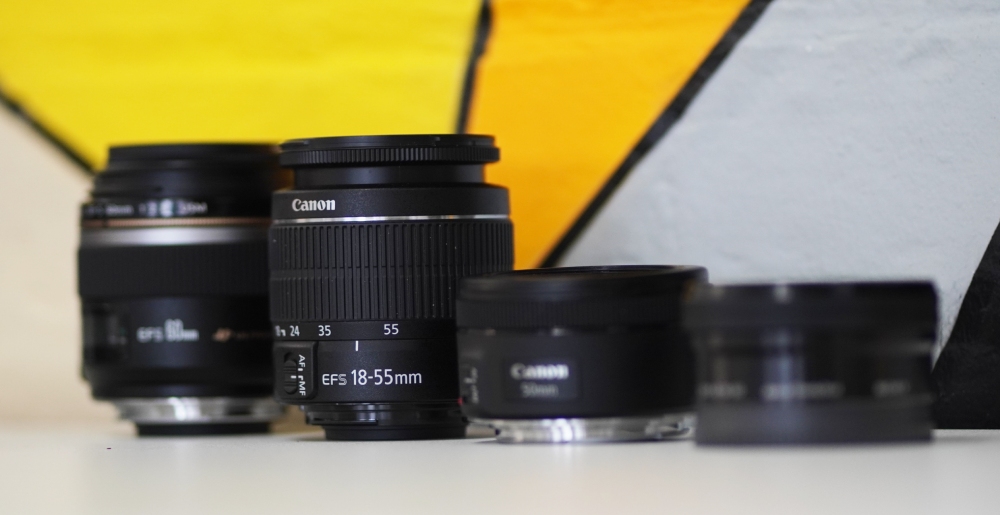
There are also a lot of lenses to choose from, but not all are suitable for bullet time event photography.
Your cameras have to capture the subject in mid-motion. In addition, the lens needs to be suitable for group shoots from a relatively short distance, as space for the setup could be limited.
A kit lens is a common choice for camera arrays as it performs its job relatively well. For example the EF-S 18-55mm kit lens should equip you with enough flexibility to perform in most situations.
If you want to make your setup more compact upgrading to an EF-S 24mm f/2.8 pancake lens is also a good option.
Kit lens:
Pancake lens:
Source: Mammoth
A game-changing component in every camera array.
Extra lighting will ensure your setup performs well under different environmental conditions. It will also have a significant impact on the quality of the final results.
Lighting needs to be powerful enough so that it reaches your subjects, otherwise it could create a shadow on the backdrop behind them.
First you’ll need to decide between strobe or continuous lighting.
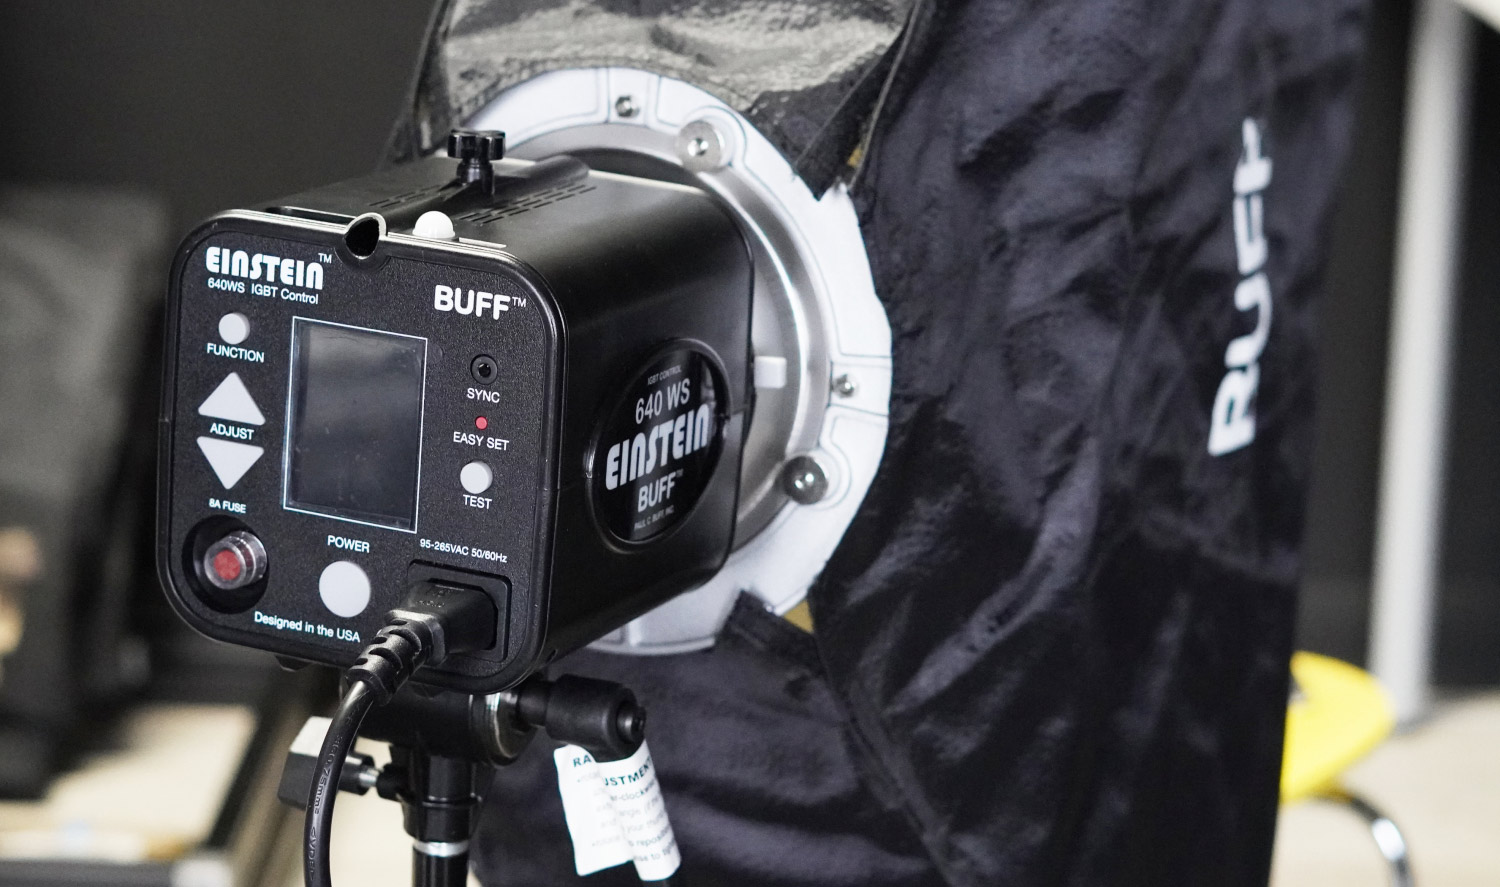
For bullet time photography you may want to go for strobe.
You need the results to be sharp even when subjects are jumping in the air and flash is perfect at freezing action. It distributes the light a lot better and is powerful enough to fill in the uneven light. Also the strobe won’t be shining in the subjects’ eyes all the time. Lastly, it can be controlled and triggered by a multi-camera software solution for the best results.
“Since I come from a photography background, I wanted to use two photography strobes. One for a face light and one for a hair light to make our 3D photos really pop. Quality is one of the most important things to me.”
BILL HAMWAY | MAMMOTH BOOTH
As for continuous lighting, this is still used by some bullet time booths. Continuous lighting is a lot easier to use as what you see is what you get. However it is not as powerful as strobe at freezing the motion, meaning the subject could be blurry especially when using light painting techniques.
For more information on which lighting to use check out the Constant Lights vs Strobes, Working with continuous light and 4 ways to combine flashes and bullet time articles.
Here are a few stunning examples by Eric Paré on how to combine flash and bullet time.


When it comes to triggering multiple cameras you’ll need a solution that will not fail you in the middle of an event.
There are several options available that would allow you to trigger multiple cameras at the same time.
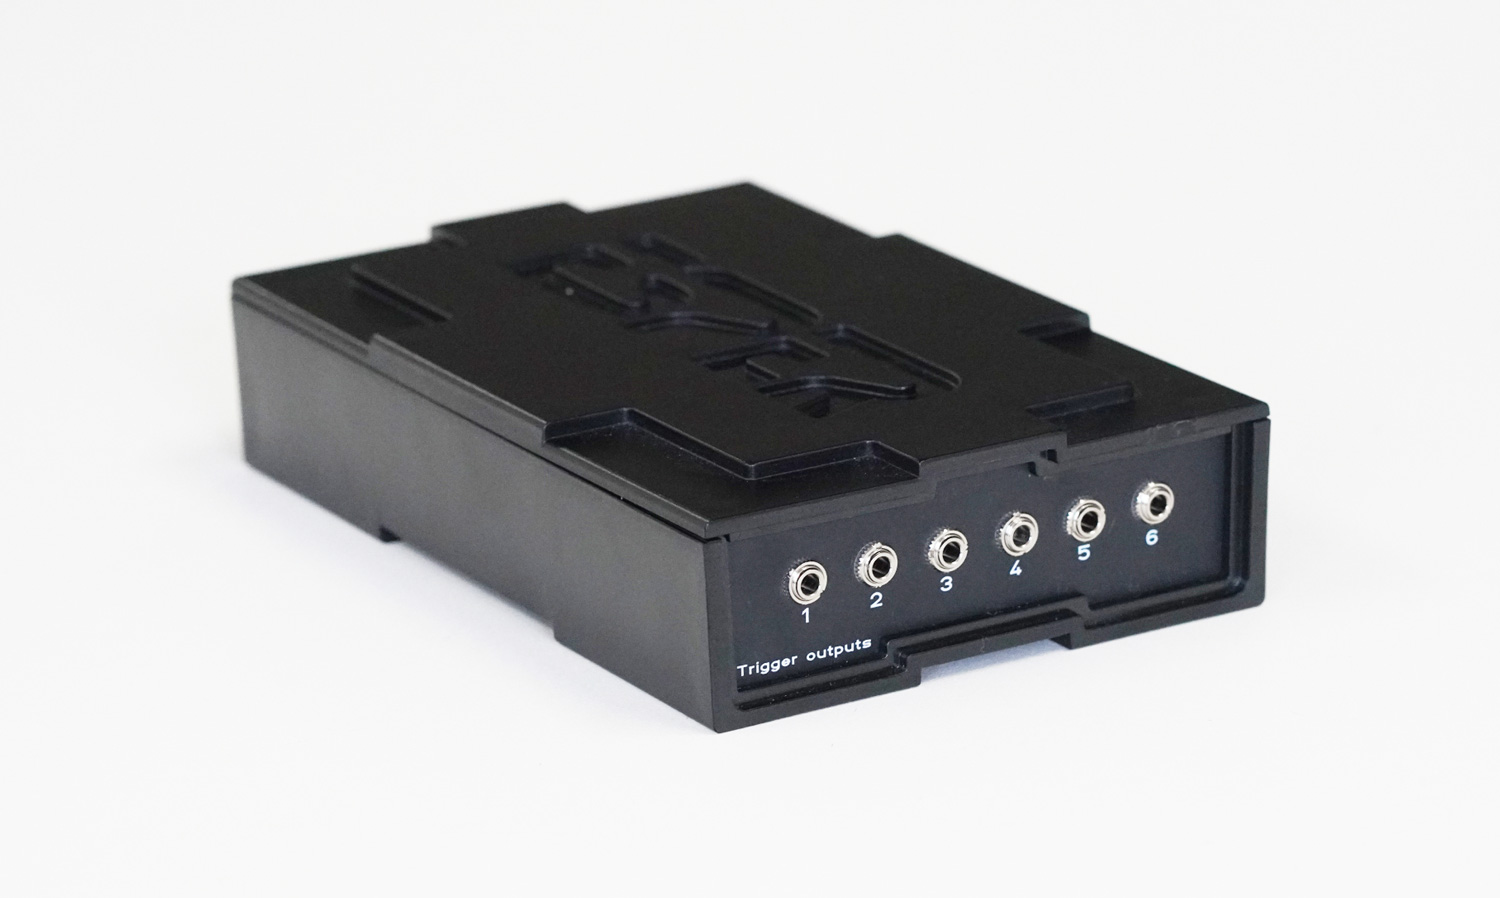
A precise and reliable way to trigger multiple cameras by using the camera’s remote release connection. It is also capable of firing the flash by using software that can programme the output and controls via a computer.
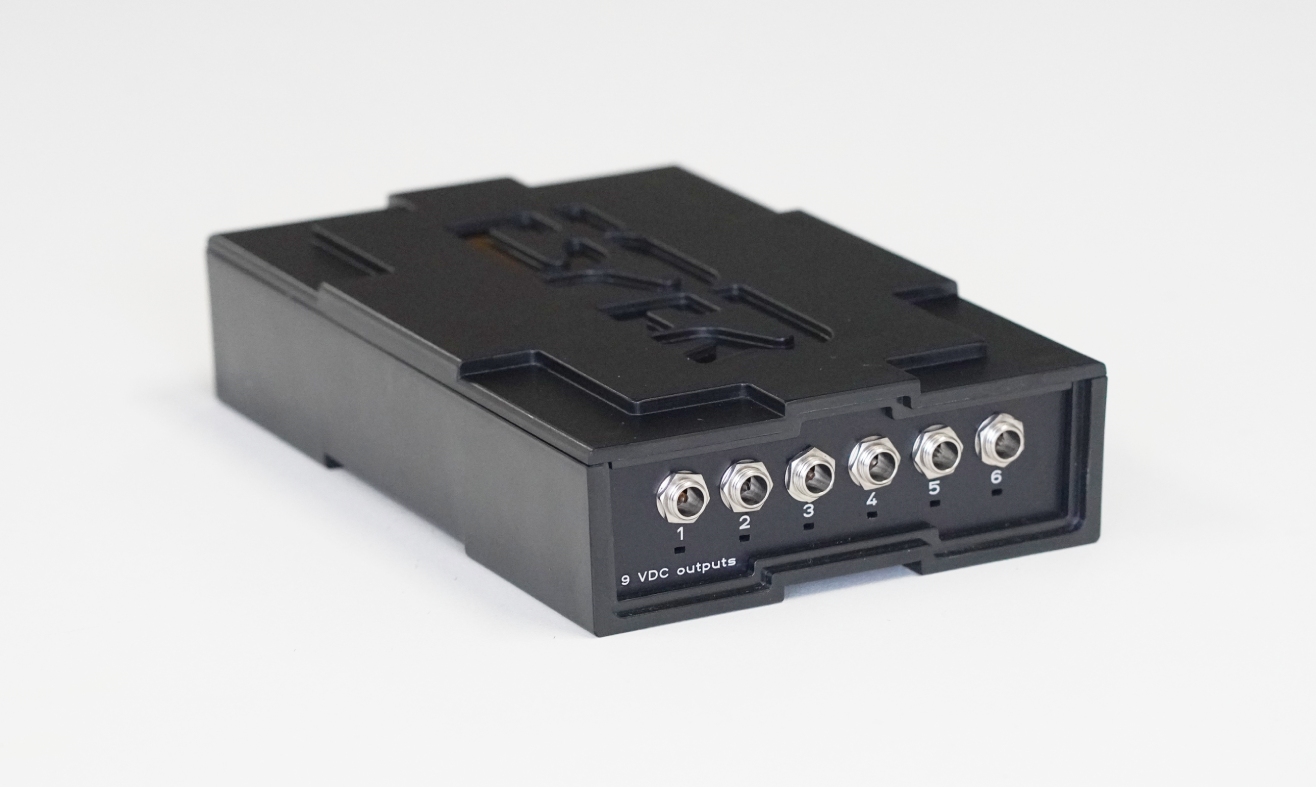
Up to six cameras can be connected to the TriggerBox and be triggered using the 3.5mm jack wired remote output. Multiple TriggerBoxes can be daisy-chained together to synchronise an unlimited number of cameras.
The most accurate sync and triggering method over other methods; many multi-camera owners switch to TriggerBoxes after using previous methods and build home-brewed systems to ensure reliability.
“We originally soldered a homemade multi camera trigger box to control the cameras; however, this proved troublesome as the lighting was difficult to control and the system would misfire 40% of the time.”
STEPHEN JAMES | SOPRO STUDIOS
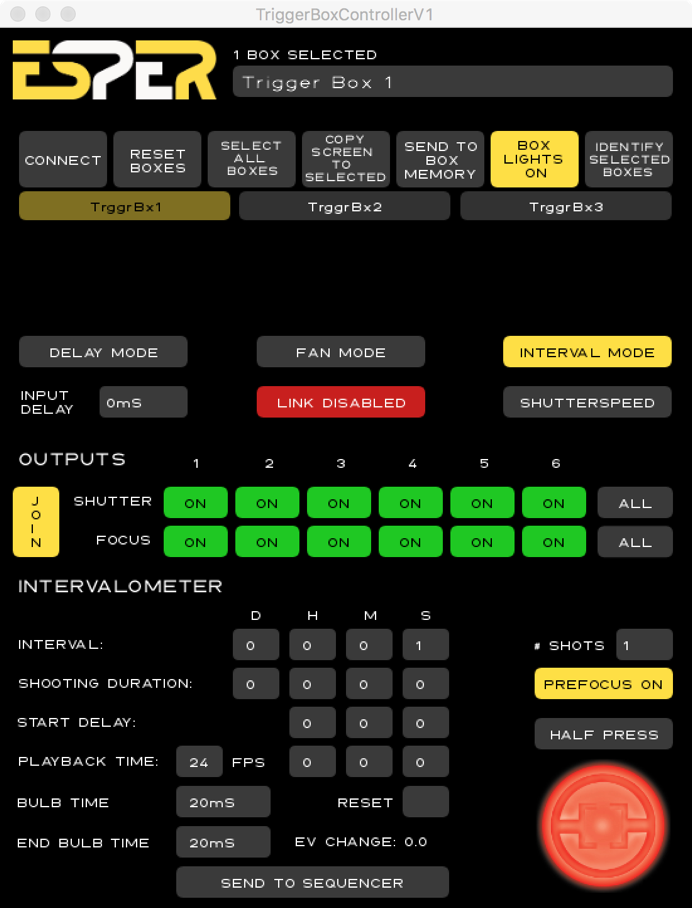
TriggerBox has two trigger modes of operation. The Green Mode works as a straight trigger. The Blue Mode, however, allows individual outputs to be delayed and programmed. It’s also perfect when using flash as it allows you to control it remotely and synchronise it with cameras.
Simple to use and a cheap solution that can trigger multiple cameras.
However when connecting many cameras using a USB connection this starts to be less accurate and less reliable. This method introduces a delay between the cameras which is caused by the cameras communicating in sequence.
“Multiple cameras connected to a single computer can be triggered via the USB connection to each camera but there will be a delay of approximately 1/10 second between each camera taking a photo. For larger arrays of cameras and more accurate synchronization (to within a few milliseconds) it is necessary to trigger the cameras via their remote release sockets.”
BREEZE SYSTEMS
Depending on how many cameras you are using, the more cameras in the array the bigger the delays that could occur.
Firing most DSLRs via a remote USB control results in fairly inconsistent timing, especially when you are using a lot of cameras at the same time.
This is another alternative method for triggering multiple cameras but it can also be problematic for bullet time applications.
Wireless triggers can create different delays as the signal can be interfered with by other ration signals, especially if many wireless triggers are used at the same time. In addition, the sync speed isn’t always the same which is not ideal for bullet time or multi-camera long-exposure shots.
“Using wireless triggers was terrible. They didn’t have any image calibration. Their triggering systems were sporadic, it would work sometimes and it wouldn’t sometimes and when you’re doing events, you needed it to work 100% of the time.”
BILL HAMWAY | MAMMOTH
Multi-camera software has its own crucial role to play in every bullet time booth.
You’ll need software to control your camera’s settings remotely such as exposure, ISO, aperture etc. But also to automatically download images from all the cameras at the same time and to process them into a final GIF or video which then will be shared by your guests.
There are currently two well-known software solutions for photo booth use which work with Canon (and some Nikon) cameras and that run on the Windows OS.
Breeze Systems – Software to control multiple Canon SLRs from a single PC running Windows. Designed for movie special effects such as bullet time, stereo video capture, product shots and other specialist applications requiring multiple cameras. Offers excellent support and is licensed per number of cameras.
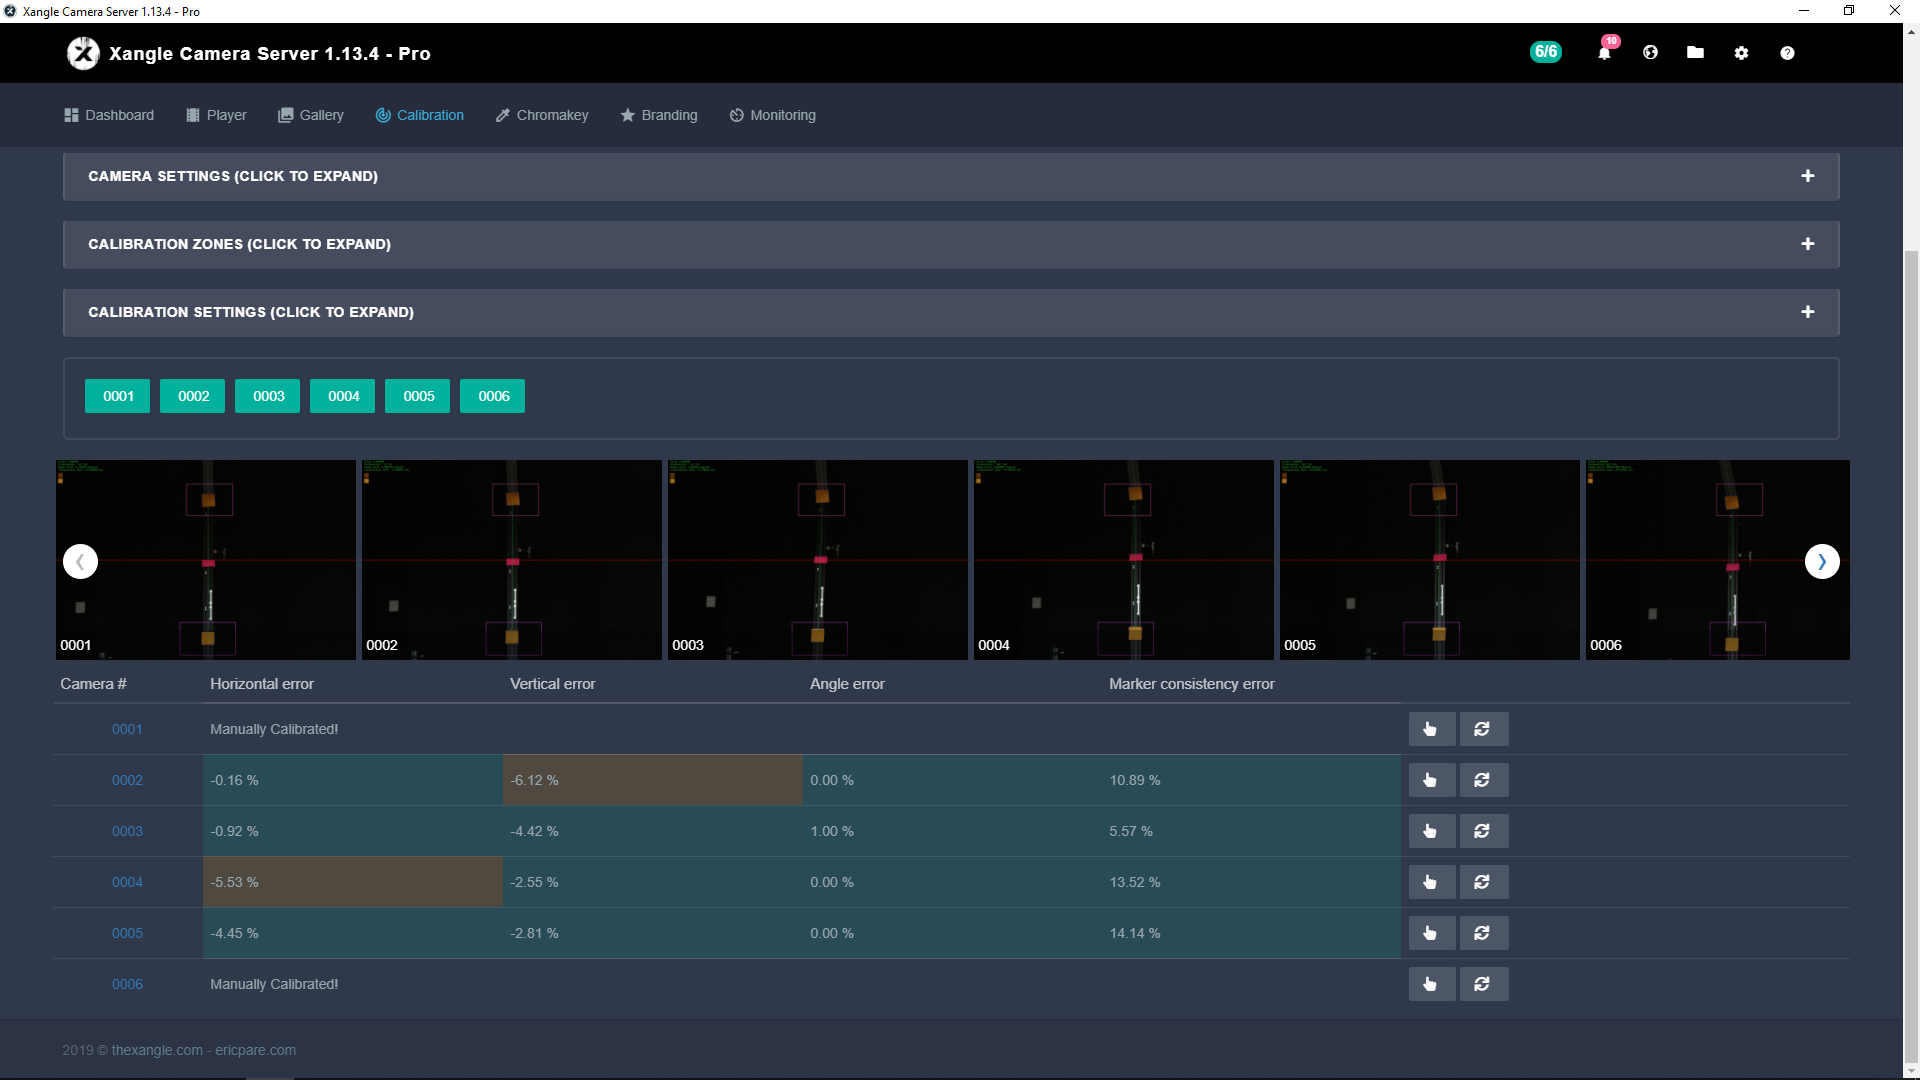
Xangle Camera Server – A set of software created to run a complete multi-camera system: connect, control, trigger, calibrate, preview, publish, share. Compatible with most Canon entry-level DSLRs it works on PCs running Windows. Different license subscription packages are available.
There is also another piece of software which you may need to use with the TriggerBox hardware:
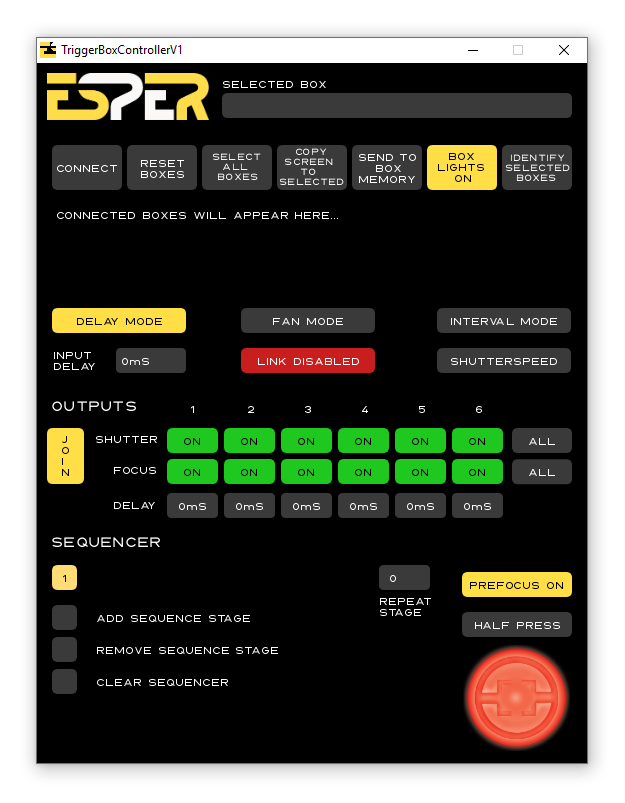
TriggerBoxController – free software that comes bundled with the TriggerBox. It can be programmed to fire all the cameras simultaneously and assign delays etc. However, it doesn’t handle anything to do with the images which is why you will need one of the above third party solutions.
The brains behind it all.
The computer you choose will impact on how quickly your images are processed etc. So the better the machine the quicker the images will, for example, be processed. You don’t want to arrive at an event and be slowed down by the things that connect everything in your setup.
Windows 10 is a typical choice as it is compatible with both multi-camera software packages, unlike Mac or Linux.
In terms of specs you’ll want to consider hardware with at least 8GB ram memory, a higher performance CPU such as i5 or i7 and enough storage to hold at least 256GB of photos and videos from an event.
You’ll also need a remote trigger to fire all the cameras at once and create the bullet time effect.
There are 3 common methods:
PC – you can fire all of the cameras from your PC but this will require using a USB hub connected to a PC and then firing them from the multi-camera software.
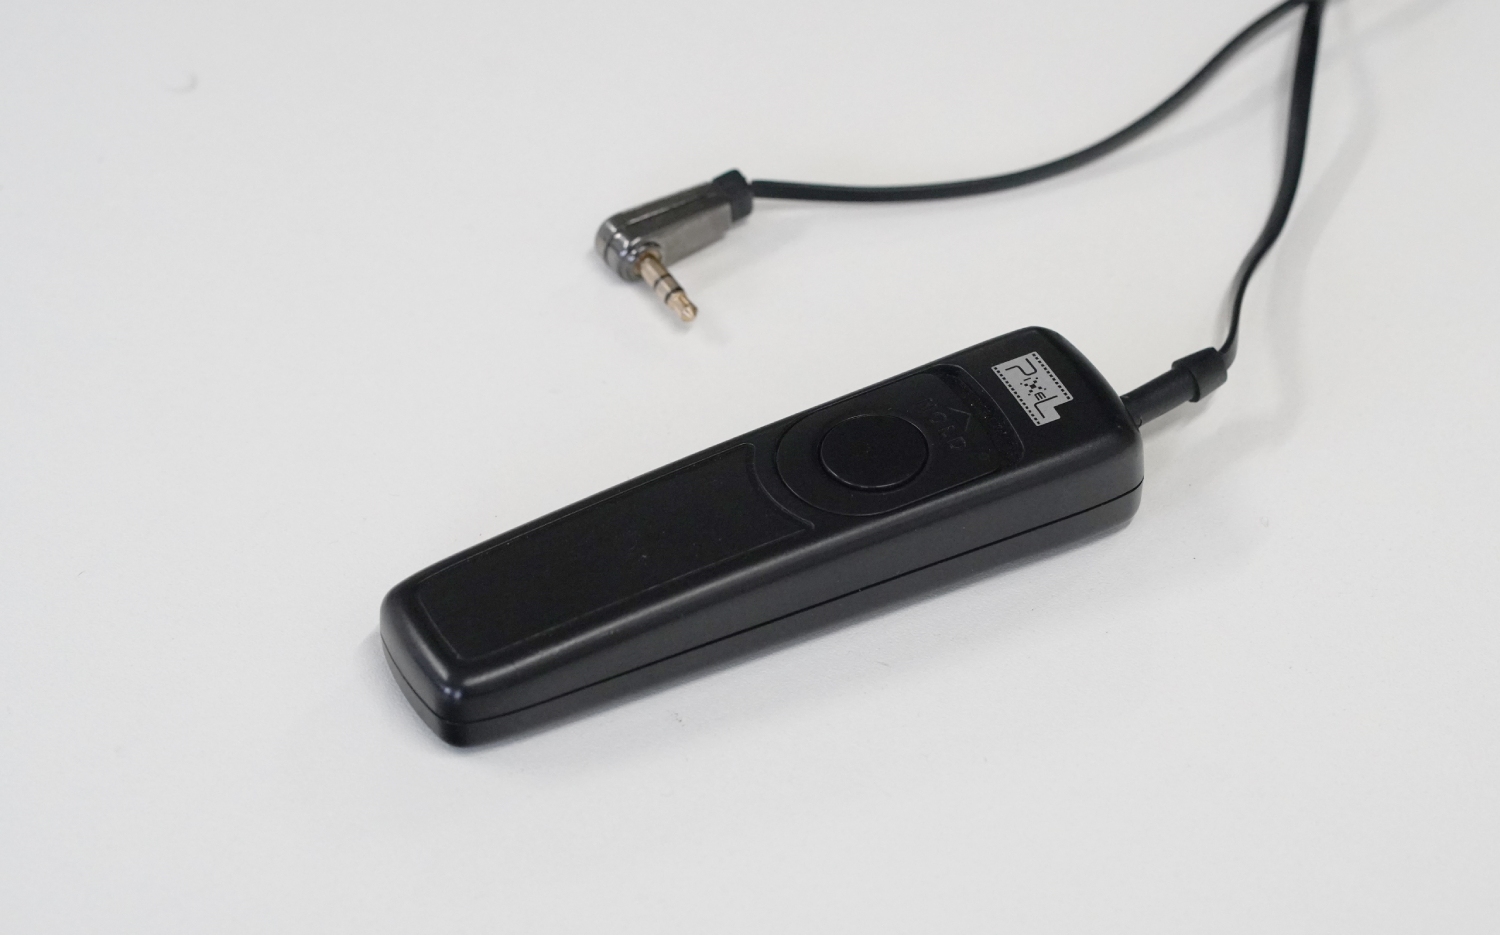
Wired Trigger – prefered option for bullet time use. You’ll need a remote with a 3.5mm jack connected to the TriggerBox such as the Pixel RC-208.
Wireless Trigger – wireless trigger is an option and you will only need one. That will be connected to the TriggerBox output via a 3.5mm jack.
Make no mistake.
The way you power your cameras will have an impact on the reliability of your camera array and also your efficiency in the long term.
The last thing you want to worry about during an event is swapping out several dead camera batteries in your array or having a problem with one camera failing to power.
When it comes to powering multi-camera setups there are a few options to consider:
PowerBox is a preferable solution that provides regulated and reliable power for up to 6 cameras from a single outlet for less than the cost of a manufacturer’s AC power adapter.
“We couldn’t survive without the PowerBox products! Esper have been powering up our bullet time rigs for a long time now. We travel with Esper on massive productions around the world to power from 12 to 200 cameras and we can’t really imagine how we could survive without the PowerBox products!”
ERIC PARÉ | XANGLE
PowerBox allows you to save space, rely on a constant power supply and enjoy less mess in your setup. In addition it helps to reduce the set-up time by utilising efficient cable management, while its intelligent trip and reset function makes it easy to reboot cameras.
Relying on batteries as a sole power source can be very inconvenient in multi-camera setups.
You will find yourself constantly changing batteries that run out of juice as DSLRs can burn through batteries relatively quickly when under continual use.
Another problem with batteries can occur during their replacement. Any slight movement to the camera could break the alignment, meaning they would need to be recalibrated, which could cause issues in the middle of your event.
An alternative to batteries that provides constant power to your cameras. However, this isn’t very practical when used for multiple cameras as you will need a lot of power outlets (one per camera) and you will end up with a bad case of “cable spaghetti” which could be inconvenient when troubleshooting. They also take up a lot of room in your setup.
AC power adapters can also be unreliable, especially the non-branded ones that can power off your camera after taking a shot. In addition, using non-branded power adapters can put your cameras at risk of being damaged due to an unregulated power source.
“We needed a solution that would get rid of all the power plugs that were causing a mess in the array. Using ESPER PowerBoxes with DC Couplers we can easily and conveniently power all of the cameras and we don’t have to worry about batteries dying ever again.
They also eliminate the risk of false power plugs, ensuring reliable and constant power supply – something a battery can’t do.”
ROLD MOOIBROEK | FOTODOOS
Read this article to learn more about powering up multiple cameras.
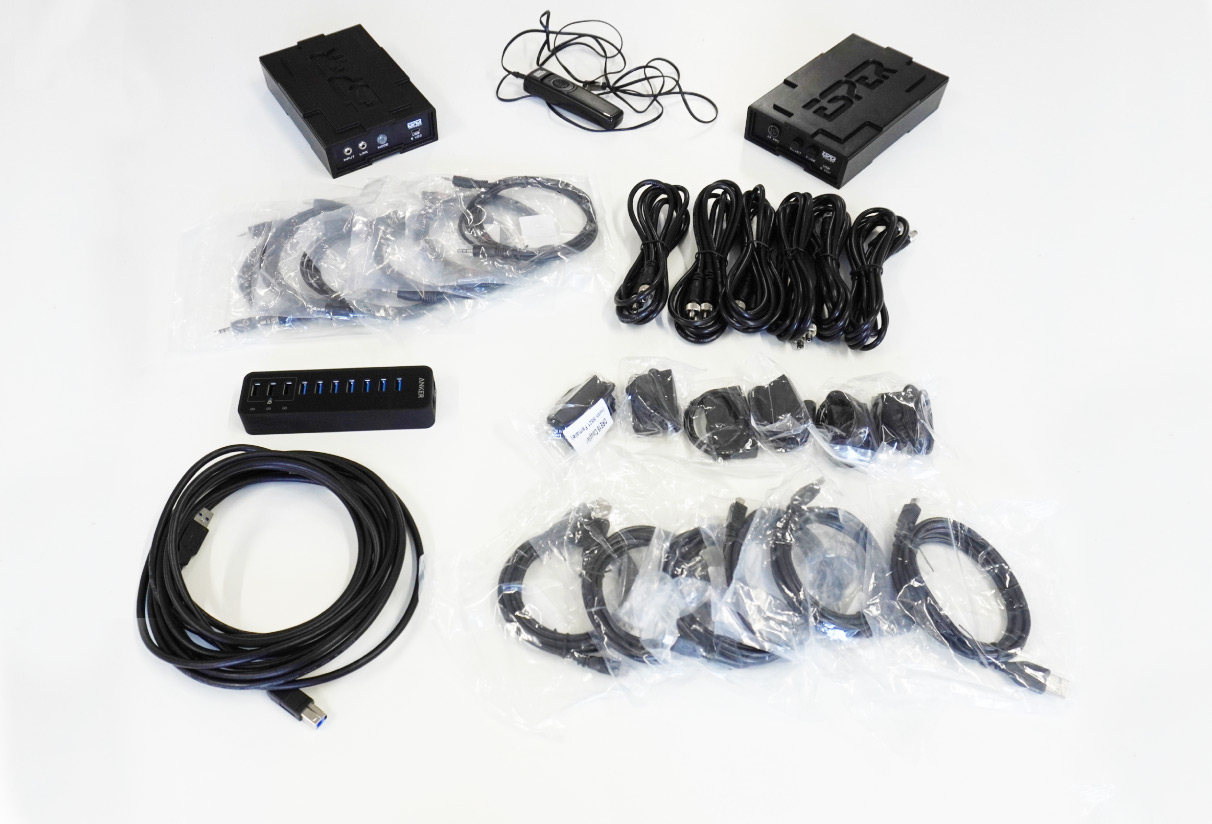
As for the ancillaries, there are a few important elements that will be essential for connecting everything.
Here’s a list of typical equipment and ancillaries used for a 6-camera array:
Now that you have an understanding of what’s needed for a bullet time setup, it’s time to start putting things together.
In this section, you’ll learn how to position your equipment, connect and power everything and get ready for action.
Let’s do this!
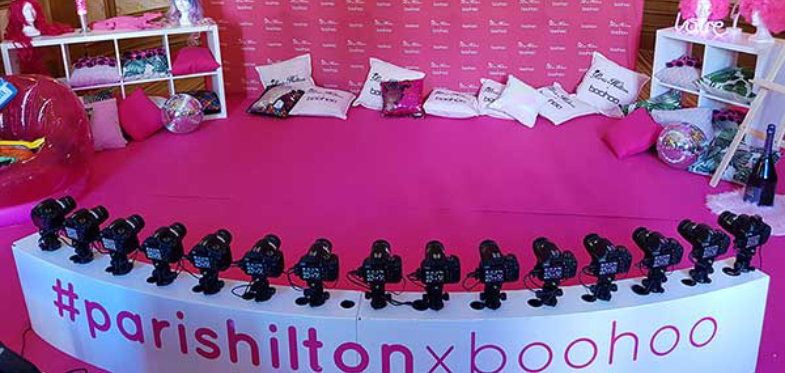
Source: Fotodoos
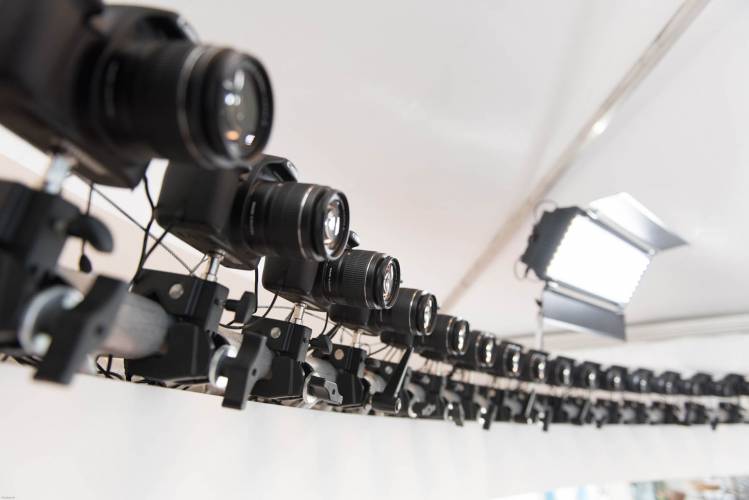
The first step is getting your structure right to get the desired results
There are premade solution camera array shells which allow you to mount the cameras in place and hide all of the hardware and cables so that they are not visible to the guests and keep your setup tidy.
If you’re planning on a DIY solution, the height of a typical array that will capture the action including people jumping into the air should be around 1.5m.
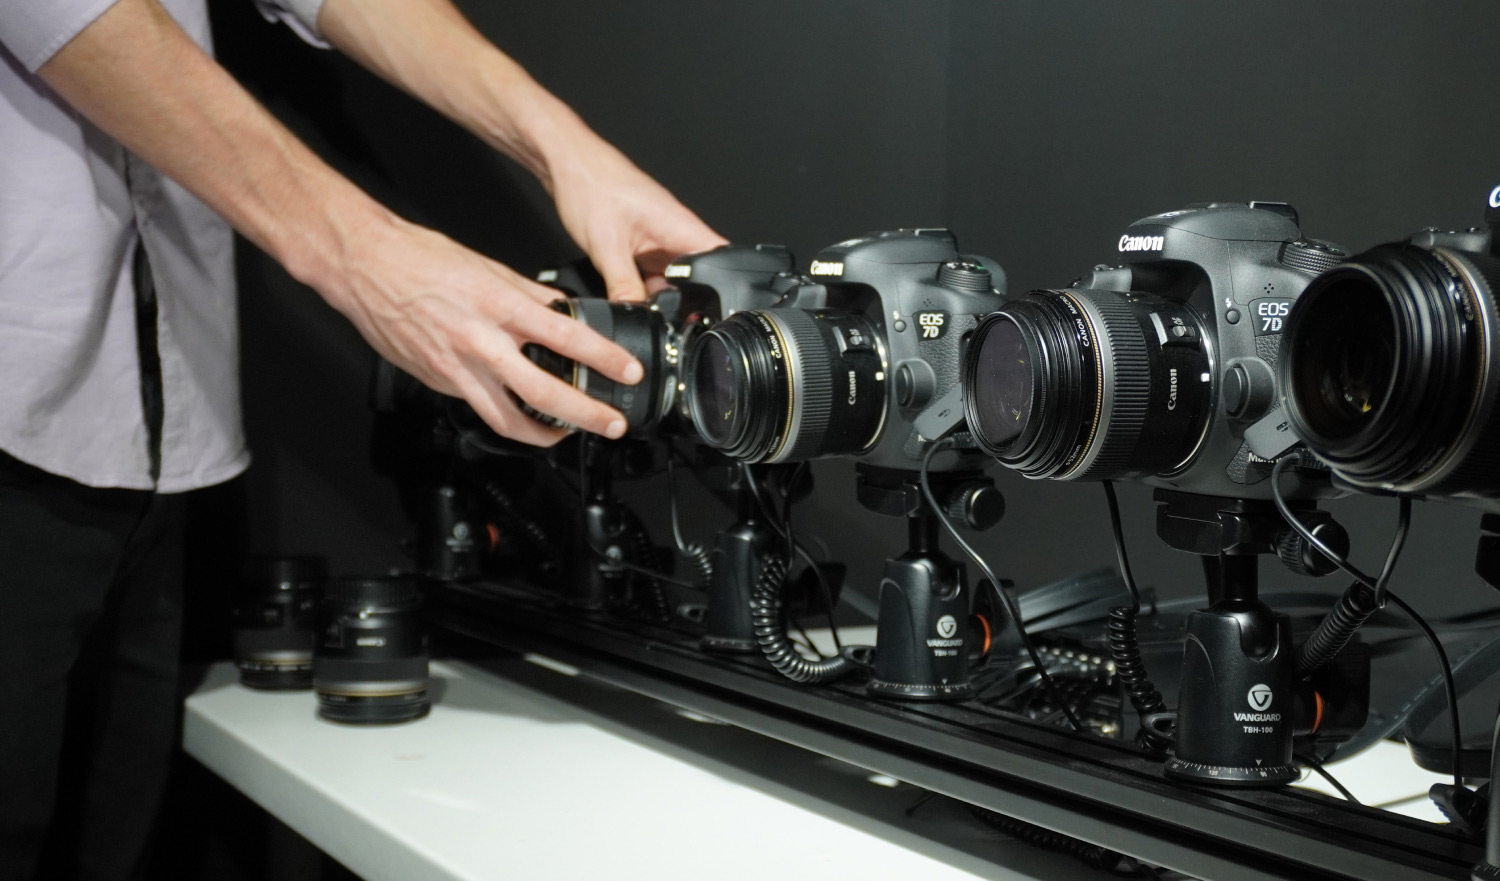
Cameras should be spaced evenly 15-20cm apart and the array should be positioned 2-3m away from the guests to leave them with plenty of space.
Having an arc shape structure will also improve the final result. It’s possible to use a straight structure but you’ll want to have your cameras rotated internally.
Once you have everything positioned, start adding the cameras to your structure. Mount them using ball heads or clamps on the structure and point them in the rough direction of the area where the subject(s) will be located.
Don’t worry about the alignment just yet, we’ll cover that later.
Now for the light.
Your subject needs to be lit from the right angle and distance so that no shadows are created on the backdrop.
You may want to consider using two lights: a key light to shape your subject in the image and a fill light placed on the opposite side of the key light used to fill the shadows created by the first light.
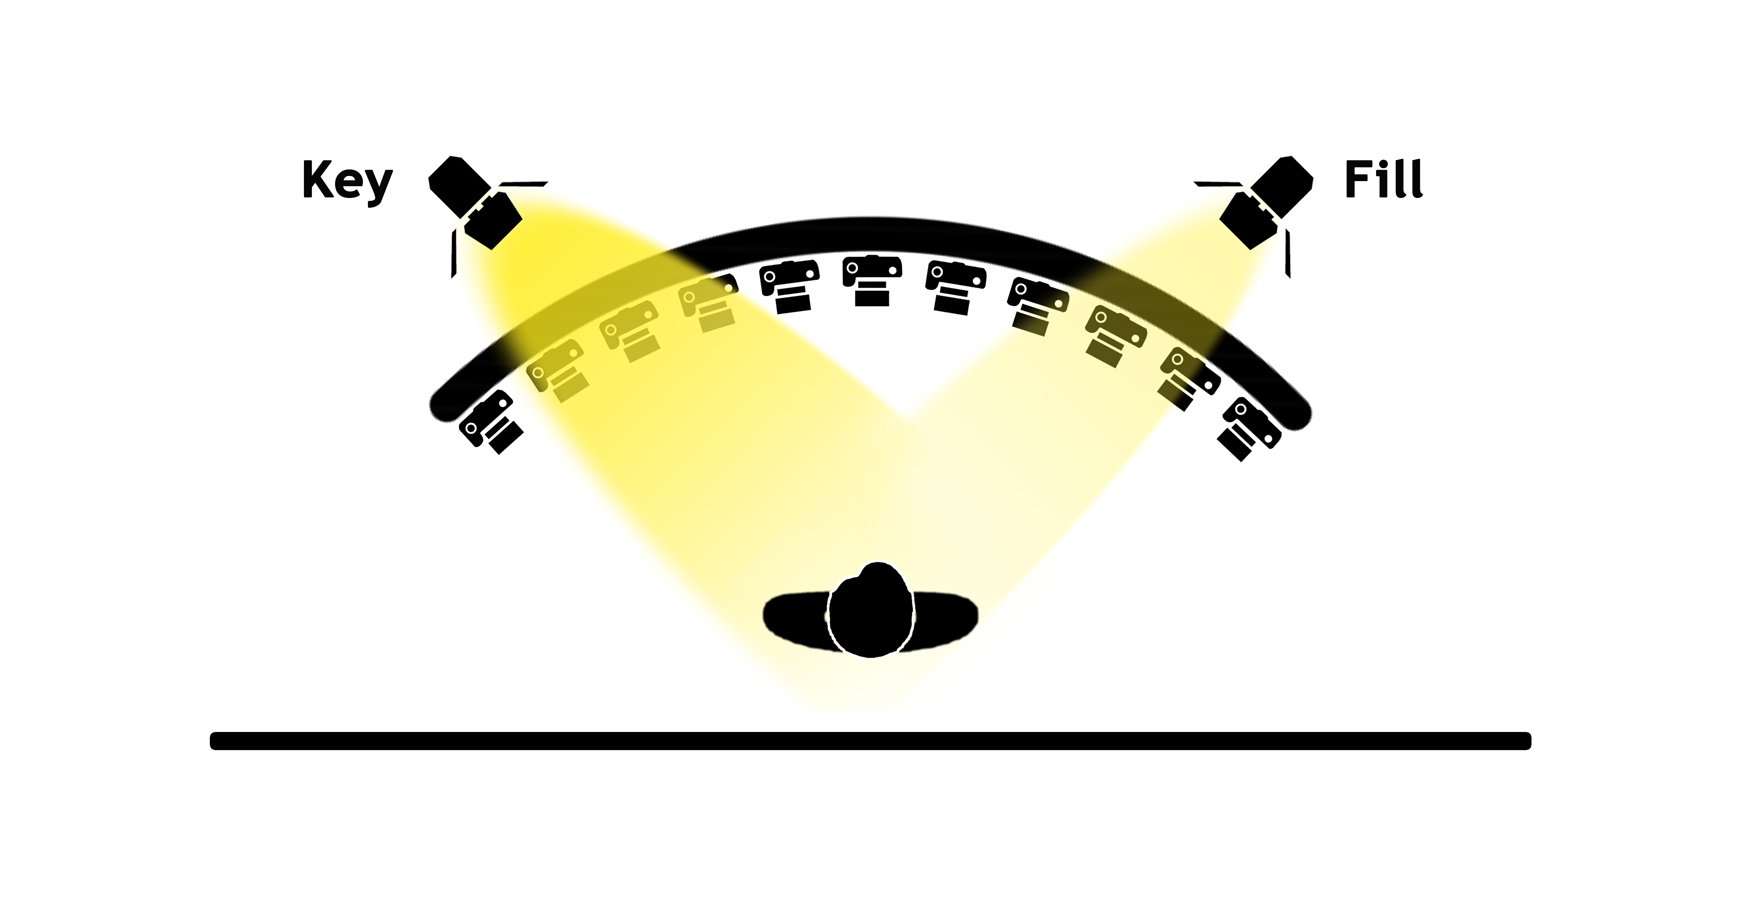
The light needs to be placed beside the camera at an approximately 45-degree angle to the subject in order to light it/them and break any shadows.
This will create a balanced light and make sure the area is well-lit. The right amount of ambient light will make your videos look brighter as there will be light on both the subject and backdrop.
Let’s get everything powered up.
The order which you connect triggering cables or power cables doesn’t really matter. However it might be best to start with the power cables as they are a bit bulkier.
Start by replacing the camera batteries with DC couplers.
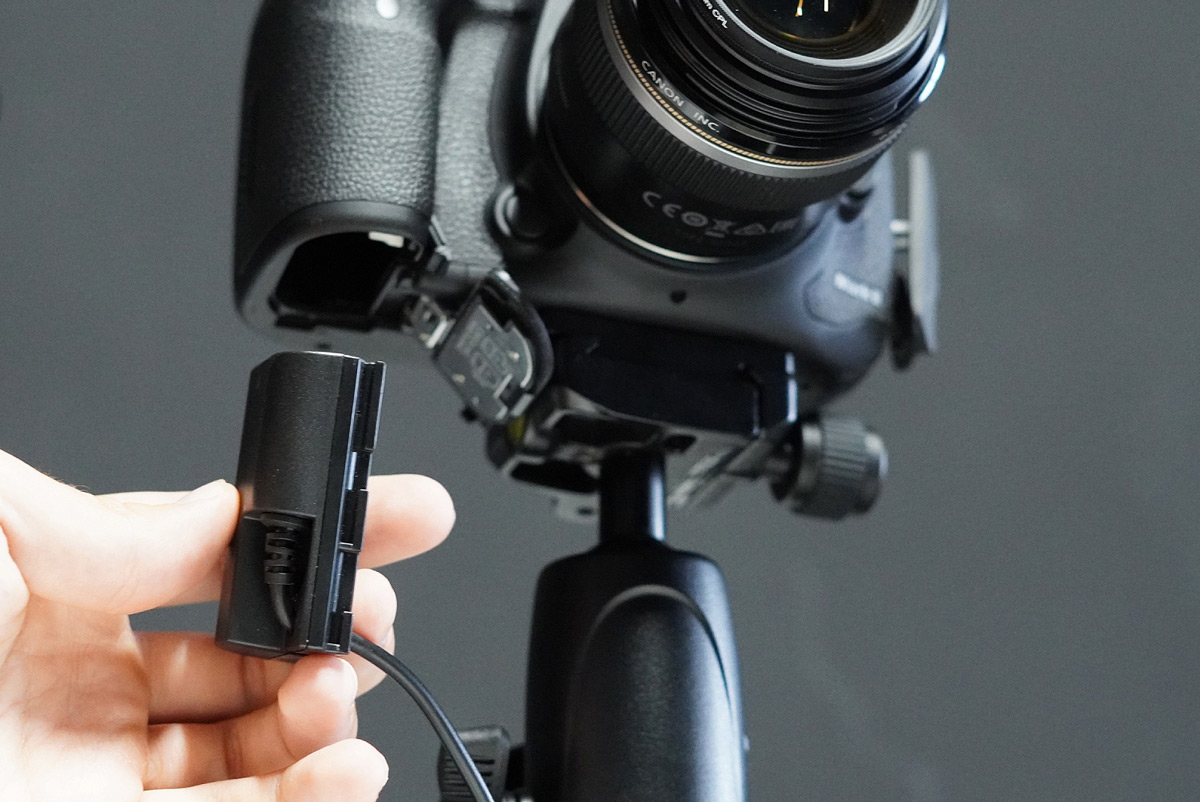
Make sure the door of the camera battery compartment is fully closed otherwise the camera may not power up. If the door won’t close then it could be because the cable is hindering it so you should take the coupler out and fix the cable to the correct position.
Connect the DC coupler to the power extension cable and then to the PowerBox for better cable management and reach.
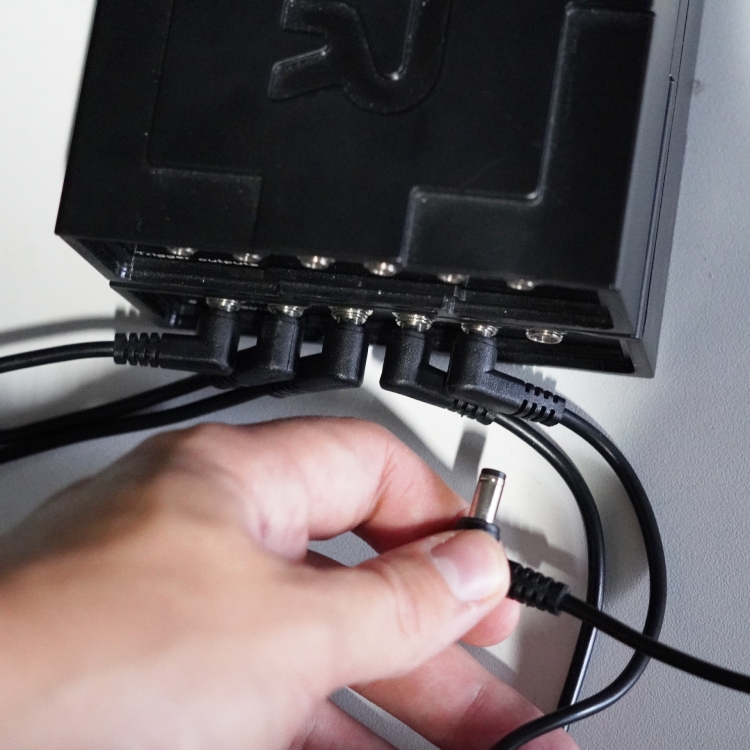
Next connect the flat top power cable to the PowerBox and then connect it to the power outlet.
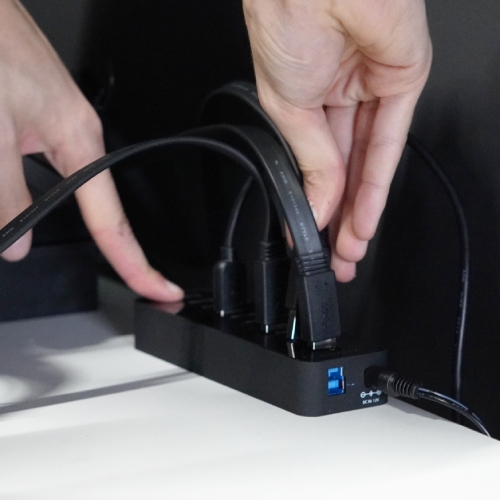
Grab a USB hub, plug it into the wall power outlet and then connect it to your PC.
Stack the TriggerBox on top of the PowerBox, using a USB C to C cable connect it to the USB hub (but not in the hub charging slot). TriggerBox can also be powered using a PC or PowerBox.
Flick the switches!
The camera, TriggerBox, PowerBox and USB hub should light up.
Now you need to connect all of the equipment.
Start with the cameras. Open the flap and locate the port then connect the shutter cable sideways. Note that there are different cable types for specific ports in different camera makes:
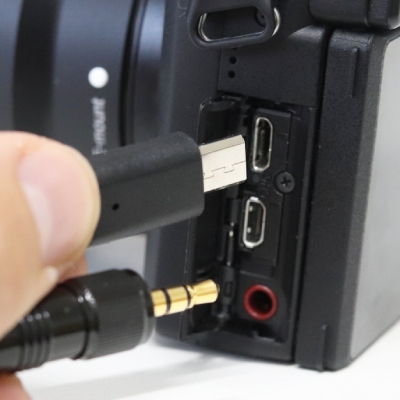

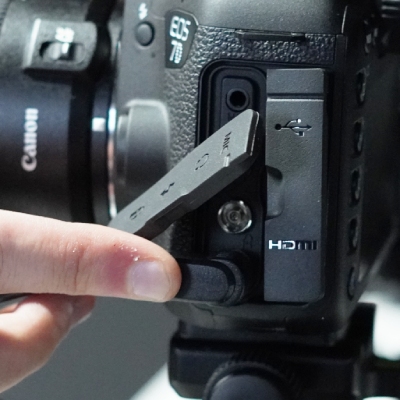
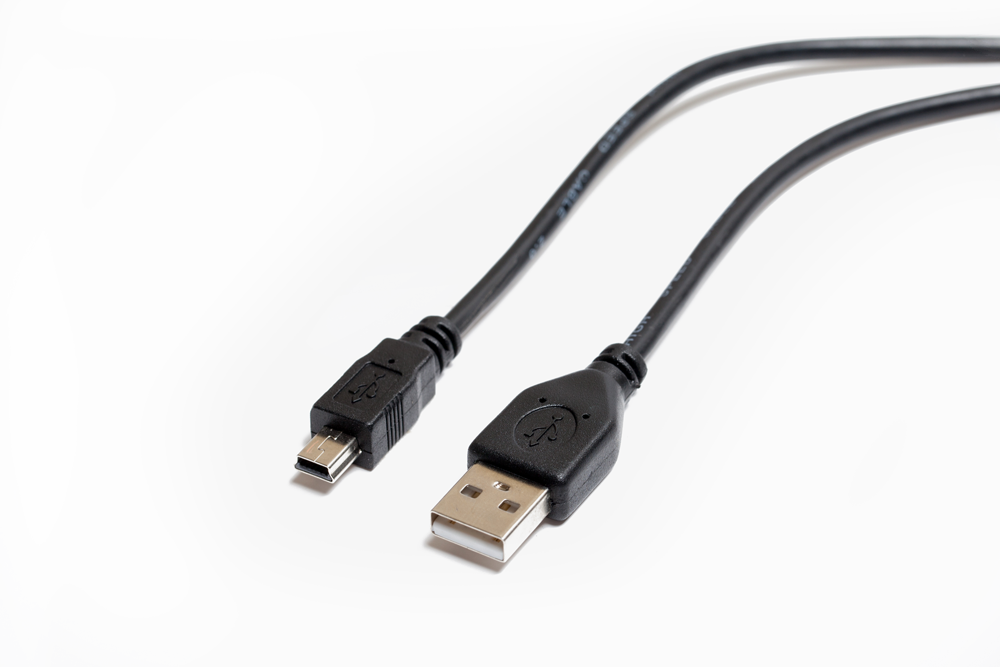
Grab a USB cable, open the flap, locate the port, plug the cable into the camera’s USB port and connect it with the USB hub. Repeat for each camera.

Next take the trigger cables and connect one cable per camera before plugging them into the TriggerBox.
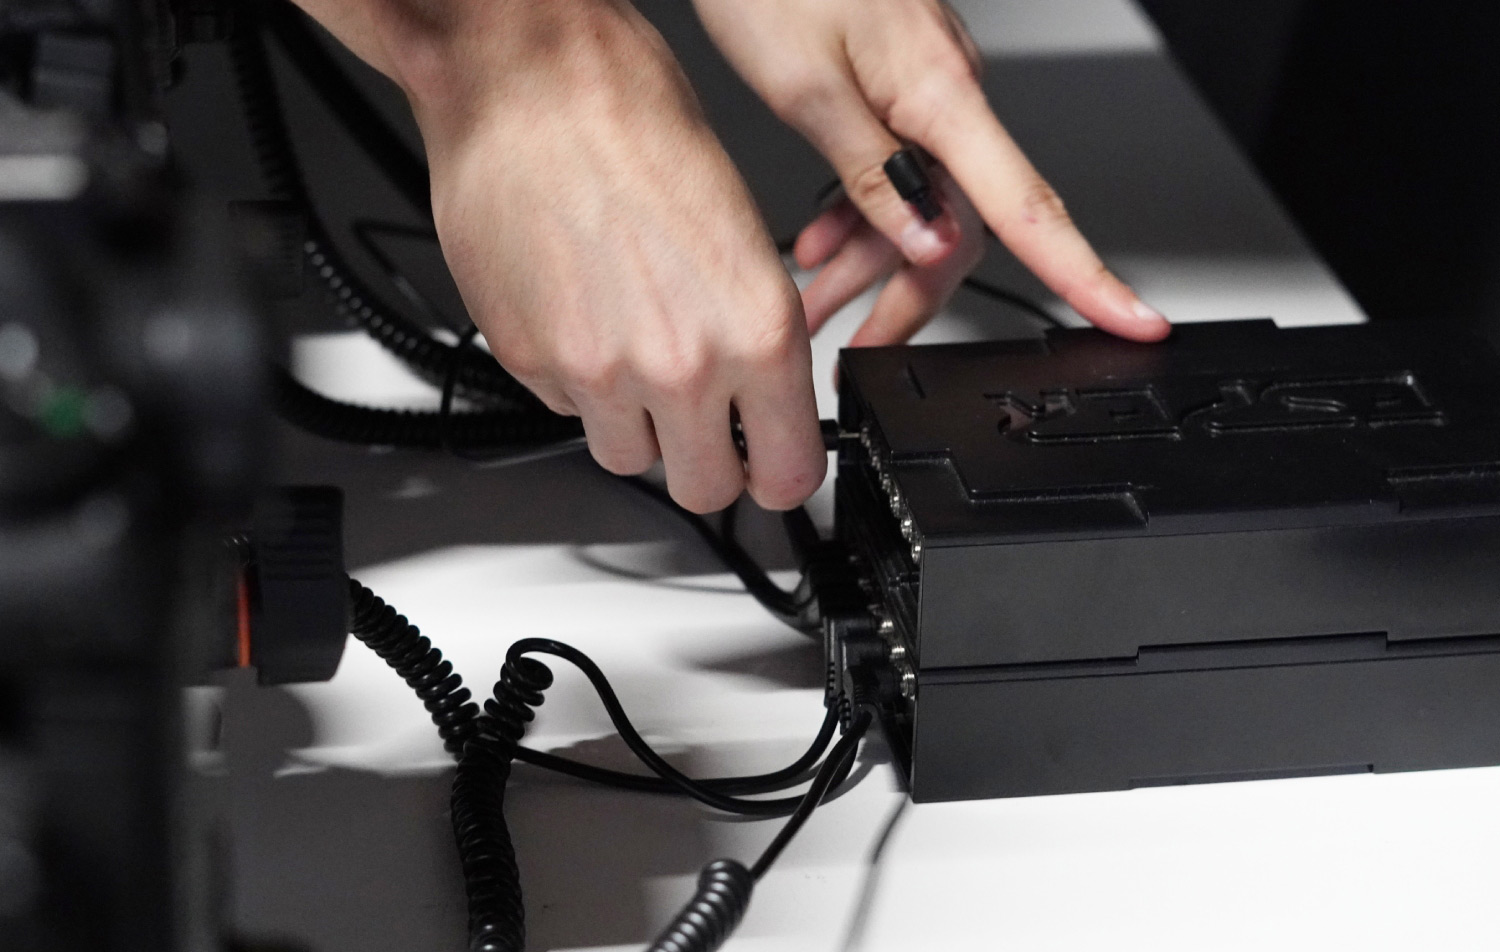
Lastly, connect the remote trigger to the TriggerBox’s INPUT port on its rear. If you’re using multiple TriggerBoxes, you can daisy-chain them using 3.5mm to 3.5mm link cables and LINK ports.
Now that everything is connected and powered up you can start using the multi-camera software.
In this section we’re going to touch on the multi-camera software and how to set it up and use it for calibration. We’ll also look at using the correct settings for bullet time shooting and getting everything ready for mastering your first bullet time experience!
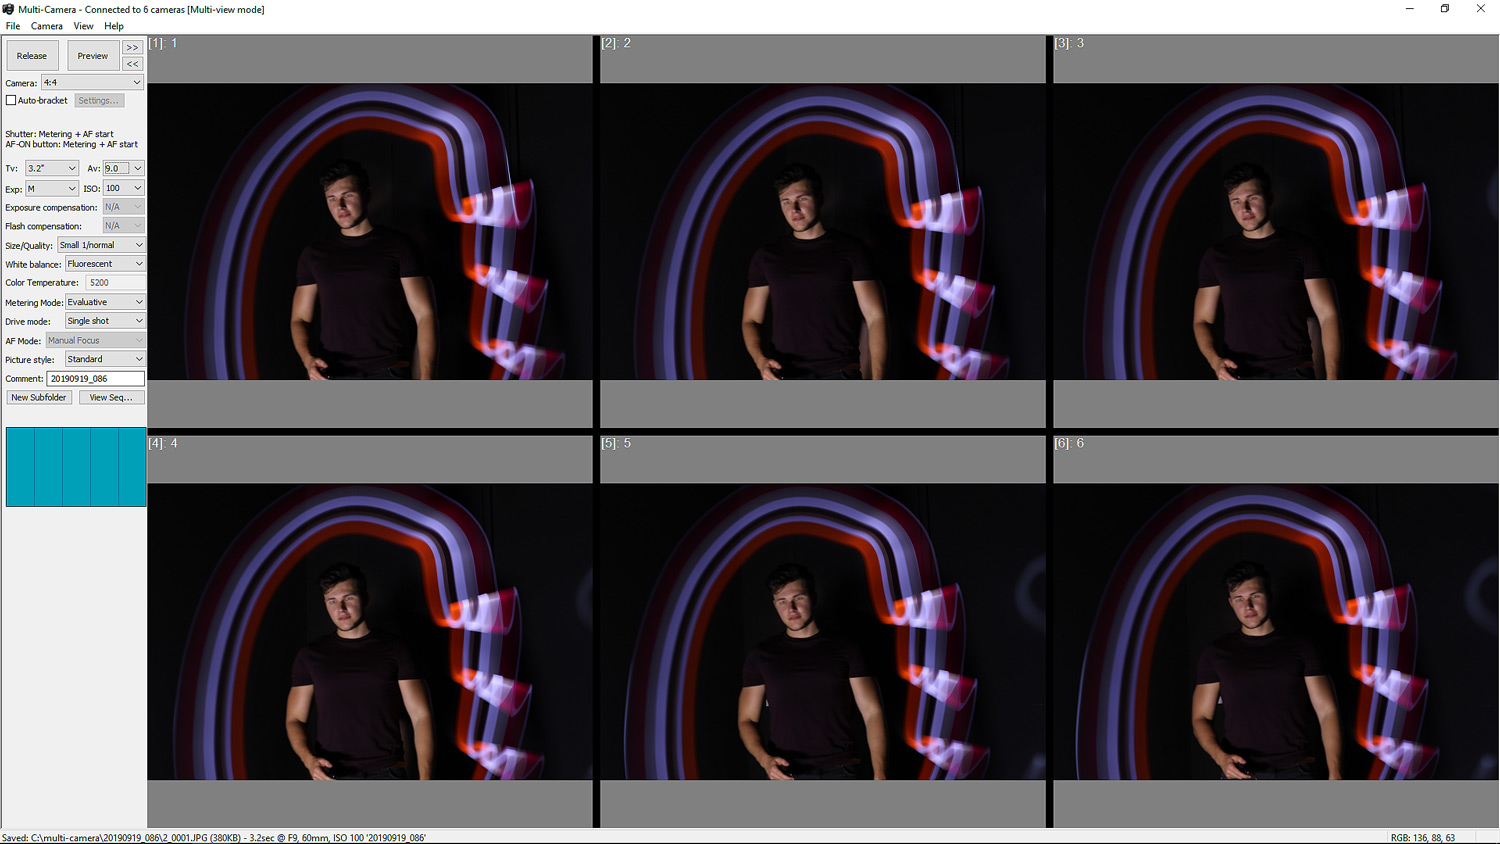
We’ve been provided with access to two popular bullet time software packages to show you how to to use them both: Breeze DSLR Pro Multi-Camera and Xangle Camera Server.

Once downloaded and installed you’ll need to activate the software. Follow the steps until you see the dashboard.
Here’s how to connect your camera array to specific software:
If you’re using Breeze:
If you’re using Xangle:
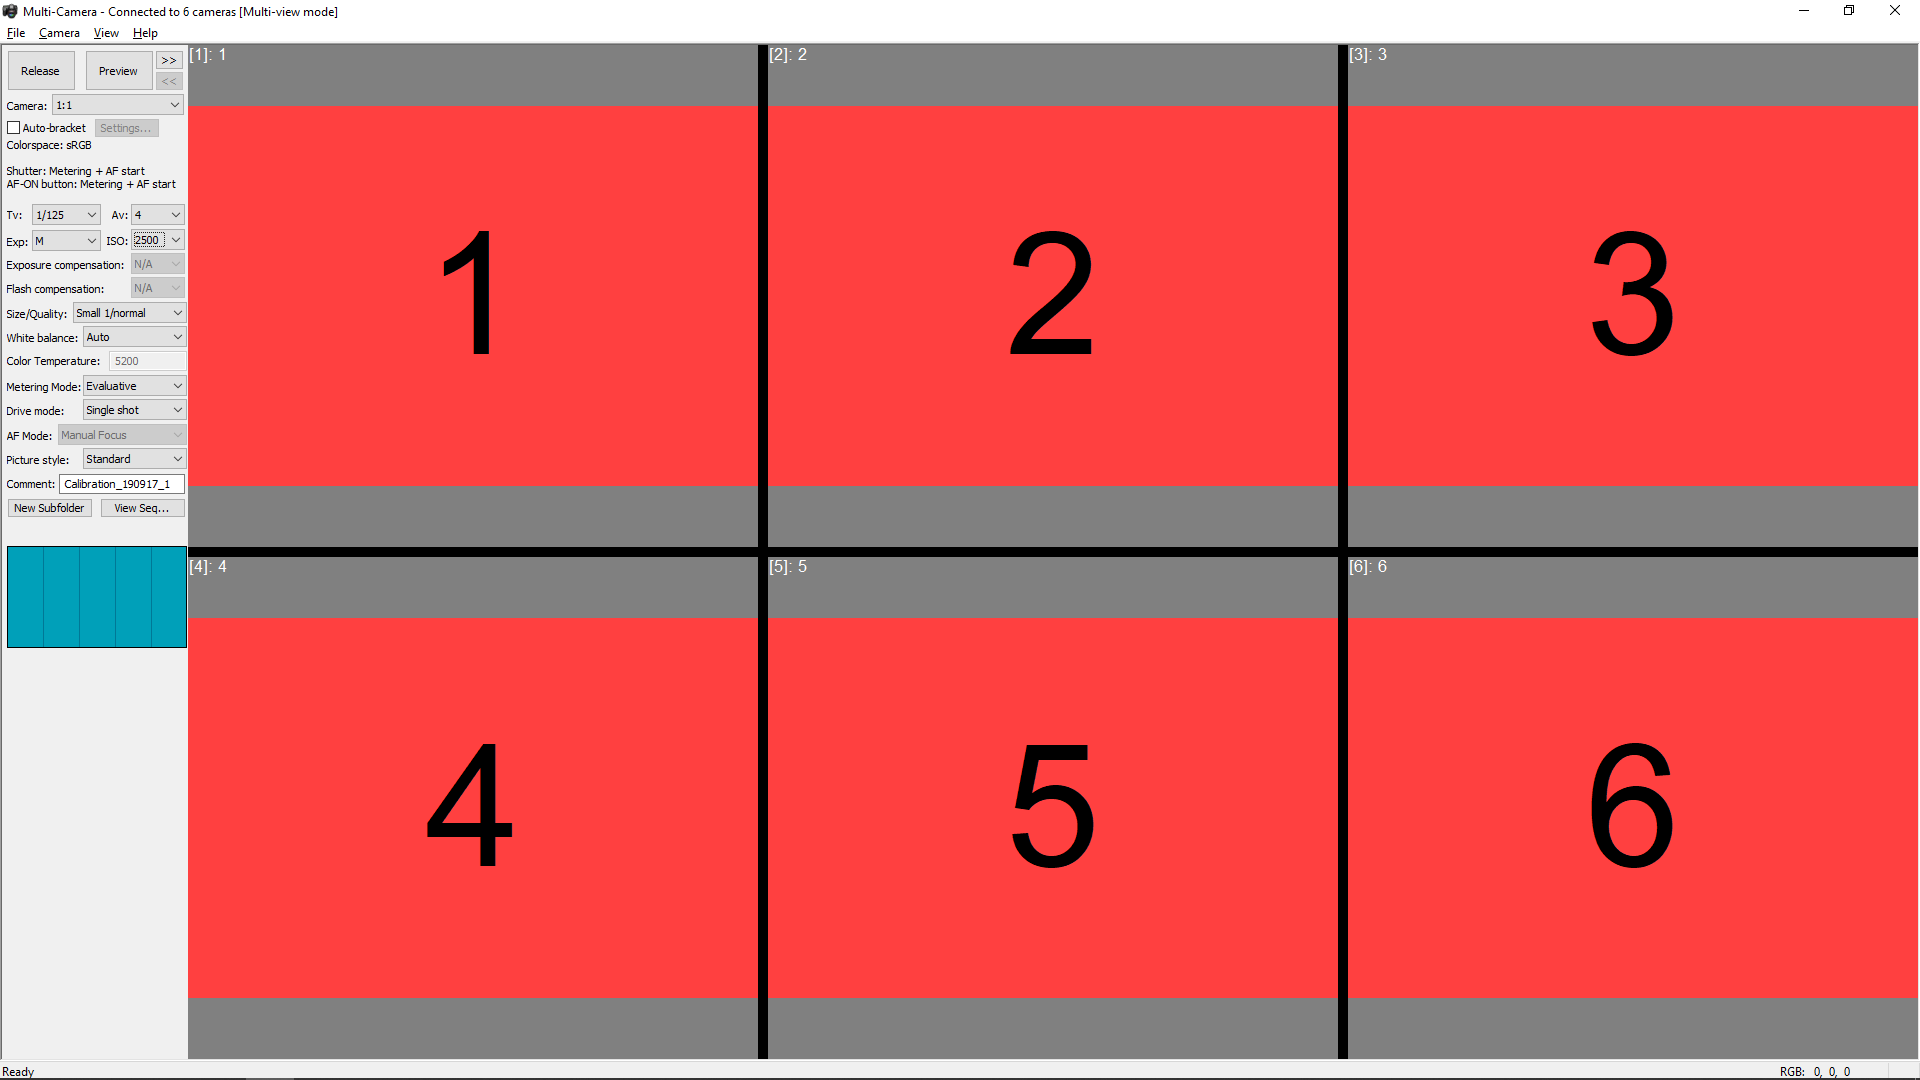
All cameras must be using the same settings so that all the photos are consistent.
You can easily change the camera settings from the software dashboard.
Before you do so, make sure to complete the following things:
The setting for the multi-camera array will also depend on the environment you are shooting and the flash. All cameras need to have the same exposure and depth of field as this will ensure everything is in focus and set at the right shutter speed to prevent blurriness.
An example of sample camera settings: 1/125, f/14, ISO1600.
Here’s how to apply the settings to all cameras:
Breeze:
Change the settings on the left-hand side of the dashboard.
Xangle:

You can change the setting from the top of the dashboard.
Proper calibration and alignment will ensure your final results are smooth and look outstanding.
Lack of calibration will create jumpy images.
To start, take a calibration bar, a pole or something similar that can be placed in the middle of the space where your subjects will be standing. You’ll also need to fix a target circle or sticky notes on the pole to be used as reference points for alignment and for focusing the cameras.
Breeze Alignment:
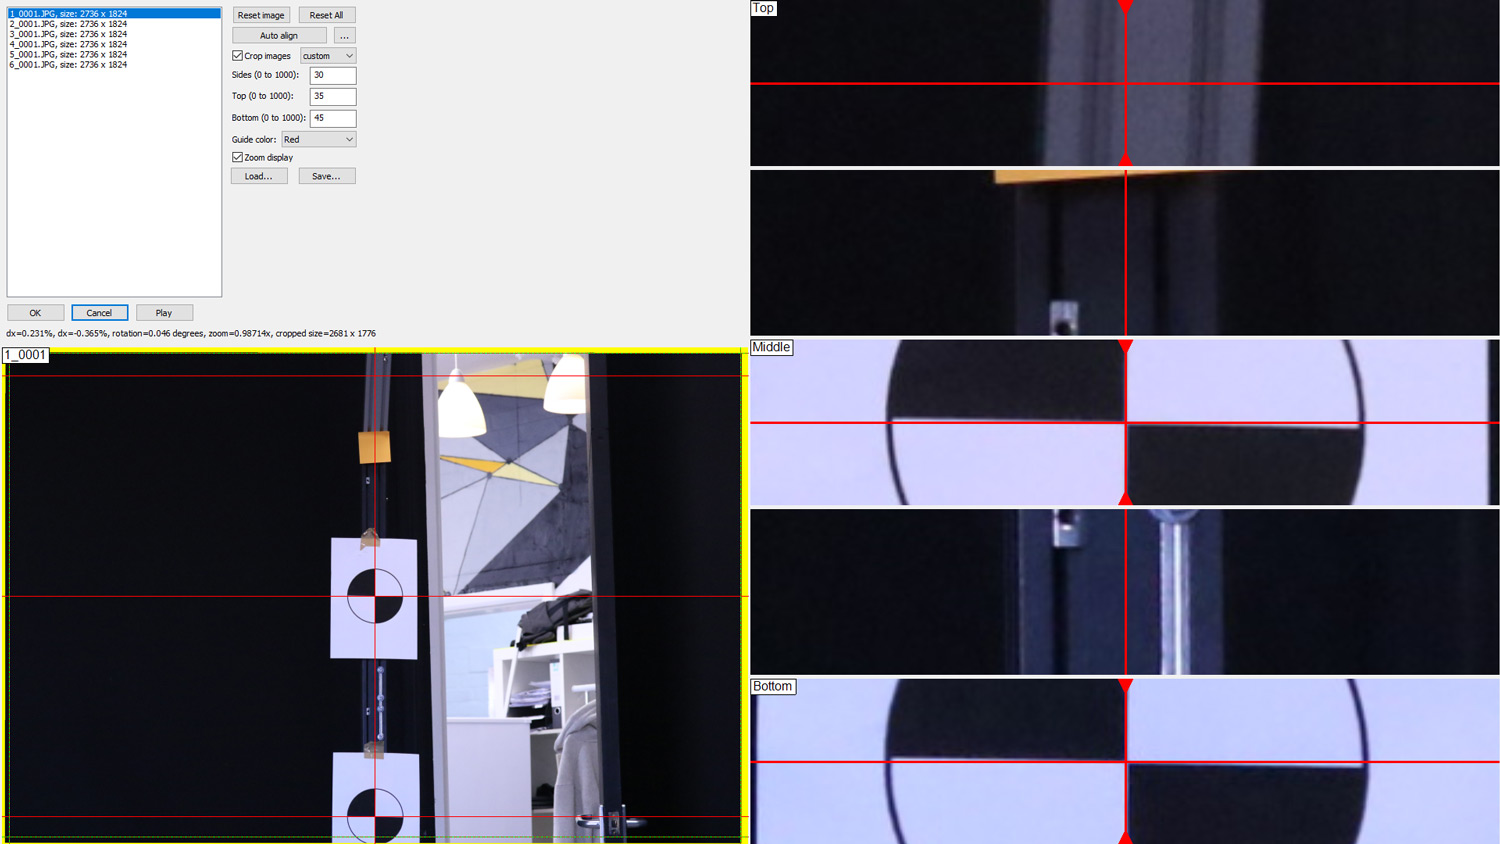
If you have access to LED lights check out the Auto Camera Alignment guide to speed up the process.
Xangle Alignment:
Now that your array is ready you can start exploring different bullet time techniques.
In this section you will learn how to shoot five techniques: bullet time/time freeze, interval mode, jump and freeze, light painting bullet time and interval light painting effects.
We’ll start with the easier techniques moving on to the more advanced effects. Before starting, make sure you’ve set the correct camera settings.


Let’s start with the most popular bullet time effect used by photo booth companies to “freeze” their guests.
Breeze Multi-Camera:
Xangle Camera Server:


The Interval Mode adds movement to the bullet time effect and is similar to the previous technique.
It is recommended to use more cameras to make the final results even more exciting. Feel free to experiment with the settings to find the right delay for your setup.
Breeze Multi-Camera:
Xangle Camera Server:


Similar to the previous effects, the jump and freeze technique introduces movement and then freezes the subject at the set sequence.
Again, we recommend using more cameras to achieve truly amazing results.
Breeze Multi-Camera:
Xangle Camera Server:


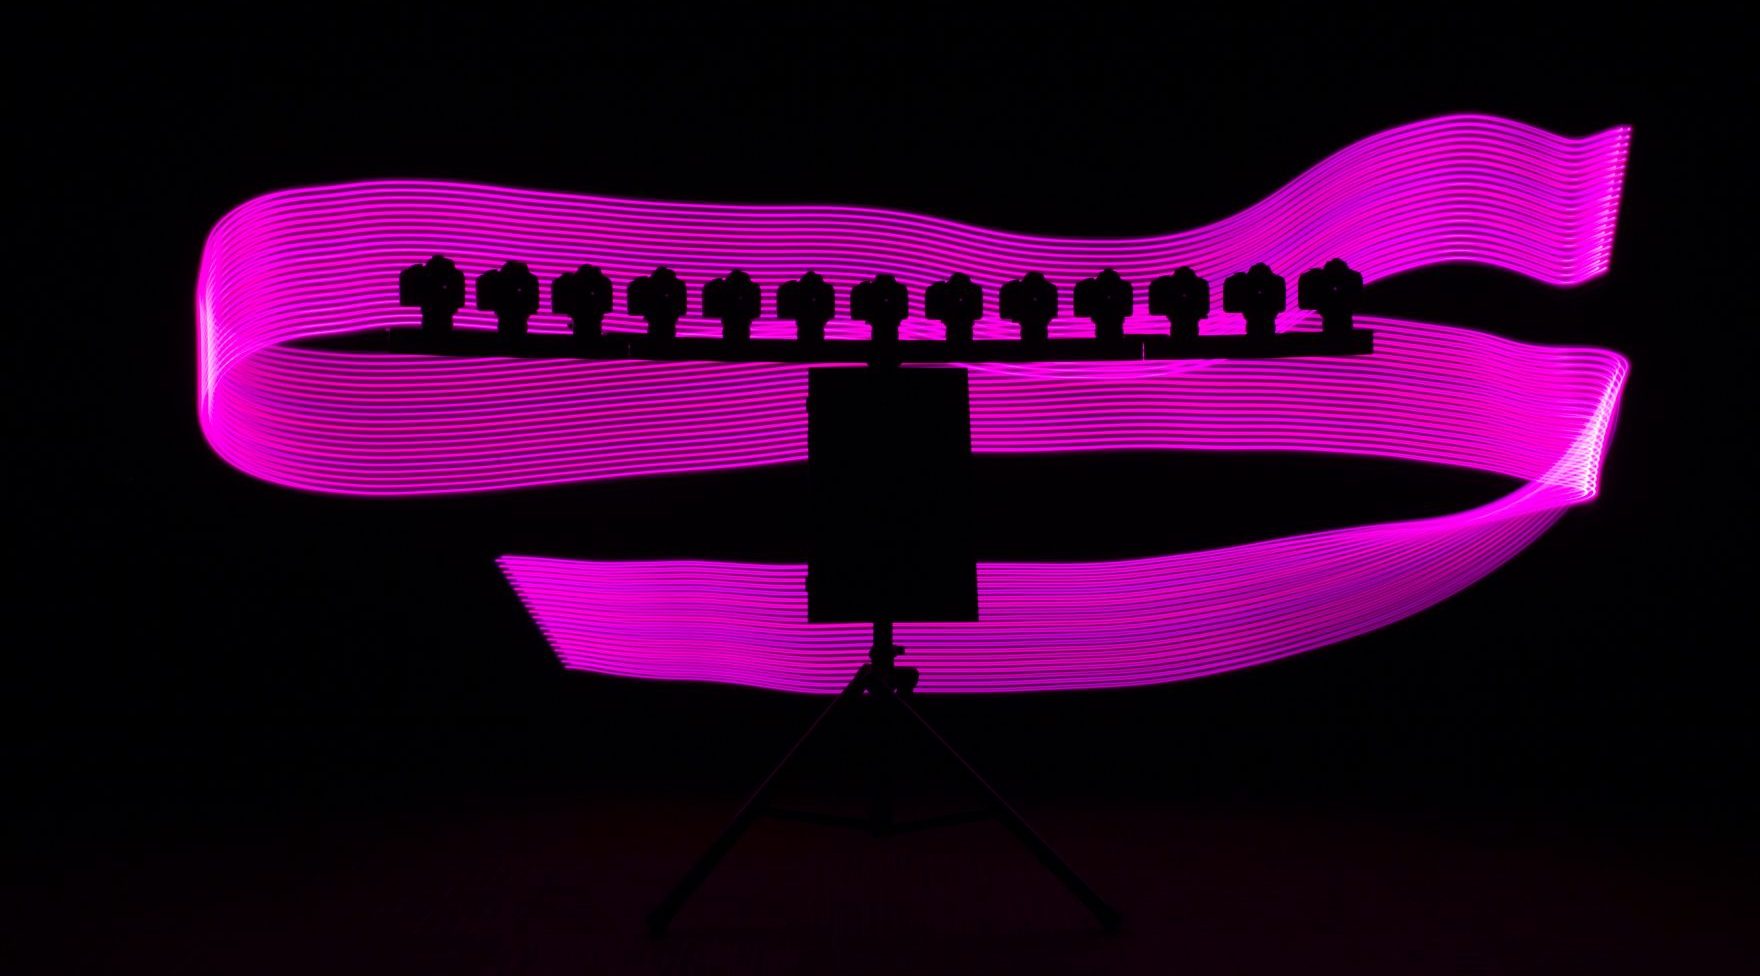
Light painting photography is rewarding, unique and adds a creative spin to the bullet time effect that makes it even more impressive.
You have two options for implementing light painting into your photo booth.
Either let your guests get creative by providing them with light painting tools during the shoot, or assign one of your staff to paint while the guests stand still for a brief moment.
Regardless of which method you choose, to create this effect you will need to use the correct camera settings. A strobe is also recommended as you’ll need to freeze the subject at the start of the exposure to make it sharp. Lastly, you’ll need some light painting props such as torches, light tubes, fibre brush, LED batons or even smartphones; the choices are endless.
Light painting camera settings:
Breeze Multi-Camera:
Xangle camera server:


The final effect uses the previous techniques to create something even more stunning.
Again, you’ll need to play around with the camera settings and the delays to achieve the best results whilst also having enough movement in the video.
Breeze Multi-Camera:
Xangle camera server:
We often get asked how to improve bullet time results by making them smoother and therefore more impressive at events.
You have to understand that besides getting the fundamentals right it’s not the hardware or software you are using but the number of cameras in your setup.
Of course there are other things that can improve your outcome, such as props, video overlays, backdrops, better lighting etc. However, the more cameras you are using the more possibilities and better results you can achieve with your setup.


To start using bullet time you should have at least five cameras at your disposal. However as you increase the number of cameras you can then begin to create effects that look even more impressive – such as a full 360 effect which, for example, requires at least 36 cameras but looks really stunning with over 100 cameras,
Of course there are benefits to having smaller arrays in your offering as they are more compact and a lot more convenient to travel with and set up for an event.
You will need more cameras to create more spectacular work and win bigger clients who are interested in high-quality work. (Rental cost for 12 camera bullet time array starts at $10,000 running to $35,000 for 48 cameras.) This is why our customers often upgrade their setups by adding more cameras.
We’ve put together some of the more common questions in case you come across any issues while setting-up your camera arrays or shooting bullet time:
Issue: GIFs look choppy. How do I make them smooth?
Solution: Your cameras need to be realigned and calibrated again as one or more cameras isn’t pointing towards the same area as the rest. You can also change the FPS for the GIF/video output in the multi-camera software settings.
Issue: My GIF looks very cropped after calibration.
Solution: Your cameras aren’t aligned properly and so the software has to compensate for this error by cropping the images to make them look the same. Manually adjust the cameras again and zoom in on a point to make sure they all are positioned at the same level. Then recalibrate in the software.
Issue: Image lighting of each camera is not consistent.
Solution: Make sure that all the cameras are set to Manual Mode and are using the same settings to ensure consistency. The environment could also affect the exposure of some cameras as any ambient light passing though could also have an impact on the final outcome.
Issue: There is a movement in the GIF.
Solution: Your cameras didn’t fire at the same time. To troubleshoot the problem, fire all cameras from the TriggerBox Controller Software. Then use the remote instead of the software and the other way around to see if the problem persists. Make sure that the cameras are in the Manual Mode.
Issue: One or more cameras failed to fire at the same time.
Solution: Make sure you are half-pressing the remote before taking a shot. This will activate the cameras’ auto-focus, readying them for when you fully press the shutter to take a picture. Also ensure that the camera settings are the same and you are in the Manual Mode.
Issue: Moving objects or subject is blurry.
Solution: Increase the shutter speed to prevent motion being captured by the cameras. Also make sure that the flash settings are correct. We recommend trying a 119.5ms delay for the flash to sync it with your cameras and see what happens. Read this guide on how to sync flashes with multiple cameras.
Make sure to check out and join some of the following groups of experienced photo booth owners and multi-camera users to learn more and find answers to any other questions you might have.
A Facebook group in which bullet time array users share their experiences and help others improve event photo experiences.
A group for Breeze software users and photo booth owners to share ideas and help each other.
Facebook group discussing bullet time photography either for studio work or for a photo booth, as well as other software solutions by the Xangle team.

A place to share ideas, ask questions and learn about building a photo booth.
Other useful sites to visit:
Congratulations on getting this far! Now you should be equipped with all the essential knowledge to begin your bullet time experience.
We hope this guide on how to set up a bullet time camera array will help you get the results you desire…
Now it’s over to you!
Are you planning on creating a bullet time booth? Or perhaps you’ve been using a multi-camera array and have something interesting to share?
Either way, let us know by leaving a comment.
In this “ESPER Customer Story”, we catch up with Eric Paré, visual artists, founder of Xangle and longtime ESPER collaborator to find out how ESPER powers and triggers have helped him create his light painting bullet time masterpieces.
Here is his interview:
I’m a visual artist from Montréal who loves combining a passion for photography, travel and light-painting. I’m also the head of Xangle – a complete multi-camera system software.
For the past 7 years, I’ve been creating tens of thousands of images involving light-painting and/or bullet-time. Everything I create is lit by hand with minimal editing.
We’ve been featured on CNN, MTV, BBC, Vice, TEDx, Peta Pixel, CNET and worked on huge campaigns for Audi, Twitter, Adobe, HP, Intel, Facebook, Canon and Microsoft.
There would be many ways to describe this, but the way I’ve been doing it forever is this: I wave a light around a subject to light it up and create shapes of light around that person.
Technically, this simply involves doing a long exposure with the cameras. Some people go with a fixed duration (typically 8 seconds), but I prefer to go in Bulb mode on the cameras to be able to decide the exact duration of the shots based on the shape that I’m doing.
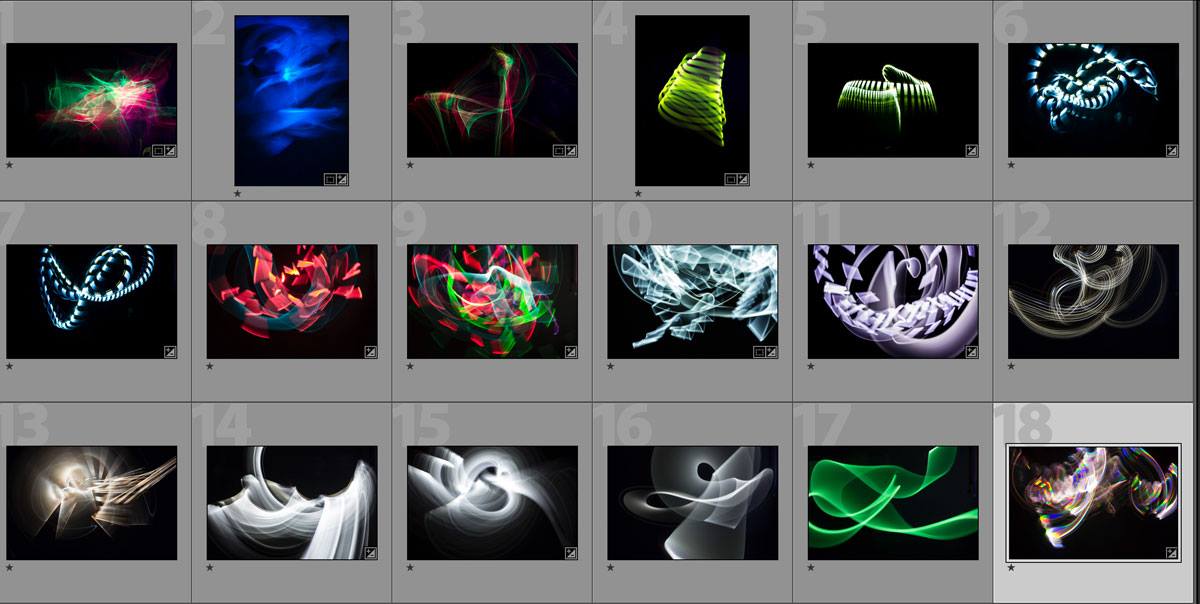
To create light-painting bullet time shots I have endless DIY things that I have been experimenting with including a long acrylic rod, a Rainbow Panel, and even a purse. But these days, I’m using only my Light-Painting Tubes and LiteBlades from Patrick Rochon.


Click here to see ESPER TriggerBox and PowerBox customer gallery.
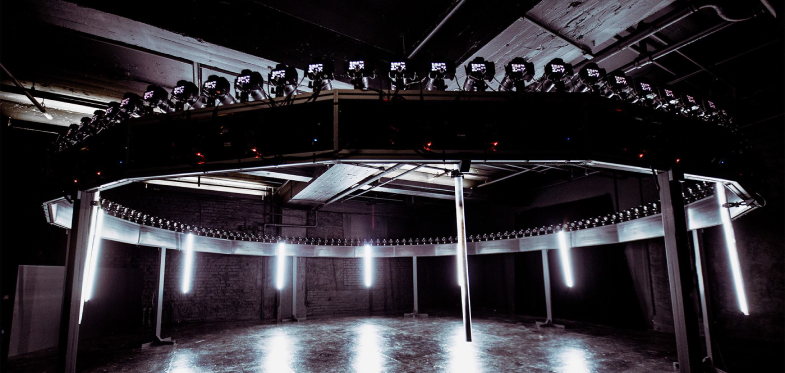
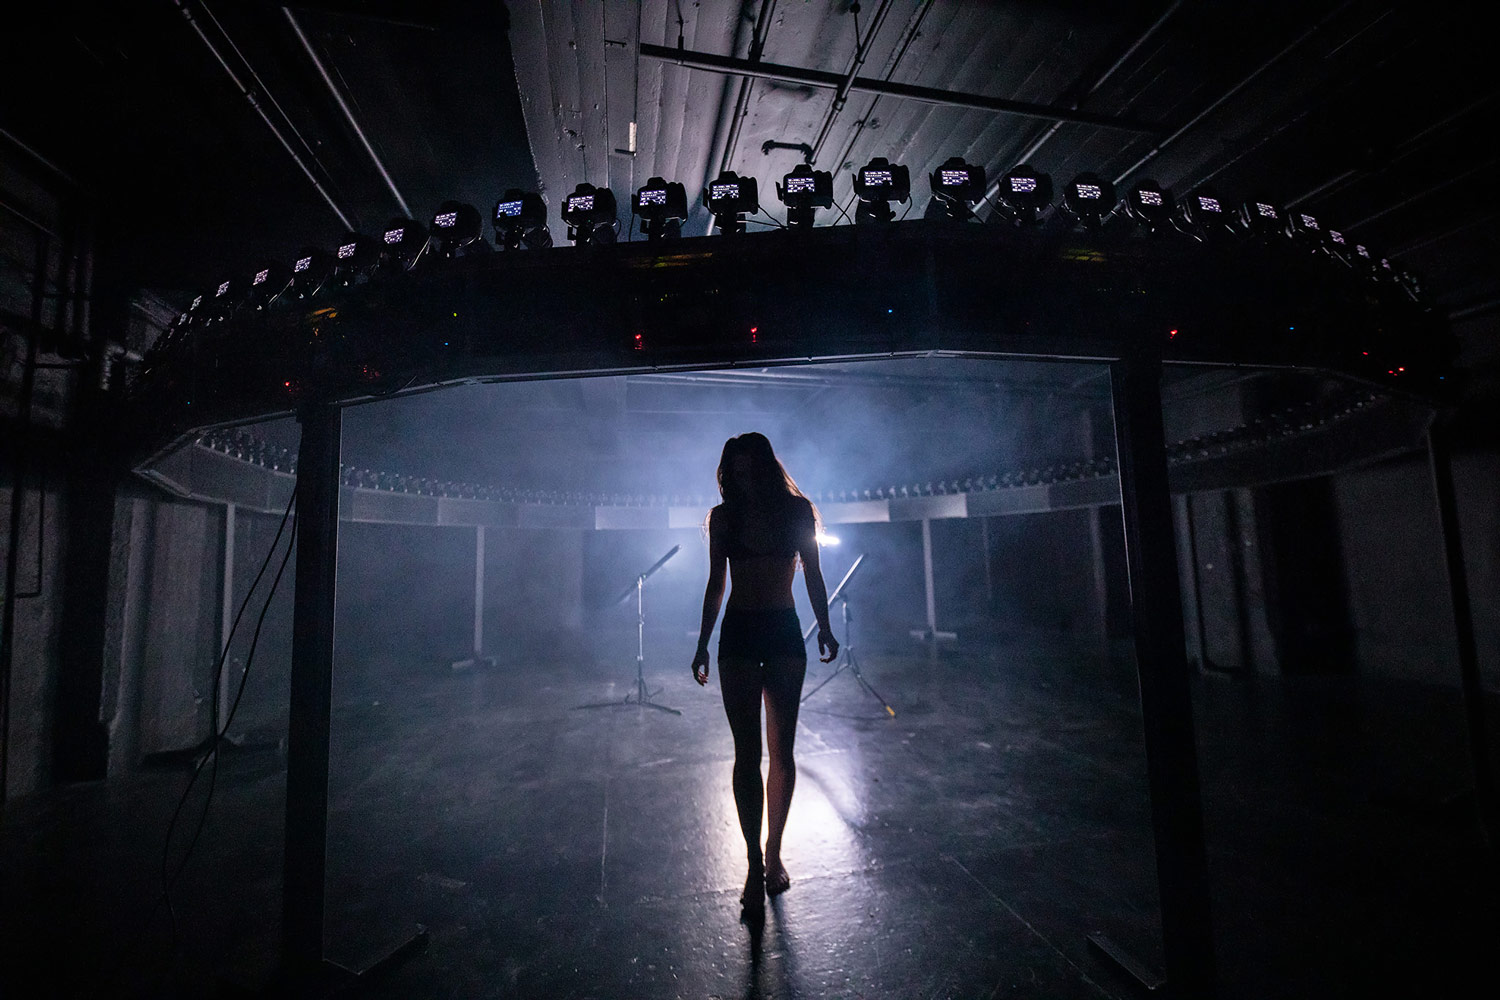
After a long outdoors 360 degree tour in 2012, I had a few months off and I wanted to see what I could come up in 360 with light-painting. I had only a tiny black studio back then, but I managed to create my most complex creation ever, the LightSpin project.
For this one, I had access to only 24 cameras, but I was combining this with stop-motion, thus triggering all cameras at the same time for hundreds of shots. That resulted in half a million images for a short dance documentary.
I teach a lot of what I do on my Youtube channel, and this is a good starting point. But the truth is that practice is the key to get great results. I spent 3 months in my studio every day before I published my first light-painting picture.
There’s a lot of things to figure out when working in 360 with light-painting, but it is so rewarding when you come up with something unique. It is still the beginning and there are a lot of things to discover and play with.
Camera trigger is sent via Xangle Camera Server on which I can pair a wireless Bluetooth presenter. The one that I’m using fits on my finger like a ring which makes it very convenient when my hands are busy manipulating the light-painting tools. Then to make it work, I press once to start the exposure, and then again to stop it.
In my case, I really want a super fast preview.
I’m currently down to 3 seconds on a 16 cameras array which is starting to make sense when you consider that we have to download the files, digitally calibrate them and generate an MP4 out of the JPG files. But I want an instant preview! That’s going to come one day 😉
For the rest, it’s pretty straightforward: we connect the cameras, calibrate and we’re ready to roll!
When we released our updated “Windows” version in early 2019 (that is when we added the possibility to use more than 12 cameras without the need of Raspberry Pis), we did a light-painting event with Canon at CES 2019 and we decided to go all in with ESPER TriggerBoxes and PowerBoxes!
We did a light-painting event with Canon at CES 2019 and we decided to go all in with ESPER TriggerBoxes and PowerBoxes!
We have used 4 ESPER TriggerBox units for 24 cameras. The camera power was also managed by ESPER on this one.
There are two key elements with ESPER PowerBoxes which make them a great addition to our setup.
One is the fact that it allows us to power up 6 cameras at the same time. This is a major upgrade to our previous solution which was made of Canon power supplies (way too many cables).
The second element is the coupler itself. ESPER is making the best non-Canon coupler we’ve ever tested. And we tested a lot! Original ones from Canon are expensive and mostly, very hard to find. ESPER has been a key element in the booming of the bullet-time industry by making and providing DC couplers.
We own probably 200 [ESPER] units at this point and we keep buying more and sending our clients your way to purchase more!
We own probably 200 units at this point and we keep buying more and sending our clients your way to purchase more!
ESPER have been powering up our bullet-time rigs for a long time now. We travel with ESPER on massive productions around the world to power from 12 to 200 cameras and we can’t really imagine how we could survive without the PowerBox products!
ESPER have been powering up our bullet-time rigs for a long time now. We travel with ESPER on massive productions around the world to power from 12 to 200 cameras and we can’t really imagine how we could survive without the PowerBox products!
My life prior to light-painting was limited to local festivals around Montréal.
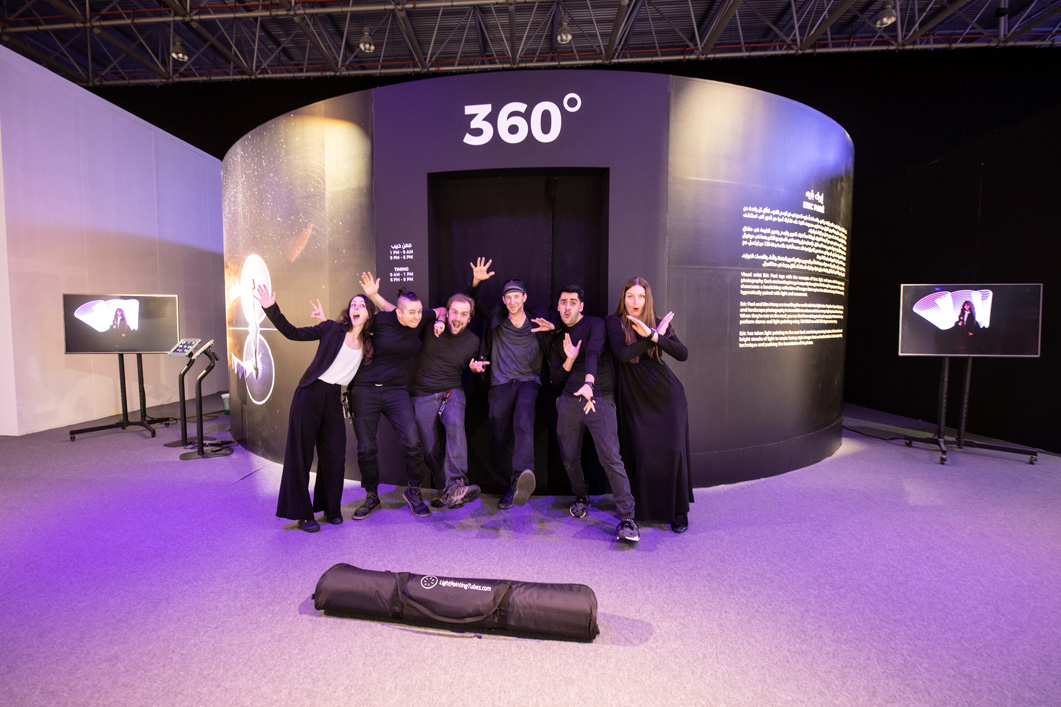
When I started to do personal bullet-time light-painting project, I got noticed super quickly by agencies and started to work on much bigger scale projects. We’ve managed to create our art at Coachella, SXSW, Xposure festival and at the CES.
This also opened the door to so many other opportunities simply based on the fact that we have a solid portfolio.
Learn more about ESPER TriggerBox and PowerBox
More interviews:
Continuing our “ESPER Customer Stories” series where we ask our clients to share their experiences using multi-camera setups.
Today we talk with Bill Hamway, the Owner of Mammoth – a photo booth company that creates unforgettable brand activations with photo & bullet time booths.
With the help of Bill, we uncover some very interesting findings from his journey about how using bullet time photography has opened up new opportunities.
Let’s dive right in.
Or, click here to listen to Bill’s full story.
Mammoth is an experiential marketing studio that dreams up ideas, then builds them. We blend psychology, art, and marketing to make brand activations unforgettable.
We help brands reach people through everything from festivals to private parties. We help our customers attract attention, spark conversations, create raving fans, and grow their companies.
We have also run activations for big conferences and industry-leading brands like Lululemon, Starbucks, Hulu, and WeWork have trusted us to deliver unforgettable experiences for their guests.


Click here to see ESPER TriggerBox customer gallery.
Our company has historically done just straight photo booths for events and so bullet time was something that I was interested in and wanted to add to our business.
It took a bunch of work to try out different systems.
First, we went with a Chinese vendor, Cam Fi. They had sold multi-camera triggers and it was all based on Ethernet or Wireless transfer. So I chose them because it’s the only thing that I could find. I don’t even think ESPER had a website back then, so I needed to take action and decided to try Cam Fi.
And it was terrible.
They didn’t have any image calibration. Their triggering systems were sporadic, it would work sometimes it wouldn’t sometimes and when you’re doing events as you needed to work a 100% of the time.
So, I returned all of the original Cam Fi units.
I then purchased another trigger box that had that could trigger all of our cameras, but there was no time delaying functions on them.
That would be okay if I was using continuous lighting for triggering all of our cameras. But since I come from a photography background, I wanted to use two photography strobes. One for a face light and one for a hair light to make our 3D photos really pop.
Quality is one of the most important things to me.
I had already tried your competitor’s products and they let me down. ESPER is just the go-to in the industry and so I went for you.
Thankfully, ESPER came out with your new website. I ordered like right away, one of the first rounds of the TriggerBoxes and PowerBoxes!
I knew that I could do some time delays for triggering our strobes which got me the desired effect. All I wanted was all of the camera shutters being able to open and stay open long enough to be able to capture the light from the strobes. So that’s why I went with ESPER and I’m a super big fan of your products!
I had already tried your competitors products and they let me down. ESPER is just the go-to in the industry and so I went for you.
Also, the design of your ESPER TriggerBox is how they all stacked neatly together was crucial for the design of our bullet time photo booth. That way everything was pretty well together, compact and it was small.
You have the brand and the support behind it.
Luke from sales acted as a kind of a customer service person.
He helped me out when your software wasn’t working for me and with stuff getting stuck in customs and being delayed even though we had events.
I’m grateful for you investing your time and actually building your products and making good products that are trustworthy that I can count on to do all of our events, so thanks.
We wouldn’t be doing bullet time photography without ESPER.
People see 13 cameras and they’re immediately intrigued. Then when they actually see the results of it, you get: “How the heck does that even work?”, “That’s so cool!”, “I’ve never seen this before!”.
We started doing conferences at the end of last year.
One was for the Hero Roundtable. They’re kind of they’re similar to TED Talks to where they bring a bunch of people who are advocating for big changes in our world together.
We also did a conference in Detroit called the Midwest Gathering. That was a two-day conference and everybody absolutely loved being able to get their bullet time photos taken and they were also curious about how it all worked everything.
I’m grateful for you investing your time and actually building your products and making good products that are trustworthy that I can count on to do all of our events, so thanks.
We’ve done an activation with Lululemon for the Detroit marathon which was in November. They hosted a cheer station for all of their team members and a lot of their brand ambassadors to come out. We went and set up at like 4 o’clock in the morning and it was super cold and super windy, but we made it happen and everybody loved it.
We’ve had some notable people. Perhaps, the biggest name we’ve had is Joe Gatto from the show Impractical Jokers.
That’s thanks to ESPER and you creating the hardware for us to power our equipment and we’ll do many many more events this year so I’m pretty pumped for that.
Yeah, we’ve made money and we’ll continue to make money doing bullet time photography this year!
In fact, we made more money last year than we ever have before.
This year will make exponentially more money. Partially due to bullet time photography and partially just due to where we’re growing as a business.
Yeah, we’ve made money and we’ll continue to make money doing bullet time photography this year! In fact, we made more money last year than we ever have before.
Being able to do bullet time photography and multi-camera work gets us a unique selling point that most other businesses do not have.
Also, the quality that we get from ESPER by being able to actually use real photography strobes to produce amazing looking 3D photos.
Even a lot of our competitors who are using or building multi-camera rigs are just using continuous lighting because they don’t have advanced knowledge of photography. Or, they don’t have an ESPER that allows them to delay the strobe outputs, which gives us the best-in-class quality.
Being able to do bullet time photography and multi-camera work gets us a unique selling point that most other photo booth businesses do not have.
That gets us into more events, bigger music festivals, bigger conferences and so that’s part of where our company is swimming up to this year.
Learn more about ESPER TriggerBox.
More interviews:
If you’re planning a bullet time or a photogrammetry set up then you’ll need a reliable software solution to control, manage and publish the image data from your multi-camera system.
We spoke to Eric Paré, longtime ESPER collaborator, bullet time and light painting guru and creator of Xangle Camera Server software to learn more about his multi-camera software and how the latest update adds even greater compatibility with the ESPER TriggerBox.
Over to Eric.
Xangle Camera Server is the multi-camera software we’re using to control our cameras for our bullet-time events and studio work. It allows easy connection to multi-camera systems: connect, control, calibrate, trigger, grab, preview, publish, share.
It is mostly used by photobooth companies for bullet-time but also by photogrammetry studios. Xangle Camera Server is currently the fastest option on the market to download files and to ensure easy cable management on a 200 DSLR 3D scanner system.
It is also currently used by a considerable amount of other companies around the world including some of the top leaders: LifeIn360 (Indonesia), SpliceBoys (Australia), TimeBusters (Poland), ThinkPrint (Brazil), FreshTape Media (USA), Ecco Studios (USA).
View this post on Instagram
The main goal of the software is bullet-time with DSLRs. But over the years, we’ve opened the door to different multi-cameras applications such as photogrammetry and even smartphone control via Android devices.
Back in 2011, we were using the only multi-camera software that was available on the market, but it was so buggy and it was crashing all the time. That was extremely stressful during live events and we ended up starting to build our own solution.
These days, I’m triggering in a seamless mode which means that in a 132 cameras set up, I trigger cameras 1 and 132 at the same time, then 2 and 131, 3 and 130, etc. All of that in RAW quality. Having my own solution allows me to move faster and experiment with so many different possibilities.
It’s an all-in-one software with easy setup for external replay and sharing stations but it was also designed for improving the performance and calibration when controlling multiple cameras.
There are a few ways to configure the equipment to run Xangle Camera Server, and there’s always a way to optimize for download speed or for setup simplicity.
For projects where we need to set up super quickly with as few cables as possible, we’re very likely to use only 12 cameras, 2 ESPER TriggerBoxes, 2 ESPER PowerBoxes, USB Hubs and one computer.
When using USB-HUB architecture of Xangle Camera Server ESPER TriggerBoxes is one of the best option currently on the market.
As of version 1.9.0, Xangle Camera Server offers the ability to control one ESPER TriggerBox via USB. From the Dashboard, if an ESPER TriggerBox is detected, we’re showing it as an available trigger mode, which then allows the user to trigger through our system to the ESPER boxes. When using USB-HUB architecture of Xangle Camera Server ESPER TriggerBoxes is one of the best option currently on the market.
Absolutely. To download free Xangle Camera Server trial head over to https://xanglecs.com/. To get started, all you need is some basic equipment. For a 6 cameras set up, you’ll need: 6 cameras, 1 ESPER TriggerBox, 6 trigger cables, 5 link cables, 1 USB cable and a windows computer.
Learn more about ESPER TriggerBox and PowerBox
More interviews:
Today’s “ESPER Customer Stories” Q&A is with Sam Jackson, Director at sample & hold – a 3D scanning company focused on the creative media sector.
After using ESPER boxes, Sam is less stressed about the reliability of his multi-camera setup and feels an improvement in productivity.

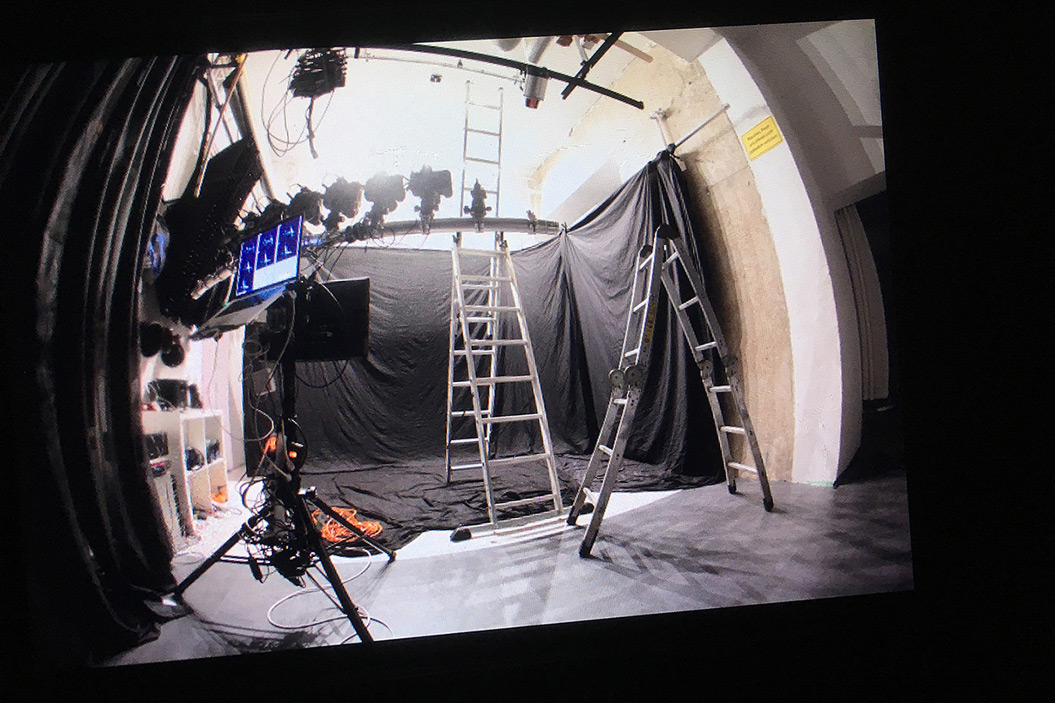
60 cameras 3d scanning array by sample & hold using ESPER TriggerBox and ESPER PowerBox
Here’s Sam’s story:
Chris (Cornish) and I set up Sample & Hold back in 2011.
We both have over 10 years experience working on 3D scanning projects so our aim was to pool our skills and create a company that produces the highest quality 3D data using the latest 3D capture technology.
We’ve worked on everything from Hollywood films to AAA games and we’ve scanned everything from horses to Michael Caine.

From the outset, we knew we needed dependable hardware to power and trigger our multi-camera scanning setup.
So, we ended up building our own multi-camera sync and power boxes in-house, which we used for quite a while. This was before ESPER’s boxes were available, I must add!
It’s fair to say that our boxes tended to be a little ‘flaky’.
We have a 60 camera head 3D scanning rig and an 80 camera body. As a result, we seemed to be spending as much time fixing sync and power issues as doing the scans. Which when you’re working against the clock and it’s your reputation on the line it becomes very, very stressful and a big problem.
Completely. We’d heard good things about the ESPER trigger and power boxes so we decided to give them a try.
Anything that meant we’d spend more time scanning and less on fixing sync and power issues!
Initially, yes. We had genuine concerns about reliability.
From our own experience, we knew that the theory of building the boxes was fairly simple. However, implementing that theory to make a 100% reliable, ‘non-flaky’ product is really tough!
Ultimately, we can spend more time producing quality scan data and less time fiddling with sync and power issues!
Using ESPER PowerBoxes and TriggerBoxes we can definitely feel an improvement in productivity.
Learn more about the ESPER TriggerBox and PowerBox.
More interviews:
Today’s “ESPER Customer Story” is from Chris Thielemann a 3D light painting artist and photo booth company owner. We discuss how he combines light painting and bullet time / 3D photography techniques to produce some exceptional imagery.
After adding a bullet time effect to his setup, Chris is receiving more requests for booth rentals and significantly expanded his creative options when creating his work.
Enjoy the read.
I like to combine different lighting setups, or light sources and use studio flashes with ambient light and flashlight. Using the multi-camera setup, I can freeze a moment and create glasses-free 3D images by using lenticular lenses.
To create the above GIF, I photographed each sequence with my multi-camera array. All 10 cameras were triggered at the same time using the ESPER TriggerBox. The model was lit by a studio strobe to freeze her, the rest I painted with the black fibre brush and some colour gels.
There is no post-editing. The pictures are taken straight out of the cameras – so no Photoshop, or After Effects manipulation. I just optimized colour and contrast in Lightroom.
There is no post-editing. The pictures are taken straight out of the cameras – so no Photoshop, or After Effects manipulation.
Below are some examples of how the image was lit.
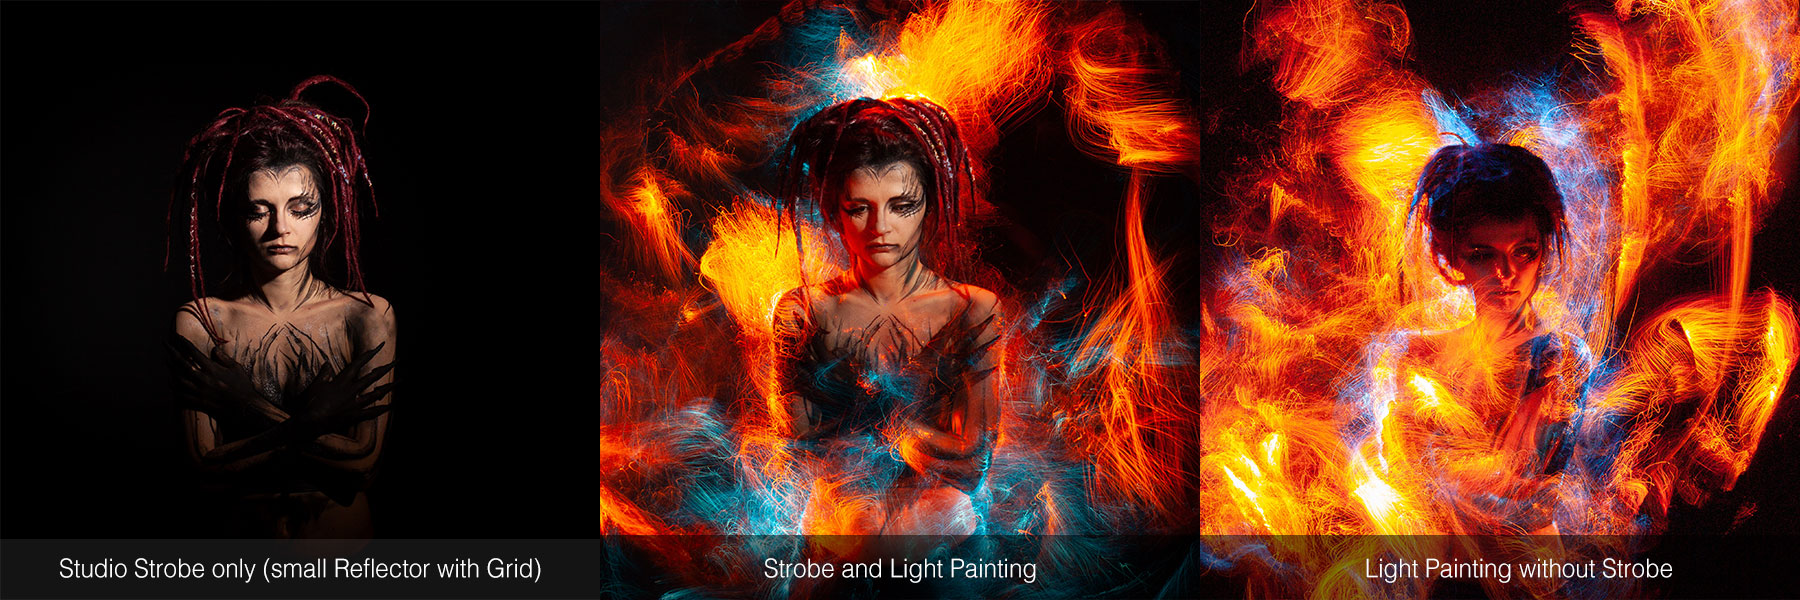
On the left side, you see the effect of the studio strobe. I’ve used a small reflector (you could also use a speedlight) with grid for hard and focused light. With a short flash burst, to get a razor-sharp face because of the very short flash speed.
The picture in the middle is the combination of the Lightpainting and the strobe. Very well balanced. The Shadows on the models face are lighten up by the light-painting brush.
On the right side, the light only comes from the flashlight/torch. So it’s not very well balanced – the face is too dark. You could put more light onto the face with the flashlight, but with an exposure time about (180s) the photo would be blurry.
You can do basic bullet time photography on a budget.
I’m currently using 11 to 12 cameras in my studio and 6 cameras as a mobile solution. I started with 5 cams and added more over a period of several months.
You can do basic bullet time photography on a budget. I’m currently using 11 to 12 cameras in my studio and 6 cameras as a mobile solution.
When I started I’ve purchased a Breeze software license for DSLR Remote Pro Multi-Camera. A solid solution that you buy once and use it without any further costs.
Later, I additionally got a Xangle Camera Server license for events, because it’s faster in setting up the cameras and extremely fast in creating the videos. This software is only licensed for a period of time so it’s necessary to do events to refinance it.
Yes, I started with wireless YongNuo triggers, to fire up to 7 cameras in my first setup. But, there was a problem was the sync speed. When I needed a 100% sync, I had to use long exposure times (more than 2s) and fire my flashes manually when all shutters were open.
When using faster shutter speeds and firing the flash with one of the cameras, the hit rate (all cameras in sync) reduced extremely. Quite a pain and a process that slows down a photoshoot significantly.
For starting out on a budget and if you only do studio work for yourself it’s ok, but definitely not fun to use. It limits the possibilities – photo shoots had to be in total darkness because of the shutter speeds.
With that set-up, events were not possible.
So basically I had several reasons.
The first was to improve the photoshoots in the studio. It’s a pain to shoot in total darkness and fire the flash manually. The previous triggers I’ve used were very slow and you can’t do action photography with moving subjects.
The second, more important reason, are bullet time photo booth events. You need a shutter speed sync time faster than 1/40s to get sharp images of people. So the choice is to buy a trigger that can do that, or to invest more money in a software solution that does not need a trigger at all.
The previous triggers I’ve used were very slow and you can’t do action photography with moving subjects. [For bullet time] you need a shutter speed sync time faster than 1/40s to get sharp images of people.
At this time, the software solution is not an option due to the costs (more hardware, software costs, abonnement costs) and for a small rig like mine with 12 cameras, it’s not needed. As of now, I put my focus on my 3D work and 12 cameras are just fine for that.
So, the ESPER TriggerBox is the right choice for me – pay once and use it forever!


Click here to see ESPER TriggerBox customer gallery.
For synchronization speed – TriggerBox does the job. It speeds up my photoshoots and I always get reliable results – in every shot, every camera is accurately synchronised. Unlike the tested wireless trigger solution. Thanks to ESPER TriggerBox I can use my multi-camera setup like a single camera!
TriggerBox does the job. It speeds up my photoshoots and I always get reliable results – in every shot, every camera is accurately synchronised.
Also, events are now possible – even with more options like setting a time delay. So, it’s a very big improvement compared to the wireless triggers.
But, as a small photography business owner, I was hesitant because of the cost. Normal income goes to pay all bills and feed the family. Any left money, I invest in building my rig – and that’s not much, because the costs multiply with every camera.
As of now, I have 12 cameras in my rig (plus some more backups) – so that’s quite insane ;). When you don’t have a ton of money to spend you have to think carefully about your next purchase. So, even small things like camera mounts, cables, metal pieces etc. will add up.
I have more control and confidence in my rig.
Once the cameras are set-up, I can concentrate on my images instead of on my camera triggers. A really a big plus for me compared to wireless triggers! Before that, I had a ton of ruined shots because not all cameras were in sync. An extremely frustrating process that happened too often. Now, I can use every shot.
Besides the significantly increased productivity in creating my work, I have some requests for small bullet time photo booth events. Without the ESPER TriggerBoxes I wouldn’t be able to attend them.
I can also set the cameras to bulb exposures and shoot for many minutes – that’s needed for my light paintings (with the wireless triggers you are limited to 30s exposure if you are not holding down the button on the release).
I’m able to create artworks that I couldn’t create before. I can experiment and try out new light painting techniques and test out what I can do with 3D. It’s nice to have a bullet time/3D animation of a light painting that I could share on social media.
But on top of that, I can also print out the photo shoot results and laminate them onto a lenticular lens – a glasses-free 3D image. A whole new world waiting to be explored!
Learn more about ESPER TriggerBox
More interviews:
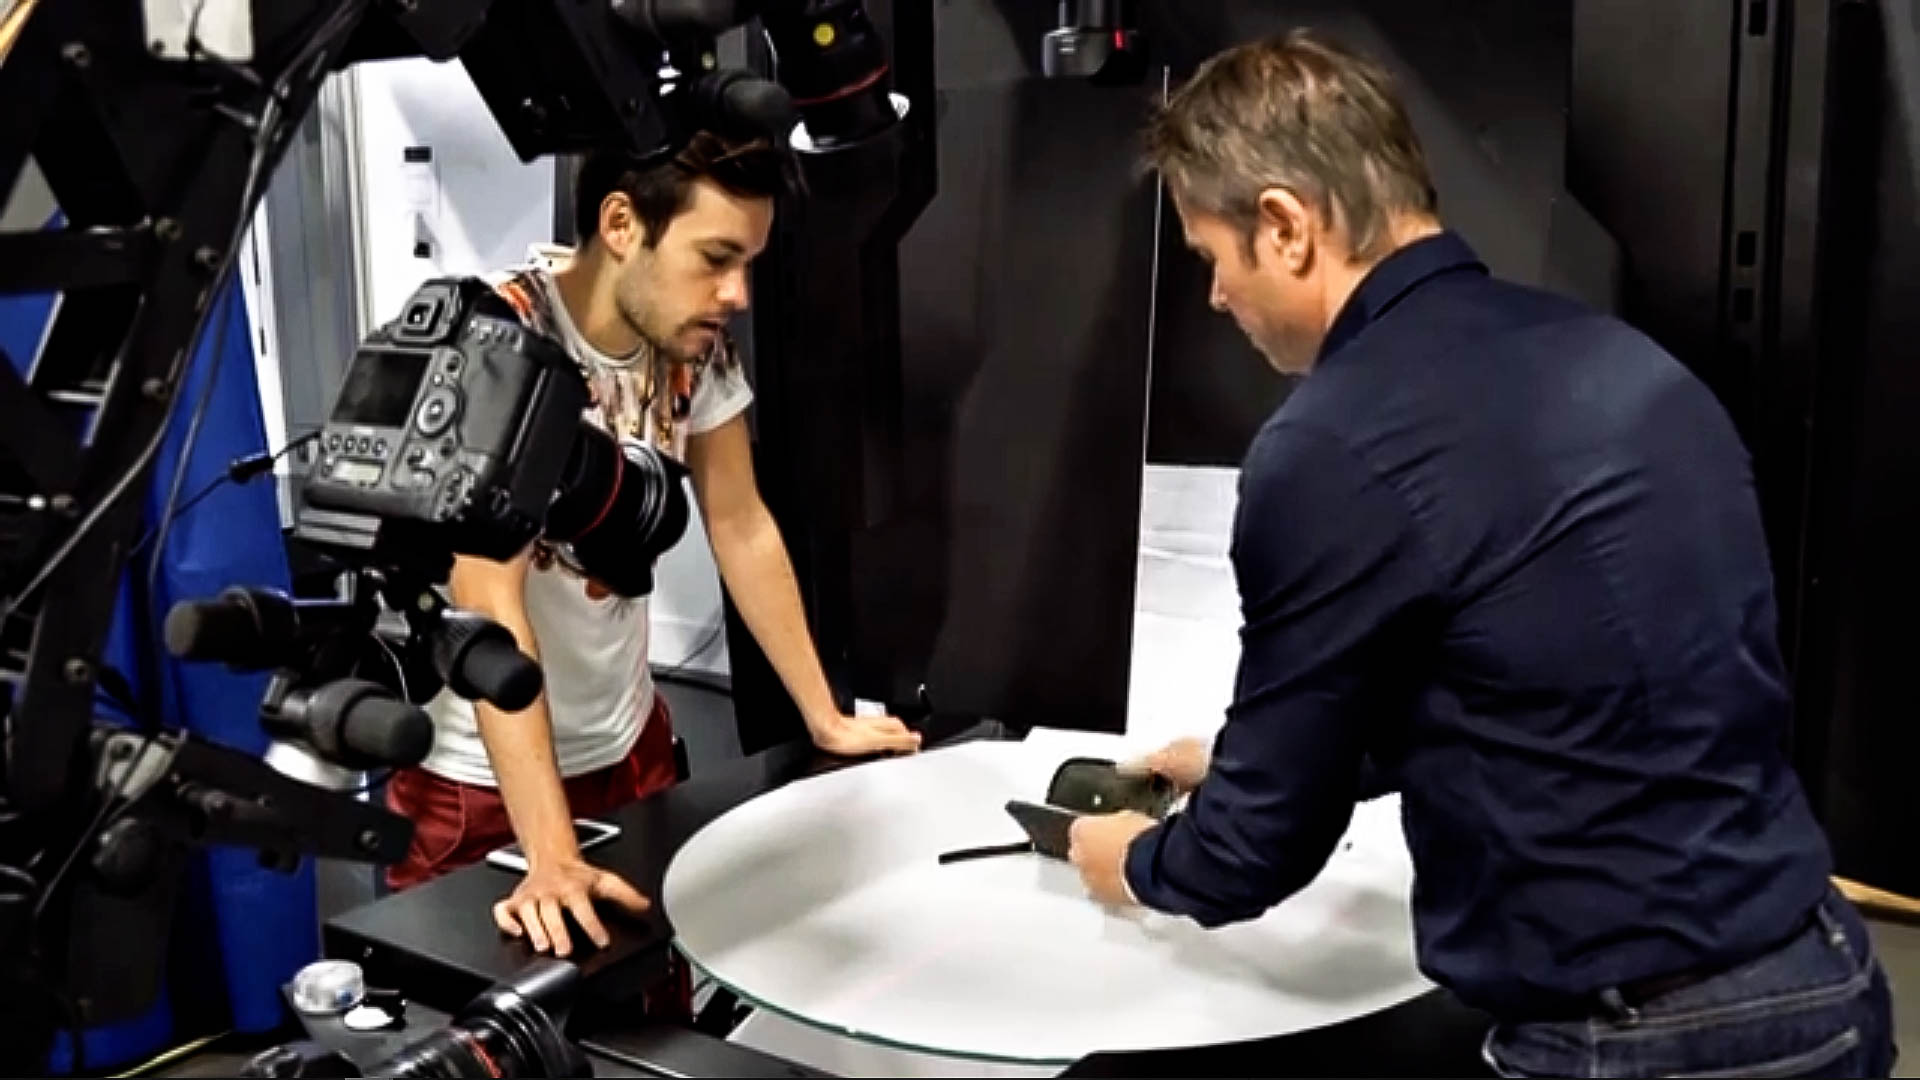
Today, as part of “ESPER Customer Stories” series we talk to Scot Warner, the Head of Technical Research at SpinMe, specialists in 360-degree photo technology for online retailers and global brands.
Scot talks about the company’s journey from single camera setups to multi-camera solutions. And how the ESPER TriggerBox made this transition possible and helped improved productivity along the way.
Read on for our conversation with Scot:
At SpinMe, we provide leading brands with a world-class automated imaging solution. We specialise in technology for 360-degree photos for use in eCommerce and on the web in general.
We offer a variety of different modules so that companies can find their ideal workflow solution. In terms of features, the solution unites the 360-degree view of the product image, as well as the zoom effect on the image.
Our goal is to refine and improve image capture and workflow processes, providing the greatest visibility, control and flexibility to all creative teams. Amazon, Apple, Saint Laurent, and JD Sports are just some of the brands that we help to manage growing product volumes and the demand for better digital content.


Click here to see ESPER TriggerBox customer gallery.
The primary focus in eCommerce is speed and efficiency. We have had single camera swing arm setups for many years but there was a want to make this multi-camera setup faster.
The ESPER TriggerBoxes made our decision to move to a multi-camera setup possible, specifically the TriggerBoxes simultaneous shooting capability and programmable port delays to sync camera shutters.
I originally saw the ESPER LightCage several years back and was really drawn in by what you were doing. We were chatting to ESPER on a different tangent and then found out you were doing trigger boxes so we tried them out and never went back.
The ESPER TriggerBoxes made our decision to move to a multi-camera setup possible, specifically the TriggerBoxes simultaneous shooting capability and programmable port delays to sync camera shutters.
Camera syncing for sure. In the beginning, before we discovered the TriggerBox, we did have a more basic box which could shoot with a multi-camera setup. However, its functionality was limited to 5 cameras and it only had a basic trigger delay on the primary camera. This made syncing a very tough job and the process of setup very challenging.
With the TriggerBox, we currently shoot at 1/40th and I still think we could improve this. I know TriggerBoxes are capable of firing higher than this! But for our subject matter, which is generally static, and the speed of setup time, this is our happy medium.
With the TriggerBox, we currently shoot at 1/40th and I still think we could improve this. I know TriggerBoxes are capable of firing higher than this!
Also, if we didn’t have fixed bows which help get the camera alignment, at least 80% of the way there then the camera positioning can also be a pain.
Luckily, we have a live-view software and camera overlays in SpinMe which can also help us out on this front.
It provides us and our customers with a small compact solution to speed up our multi-camera shooting process. We currently have several clients using the multi-camera TriggerBoxes for various purposes.
Some are using the TriggerBoxes in a 360 multi-camera spins setup which consists generally of a 4 camera setup. Yet, a couple of clients use 6 cameras and others use the TriggerBox for 3D capture of texture shots at set angles, which again use 6 cameras.
Most significantly, we have improved productivity with the multi-camera setup. With a regular swing arm, we were talking about 2 minutes for a spin, the multi-camera solution is about 35 seconds inclusive of image download & replication, spin itself is about 15-20 seconds!
Most significantly, we have improved productivity with the multi-camera setup.
All clients that have had the solution fitted have been very happy with the results!
There has been a lot of interest in multi-camera setups with more deals in the pipeline and we’re also looking to venture towards 3D capture, which will no doubt add to this demand.
Learn more about ESPER TriggerBox.
More interviews:
This “ESPER Customer Story” we’ve spoken with Stephen James, the Creative Director at SoPro Studios, a prospering photo booth company based in Canada.
By investing in bullet time photography, Stephen is seeing a significant increase in the quality of clients and revenue.
Here’s what we’ve learned:
SoPro Studios is a Toronto-based company that specialises in professional photo booth services for special events. We work with small and big brands to improve their business with creative photography.
We use the most creative photography options around to provide our clients and their guests with unique marketing solutions that connect brands with consumers.
Our activations provide fun, engaging, experiences that encourage users to share with the world! We have run bullet time activations for YouTube Space, Hush Hush, Charles Smith Wines and many more.
This industry is currently evolving at an alarming rate.
Basic open-air booths were “High-Tech” for a decade and all of a sudden are obsolete.
The industry saw huge growth, which attracts smart, innovative people who are disrupting the market with new technologies.

Click here to see ESPER TriggerBox customer gallery.
I got into this industry to create unique, almost cinematic, experiences. So as the technologies advanced I did not hesitate to jump on the opportunities and the Bullet Time Booth was my primary objective.
Long story short, if you stand still in this industry you are dead.
Currently, the Bullet-Time Booths seem to be the hot ticket, which is why I searched far and wide for a solution like ESPER’s TriggerBox.
I needed hardware that would allow us to fire all cameras at the same time.
We originally soldered a homemade multi camera trigger box to control the cameras; however, this proved troublesome as the lighting was difficult to control and the system would misfire 40% of the time.
To put it bluntly, the home-made multi camera trigger prevented us from learning and mastering the multi camera array for about a year.
The original box was not producing satisfactory results and it was not fair to our clients who were paying us for professional results.
Which is why I really wish I invested in ESPER TriggerBoxes immediately.


It seemed to be the only high-end multi camera trigger box out there, so we took a chance with their product and were extremely impressed.
However, I was hesitant at first due to the fact that I built trigger-box for $60 at home for 13 cameras. BUT, after struggling at dozens of events and producing mediocre results that we were not satisfied with we went with ESPER equipment.
Once we switched to the ESPER TriggerBoxes, our lives got much easier and we learned improvements at an exponential rate!
Since offering the multi camera array we have definitely a substantial increase in both clients and the quality of clients.
Our events get bigger and bigger, with larger budgets. The array is our primary seller and has helped enhance sales on all our product offerings.
We are just about to get into our second year with it and I can confidently say it has won us clients I have been working on for years before. We are predicting quite an increase in revenue this year, with most our bookings being for the multi camera array.
Since switching to the ESPER TriggerBoxes we truly produce studio quality shots in real-time at events. The arrays are starting to become a common thing, but our guests often comment on the quality of our results!
Learn more about ESPER TriggerBox
More interviews: