How often do you think about increasing your photo booth rentals and attracting more clients?
Have you ever tried to master the bullet time effect using a multi-camera array?
Felt frustrated by the lack of information on the web?
It’s not surprising.
If you’re serious about renting equipment for a huge event with thousands of guests, you need to carefully consider how you set up your multi-camera array.
In this article we’ll tell you how to set up a successful bullet time booth that wows!


So, if you want to:
- Grow your photo booth sales and enhance all your other offerings
- Increase the quality of clients by renting for bigger events with larger budgets
- Wow your guests by adding different bullet time and light-painting techniques
- Improve the efficiency and reliability of your setup
… this guide is for you.
Keep reading to learn how!
Bullet Time – The Next Big Thing In The Photo Booth Industry
After collecting first-hand knowledge from, and responding to, hundreds of enquiries from photo booth owners we realised that the bullet time effect was becoming more and more popular and resulting in greater success for companies by…
…generating more revenue:
“Being able to do bullet time photography and multi-camera work gives us a unique selling point that most other photo booth businesses do not have. We’ve made money and we’ll continue to make money doing bullet time photography this year! In fact, we made more money last year than we ever have before.”
BILL HAMWAY | MAMMOTH BOOTH
…adding value to the business:
“In Singapore, we are the only company that can do 360 Time Stop photography which has given us a great competitive advantage. It’s opened up a lot of opportunities and significantly increased revenue as a result!”
EWAN SOU | INSTANTLY.SG
…shocking guests (in a good way!):
“The bullet time effect and array really create amazing reactions.
When guests couldn’t see all of the cameras they were like “Okay that’s a nice thing”, but when they walked around to look at the array from the front, almost everybody was shocked! “ROLF MOOIBROEK | FOTODOOS
Plus there’s the engagement it creates:
View this post on Instagram
Not to mention that you can charge between $600 – $1,000 per camera in your array for the first day, and that’s not including extras!
Which leads to…
How To Set-Up a Successful Bullet Time Camera Array?
It might seem a little complicated at first as there are a lot more things involved than just grabbing a few cameras! But don’t worry, we’ll explain everything step-by-step in this guide.
Over the years we’ve been studying the photo booth market, have spoken with many experts, and we’ve solved a variety of issues that will help you to create truly amazing bullet time results.
This guide will help you understand the principles of an effective camera array. In addition, you’ll learn about the right equipment that’s needed, how to connect everything together, the importance of camera calibration and what settings to use when firing all cameras.
Contents
Step 1: Bullet Time Essentials
First let’s learn the basics of bullet time photography and the way in which it works.
Once covered you’ll be ready to move onto the next stages such as getting the right equipment and setting up your camera array.
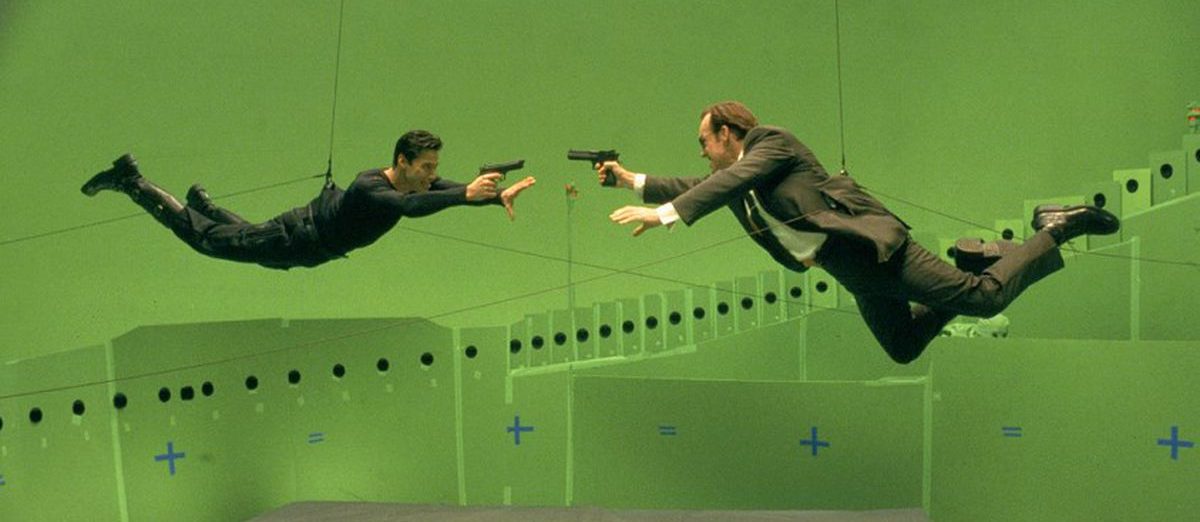
What Is Bullet Time?
Many of you will probably associate bullet time photography with the famous action scene in the Matrix movie (1999) where Neo effortlessly dodges one bullet after another.
Source: The Verge
That’s cool – but what exactly is bullet time?
It’s an effect in which audiences are given the impression of circling around an action sequence which is frozen in time, and at a speed which wouldn’t be possible in real life.
In actual fact, the bullet time effect didn’t make its first appearance in the Matrix. Its origins date all the way back to 1878 when an Eadweard Muybridge used it to capture the motion of a horse. Just over one hundred years later in 1980, director Tim Macmillan also started experimenting with bullet time, creating videos that used the time slice technique.
How Is The Bullet Time Effect Created?
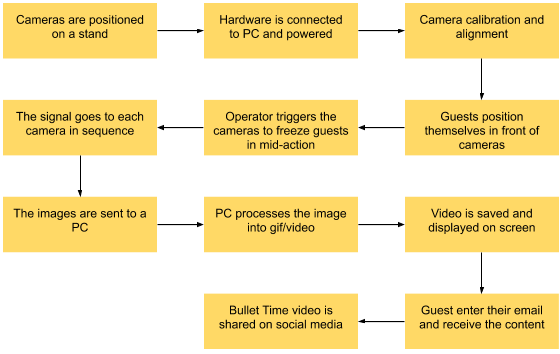
A number of synchronised cameras are physically separated from each other and positioned around the subject, commonly in curved or rig positions.
Cameras are either typically fired at the same time or one by one to introduce movement. Then all the images are transferred to a PC and stitched so that the final outcome forms a movie, or GIF, of a moving image sequence. This gives the impression that a camera was spinning around the subject at very high speed.
Here’s an example of the process in a typical photo booth scenario…
…and here’s a real-life example from an actual event:
Step 2: Camera Array Equipment Checklist
Just knowing what you need to build a camera array can feel like a huge task alone. But finding each piece of essential (and compatible) equipment without breaking the bank can be even more difficult!
You don’t need the best equipment to create high-quality bullet time videos. However, you’ll need to use hardware that is reliable and won’t let you down in the middle of an event.
There are several essential things, from camera model to light and triggering mechanisms which will contribute to the reliability, quality and compatibility of your array.
Let’s get started.
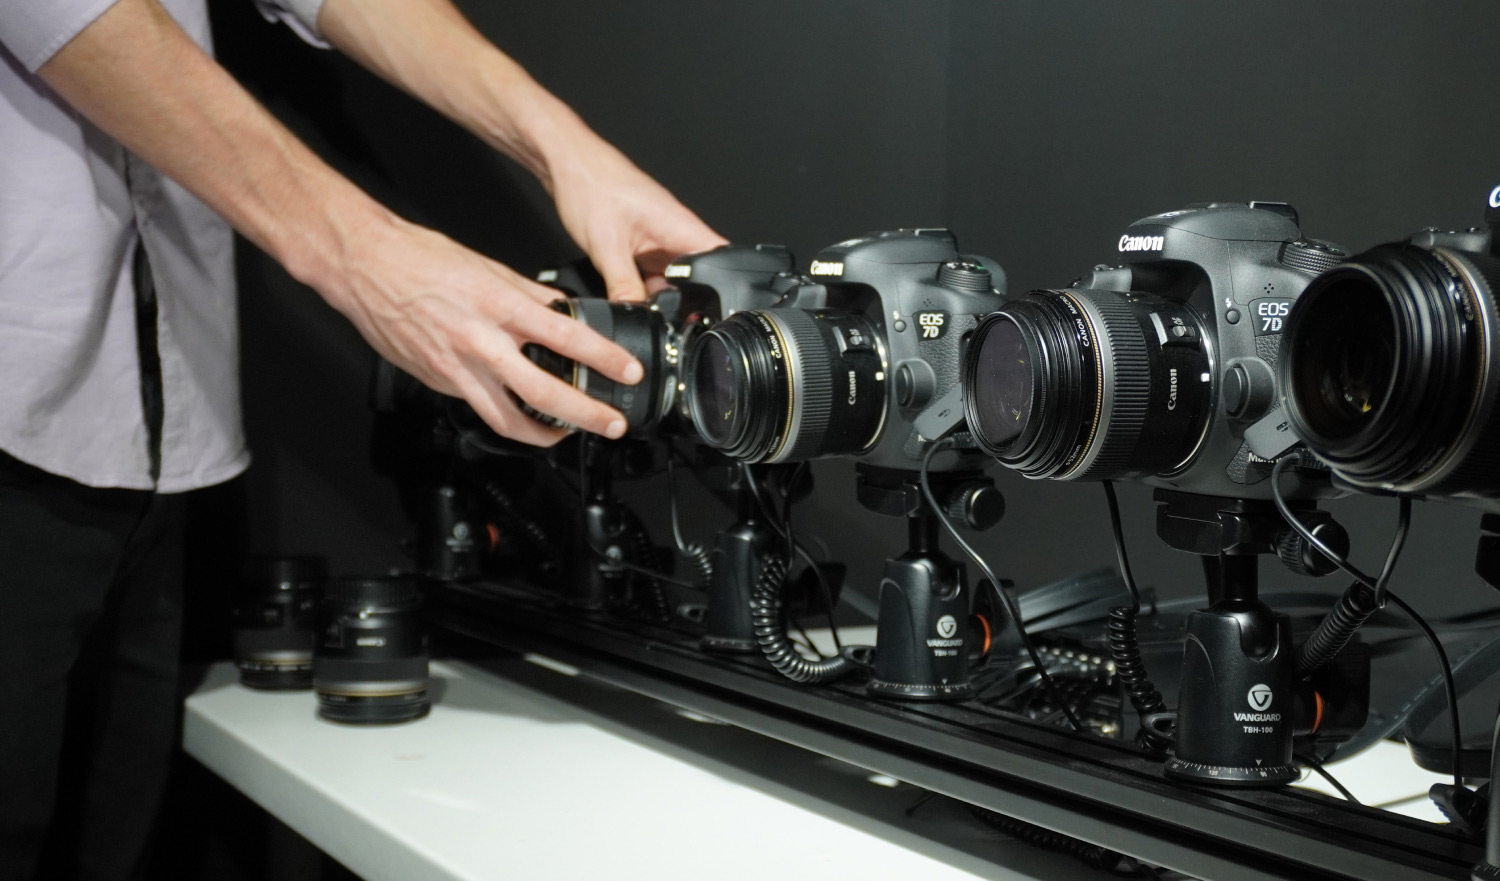
Best Cameras For The Array
We are often asked which camera is best for a bullet time booth.
There are thousands of camera models to choose from.
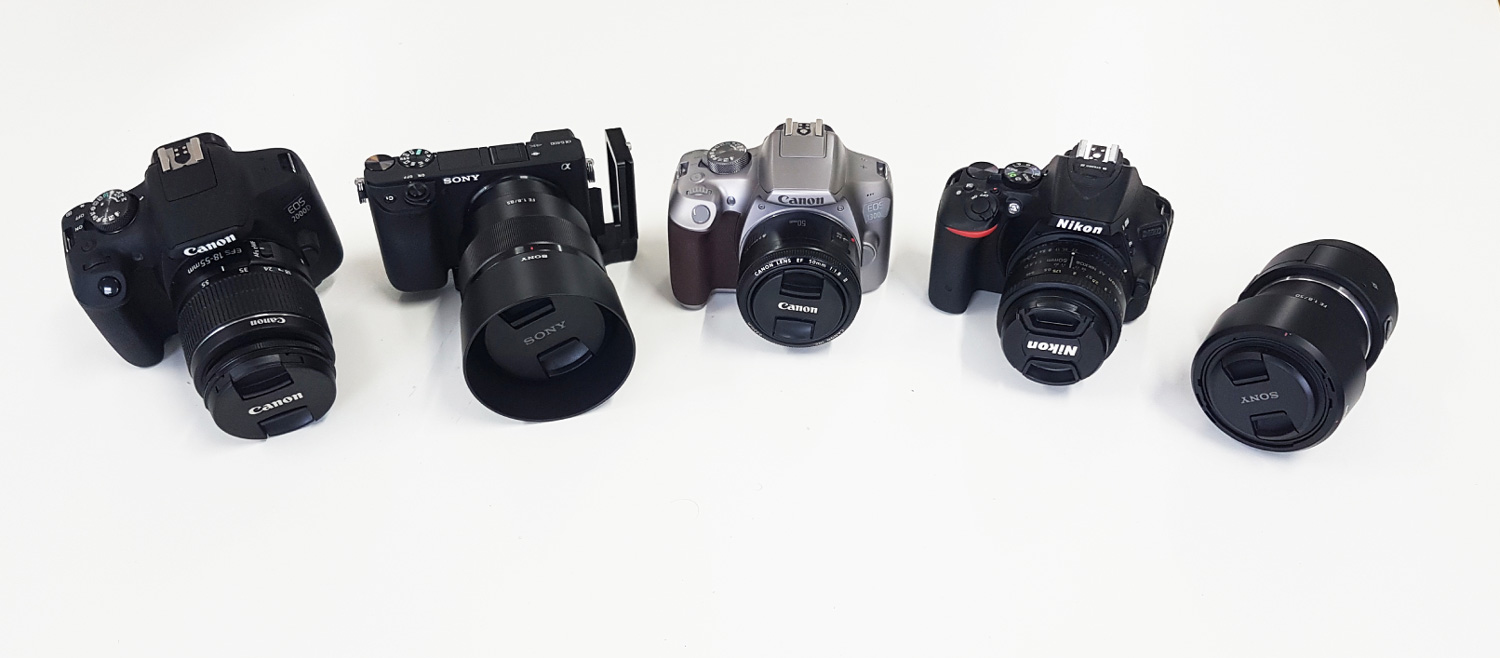
And if you are serious about bullet time then you will want to use a DSLR or mirrorless camera.
That’s because you’ll need a piece of hardware that offers features and settings, produces quality photos, is designed to sync with other cameras and flashes, and is capable of remote capturing.
So, when selecting the best camera for a camera array there are three important factors to keep in mind:
First, compatibility. Not all cameras are recommended for use in multi-camera arrays as some cannot be triggered remotely.
Second is the price. The camera in your array will likely be your main expense so you need to choose your model wisely as the price scales with each camera.
Third is the size. Transporting the whole setup to different locations could be affected by the weight and dimensions of all the cameras.
To make your decision easier, we’ve collected data from over 1,600 multi-camera users.
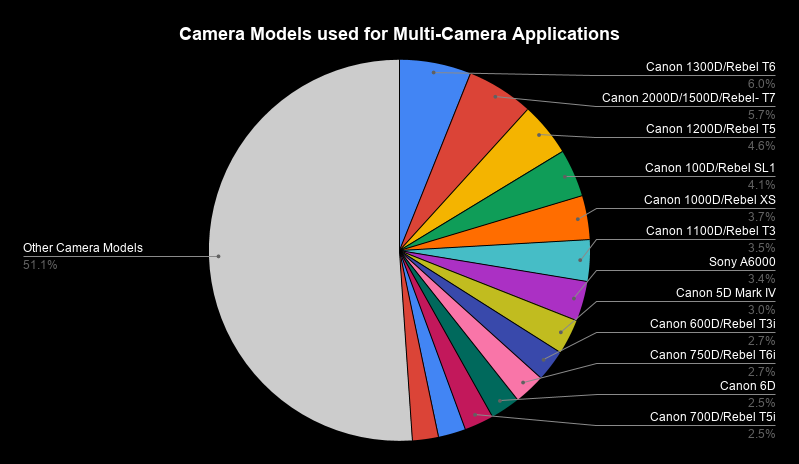
Photo booth multi-camera software packages mainly support Canon cameras, which explains their popularity. However, other camera models are still being used in multi-camera arrays, albeit usually for other applications.
For now, let’s focus on the three most popular camera models commonly used in bullet time camera arrays:
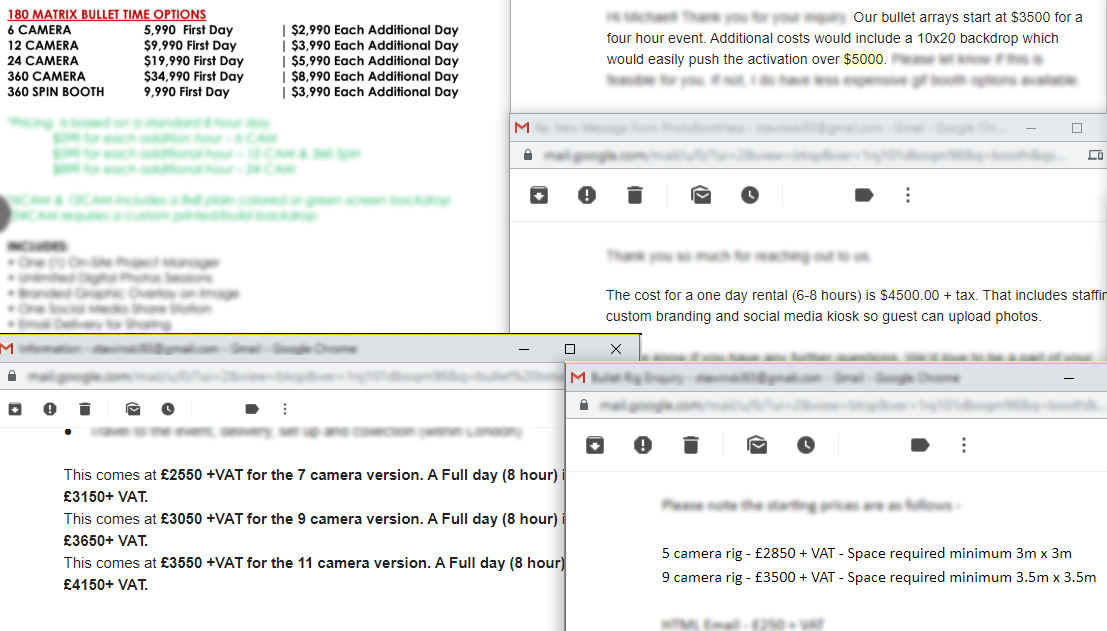
| CANON 1300D (T6) | CANON 200D (SL2) | CANON 2000D (T7) | |
|---|---|---|---|
 |
 |
 |
|
| Amazon Price | ~$419 | ~$549 | ~$449 |
| Resolution | 18 MP | 24 MP | 24 MP |
| Release Date | Mar, 2016 | Jun, 2017 | Feb, 2018 |
| Remote Control | Yes | Yes | Yes |
| DC-Coupler Compatible | Yes | Yes | Yes |
| Weight | 485g | 453g | 475g |
| Dimensions | 129 x 101 x 78 mm | 122 x 93 x 70 mm | 129 x 101 x 78 mm |
In summary, choose the 1300D if your budget is tight. Note that it’s an old camera which may not be available in every country. Therefore the 2000D is a newly-released alternative with a better resolution. Go for the 200D if you’re looking for a compact camera with mirror lockup function for more accurate triggering.
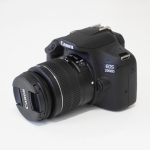
Camera Lenses
There are also a lot of lenses to choose from, but not all are suitable for bullet time event photography.
Your cameras have to capture the subject in mid-motion. In addition, the lens needs to be suitable for group shoots from a relatively short distance, as space for the setup could be limited.
A kit lens is a common choice for camera arrays as it performs its job relatively well. For example the EF-S 18-55mm kit lens should equip you with enough flexibility to perform in most situations.
If you want to make your setup more compact upgrading to an EF-S 24mm f/2.8 pancake lens is also a good option.
Kit lens:
- Cheap – comes with the camera
- Flexible zoom
- Average quality and sharpness
- Takes more time to calibrate as any difference in zoom can create jumpy pictures
Pancake lens:
- More compact and lighter
- Easier to calibrate
- Better aperture
- More expensive
Lighting
Source: Mammoth
A game-changing component in every camera array.
Extra lighting will ensure your setup performs well under different environmental conditions. It will also have a significant impact on the quality of the final results.
Lighting needs to be powerful enough so that it reaches your subjects, otherwise it could create a shadow on the backdrop behind them.
First you’ll need to decide between strobe or continuous lighting.
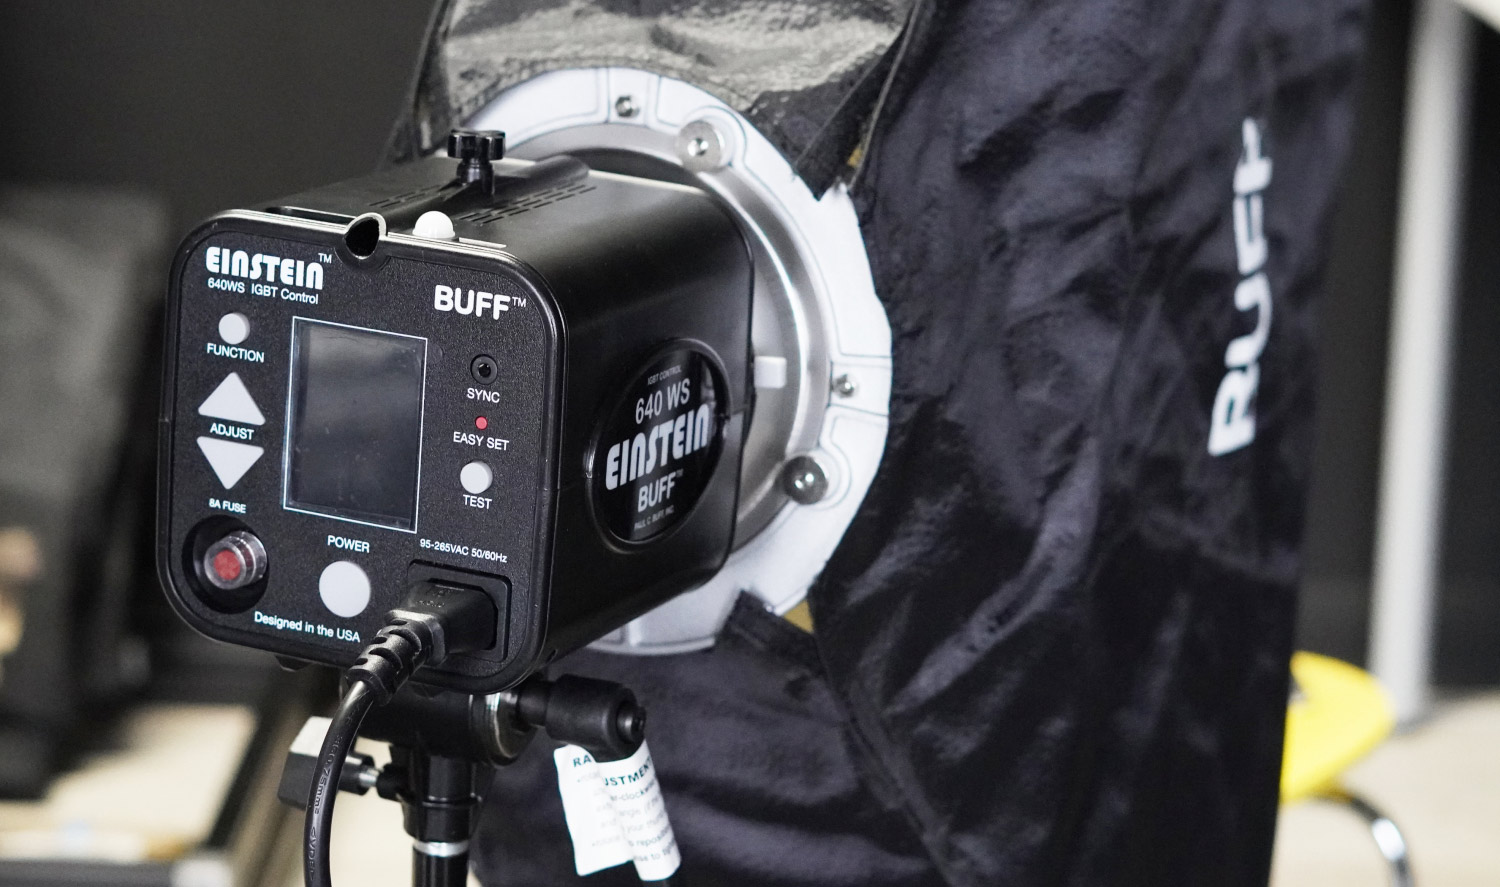
For bullet time photography you may want to go for strobe.
You need the results to be sharp even when subjects are jumping in the air and flash is perfect at freezing action. It distributes the light a lot better and is powerful enough to fill in the uneven light. Also the strobe won’t be shining in the subjects’ eyes all the time. Lastly, it can be controlled and triggered by a multi-camera software solution for the best results.
“Since I come from a photography background, I wanted to use two photography strobes. One for a face light and one for a hair light to make our 3D photos really pop. Quality is one of the most important things to me.”
BILL HAMWAY | MAMMOTH BOOTH
As for continuous lighting, this is still used by some bullet time booths. Continuous lighting is a lot easier to use as what you see is what you get. However it is not as powerful as strobe at freezing the motion, meaning the subject could be blurry especially when using light painting techniques.
For more information on which lighting to use check out the Constant Lights vs Strobes, Working with continuous light and 4 ways to combine flashes and bullet time articles.
Here are a few stunning examples by Eric Paré on how to combine flash and bullet time.


Multi-Camera Triggering Solutions
When it comes to triggering multiple cameras you’ll need a solution that will not fail you in the middle of an event.
There are several options available that would allow you to trigger multiple cameras at the same time.
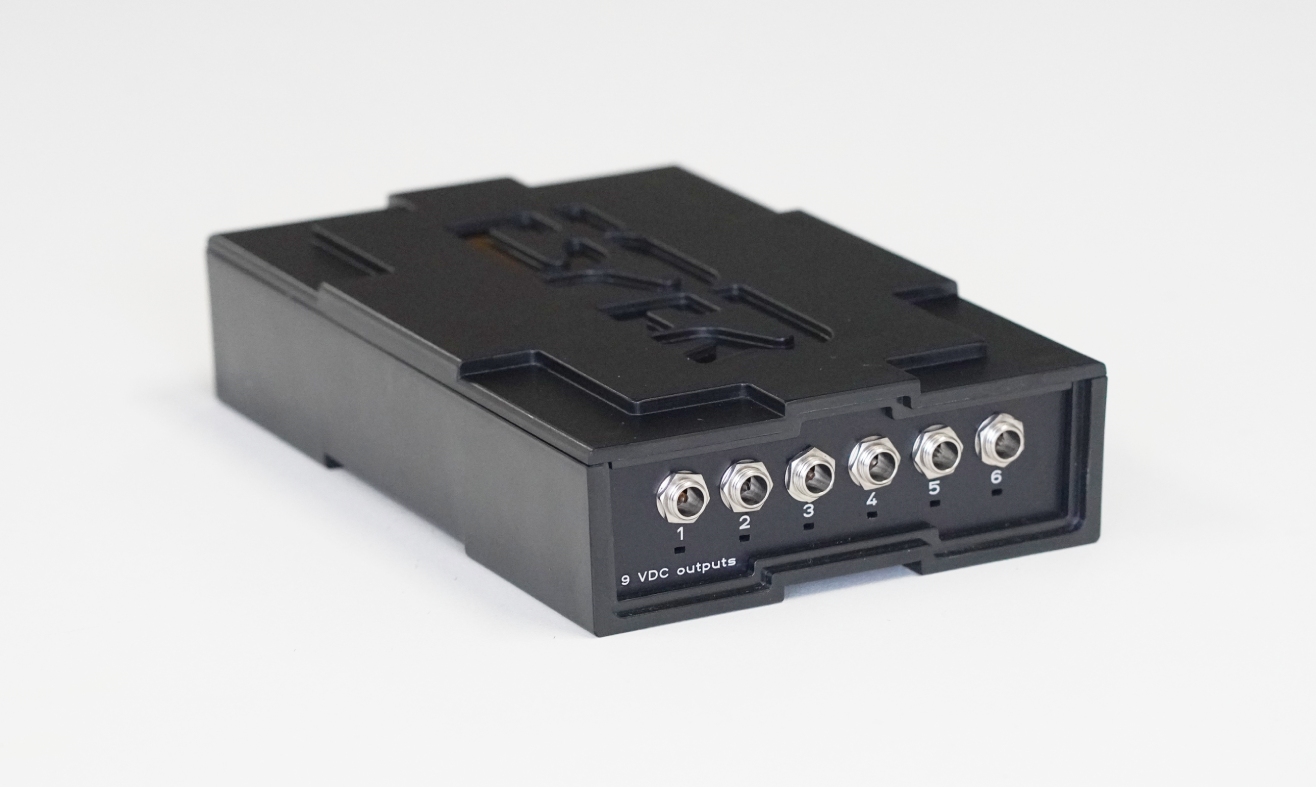
TriggerBox
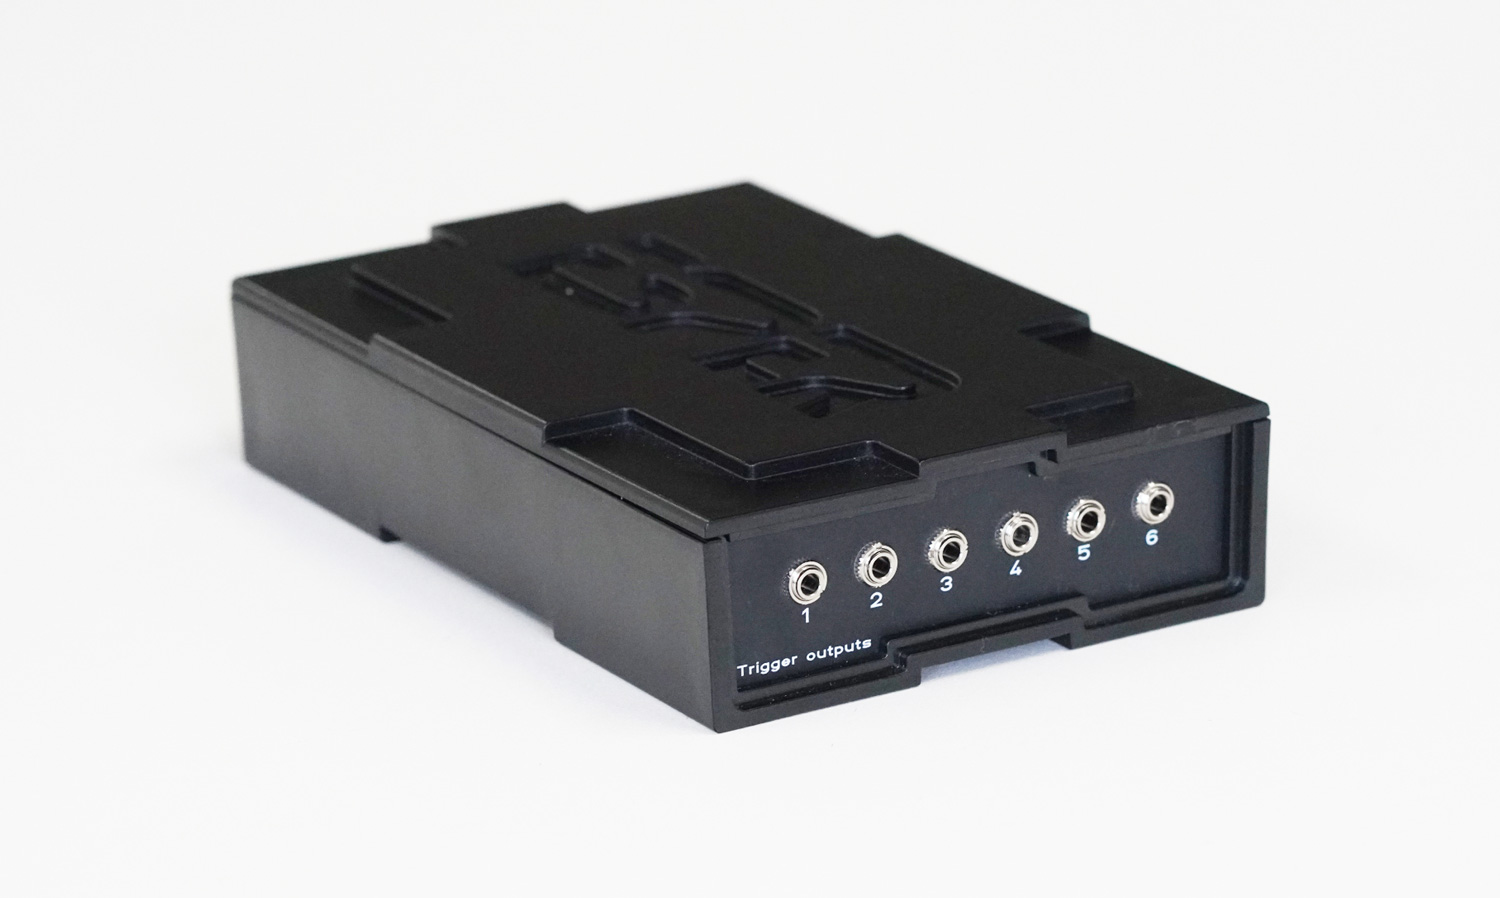
A precise and reliable way to trigger multiple cameras by using the camera’s remote release connection. It is also capable of firing the flash by using software that can programme the output and controls via a computer.
Up to six cameras can be connected to the TriggerBox and be triggered using the 3.5mm jack wired remote output. Multiple TriggerBoxes can be daisy-chained together to synchronise an unlimited number of cameras.
The most accurate sync and triggering method over other methods; many multi-camera owners switch to TriggerBoxes after using previous methods and build home-brewed systems to ensure reliability.
“We originally soldered a homemade multi camera trigger box to control the cameras; however, this proved troublesome as the lighting was difficult to control and the system would misfire 40% of the time.”
STEPHEN JAMES | SOPRO STUDIOS
TriggerBox has two trigger modes of operation. The Green Mode works as a straight trigger. The Blue Mode, however, allows individual outputs to be delayed and programmed. It’s also perfect when using flash as it allows you to control it remotely and synchronise it with cameras.
USB Cables
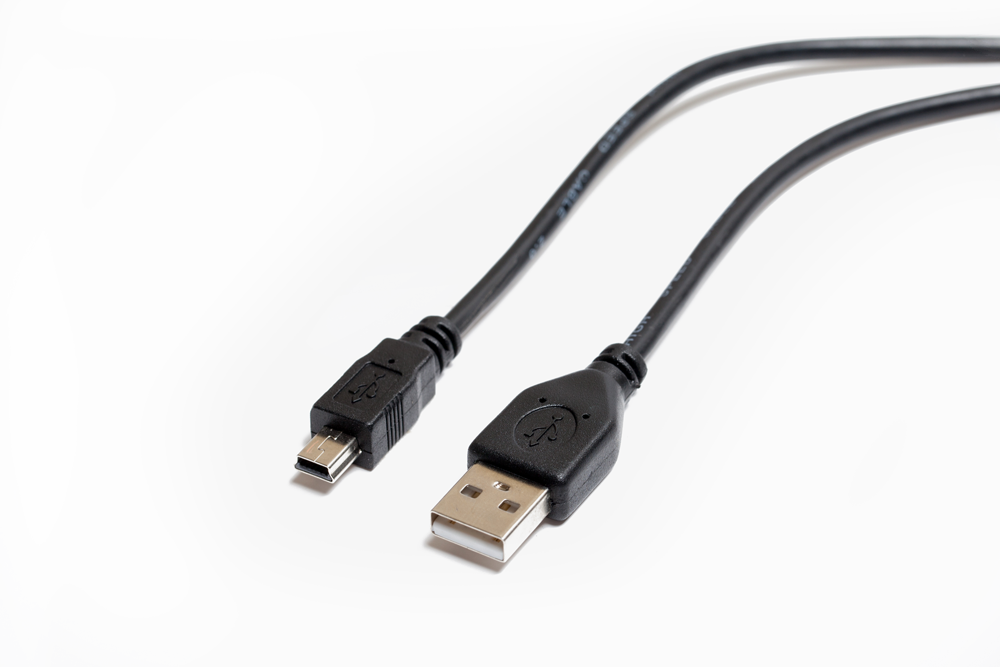
Simple to use and a cheap solution that can trigger multiple cameras.
However when connecting many cameras using a USB connection this starts to be less accurate and less reliable. This method introduces a delay between the cameras which is caused by the cameras communicating in sequence.
“Multiple cameras connected to a single computer can be triggered via the USB connection to each camera but there will be a delay of approximately 1/10 second between each camera taking a photo. For larger arrays of cameras and more accurate synchronization (to within a few milliseconds) it is necessary to trigger the cameras via their remote release sockets.”
BREEZE SYSTEMS
Depending on how many cameras you are using, the more cameras in the array the bigger the delays that could occur.
Firing most DSLRs via a remote USB control results in fairly inconsistent timing, especially when you are using a lot of cameras at the same time.
Wireless Trigger
This is another alternative method for triggering multiple cameras but it can also be problematic for bullet time applications.
Wireless triggers can create different delays as the signal can be interfered with by other ration signals, especially if many wireless triggers are used at the same time. In addition, the sync speed isn’t always the same which is not ideal for bullet time or multi-camera long-exposure shots.
“Using wireless triggers was terrible. They didn’t have any image calibration. Their triggering systems were sporadic, it would work sometimes and it wouldn’t sometimes and when you’re doing events, you needed it to work 100% of the time.”
BILL HAMWAY | MAMMOTH
Multi-Camera Software
Multi-camera software has its own crucial role to play in every bullet time booth.
You’ll need software to control your camera’s settings remotely such as exposure, ISO, aperture etc. But also to automatically download images from all the cameras at the same time and to process them into a final GIF or video which then will be shared by your guests.
There are currently two well-known software solutions for photo booth use which work with Canon (and some Nikon) cameras and that run on the Windows OS.
Breeze Systems – Software to control multiple Canon SLRs from a single PC running Windows. Designed for movie special effects such as bullet time, stereo video capture, product shots and other specialist applications requiring multiple cameras. Offers excellent support and is licensed per number of cameras.
Xangle Camera Server – A set of software created to run a complete multi-camera system: connect, control, trigger, calibrate, preview, publish, share. Compatible with most Canon entry-level DSLRs it works on PCs running Windows. Different license subscription packages are available.
There is also another piece of software which you may need to use with the TriggerBox hardware:
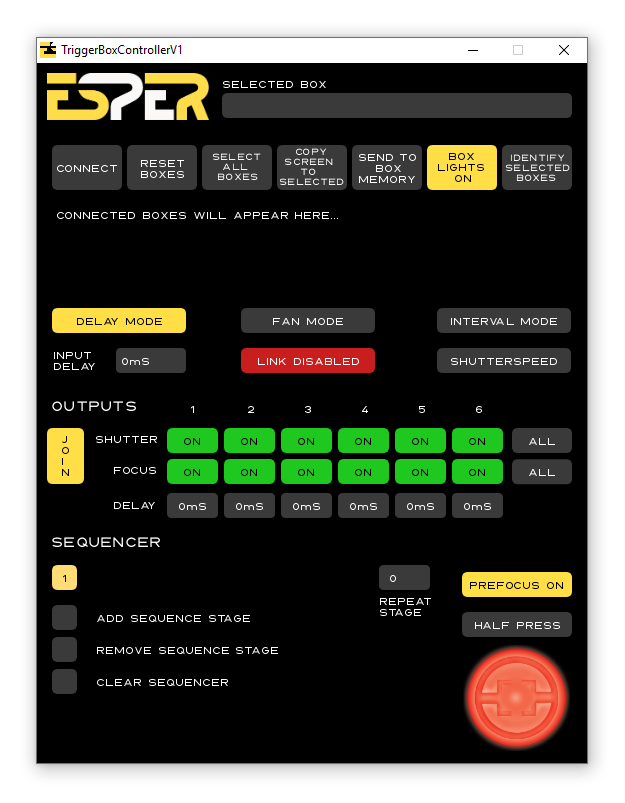
TriggerBoxController – free software that comes bundled with the TriggerBox. It can be programmed to fire all the cameras simultaneously and assign delays etc. However, it doesn’t handle anything to do with the images which is why you will need one of the above third party solutions.
PC
The brains behind it all.
The computer you choose will impact on how quickly your images are processed etc. So the better the machine the quicker the images will, for example, be processed. You don’t want to arrive at an event and be slowed down by the things that connect everything in your setup.
Windows 10 is a typical choice as it is compatible with both multi-camera software packages, unlike Mac or Linux.
In terms of specs you’ll want to consider hardware with at least 8GB ram memory, a higher performance CPU such as i5 or i7 and enough storage to hold at least 256GB of photos and videos from an event.
Remote trigger
You’ll also need a remote trigger to fire all the cameras at once and create the bullet time effect.
There are 3 common methods:
PC – you can fire all of the cameras from your PC but this will require using a USB hub connected to a PC and then firing them from the multi-camera software.
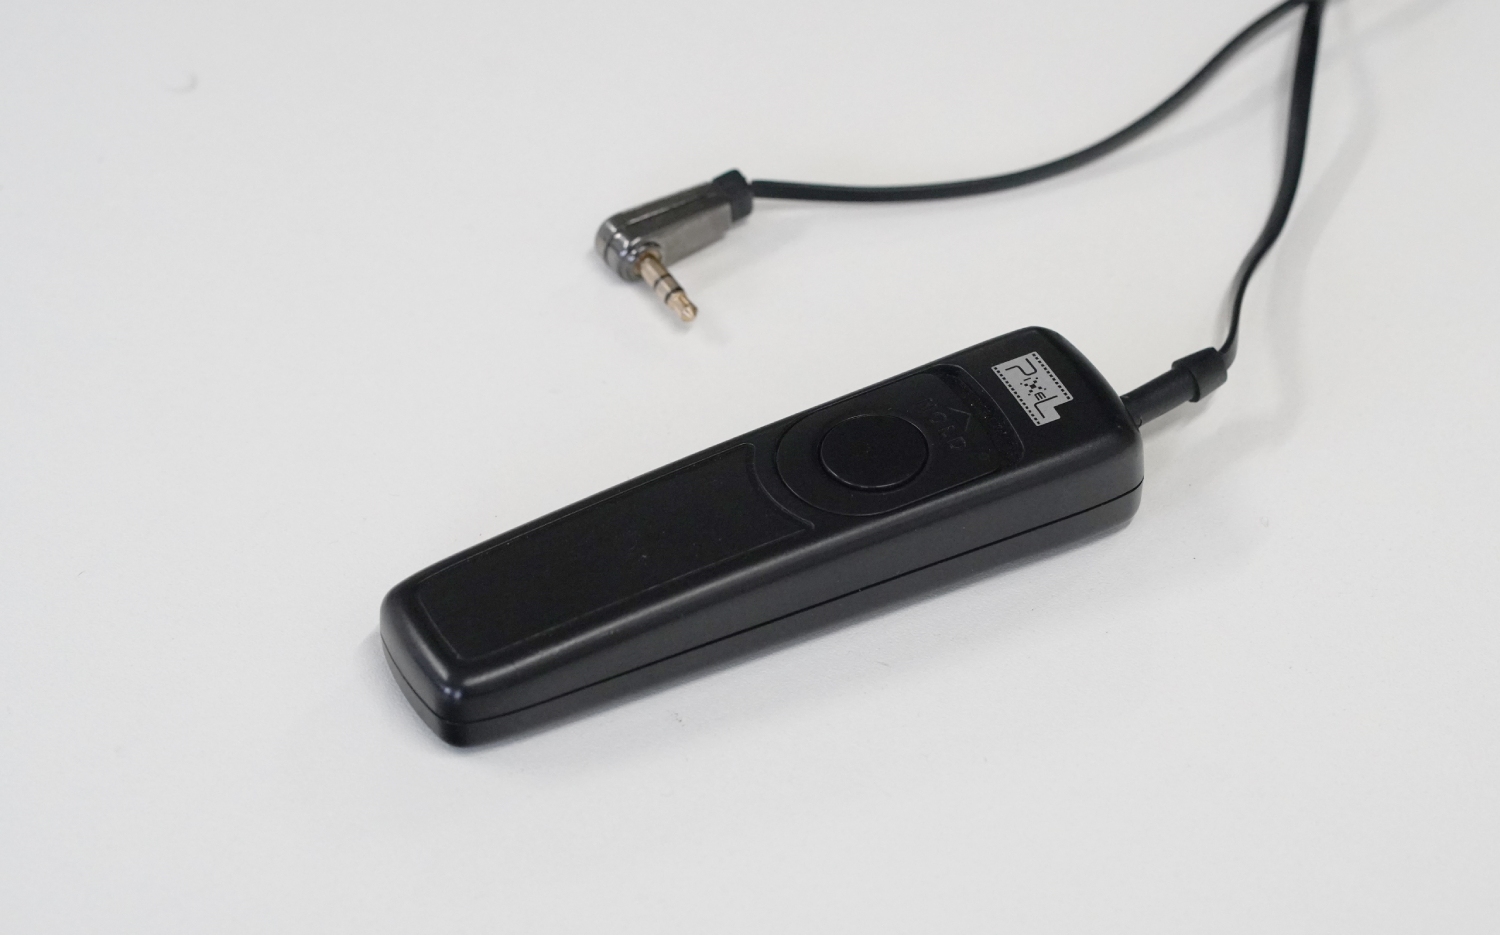
Wired Trigger – prefered option for bullet time use. You’ll need a remote with a 3.5mm jack connected to the TriggerBox such as the Pixel RC-208.
Wireless Trigger – wireless trigger is an option and you will only need one. That will be connected to the TriggerBox output via a 3.5mm jack.
Multi-Camera Powering Solutions
Make no mistake.
The way you power your cameras will have an impact on the reliability of your camera array and also your efficiency in the long term.
The last thing you want to worry about during an event is swapping out several dead camera batteries in your array or having a problem with one camera failing to power.
When it comes to powering multi-camera setups there are a few options to consider:
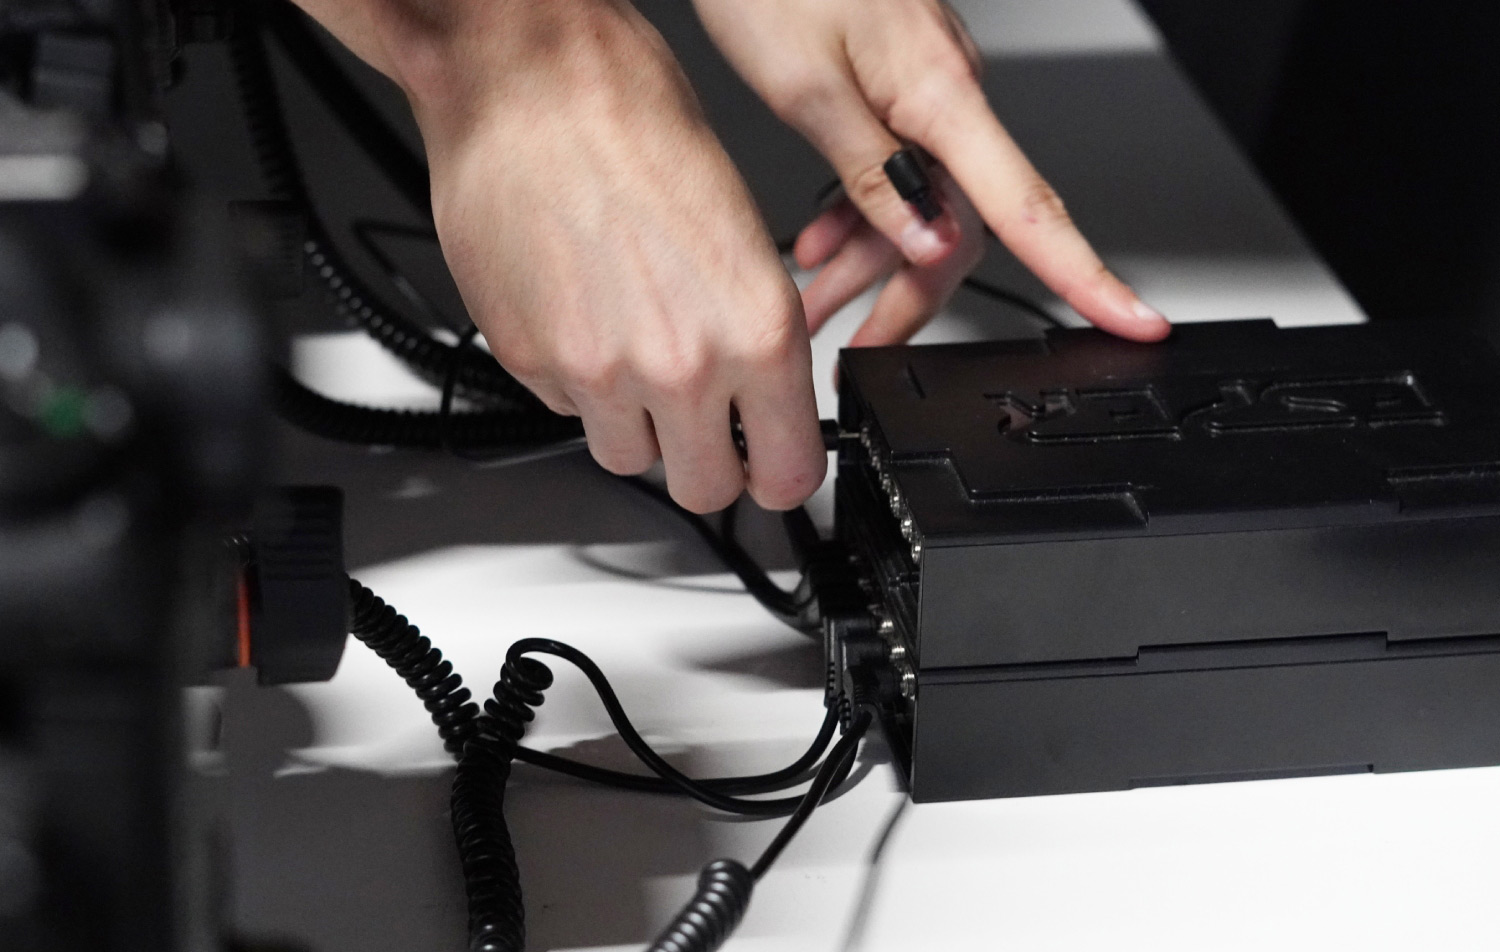
PowerBox
PowerBox is a preferable solution that provides regulated and reliable power for up to 6 cameras from a single outlet for less than the cost of a manufacturer’s AC power adapter.
“We couldn’t survive without the PowerBox products! Esper have been powering up our bullet time rigs for a long time now. We travel with Esper on massive productions around the world to power from 12 to 200 cameras and we can’t really imagine how we could survive without the PowerBox products!”
ERIC PARÉ | XANGLE
PowerBox allows you to save space, rely on a constant power supply and enjoy less mess in your setup. In addition it helps to reduce the set-up time by utilising efficient cable management, while its intelligent trip and reset function makes it easy to reboot cameras.
Battery
Relying on batteries as a sole power source can be very inconvenient in multi-camera setups.
You will find yourself constantly changing batteries that run out of juice as DSLRs can burn through batteries relatively quickly when under continual use.
Another problem with batteries can occur during their replacement. Any slight movement to the camera could break the alignment, meaning they would need to be recalibrated, which could cause issues in the middle of your event.
AC Adapter
An alternative to batteries that provides constant power to your cameras. However, this isn’t very practical when used for multiple cameras as you will need a lot of power outlets (one per camera) and you will end up with a bad case of “cable spaghetti” which could be inconvenient when troubleshooting. They also take up a lot of room in your setup.
AC power adapters can also be unreliable, especially the non-branded ones that can power off your camera after taking a shot. In addition, using non-branded power adapters can put your cameras at risk of being damaged due to an unregulated power source.
“We needed a solution that would get rid of all the power plugs that were causing a mess in the array. Using ESPER PowerBoxes with DC Couplers we can easily and conveniently power all of the cameras and we don’t have to worry about batteries dying ever again.
They also eliminate the risk of false power plugs, ensuring reliable and constant power supply – something a battery can’t do.”
ROLD MOOIBROEK | FOTODOOS
Read this article to learn more about powering up multiple cameras.
List of Other Ancillaries and Equipment
As for the ancillaries, there are a few important elements that will be essential for connecting everything.
Here’s a list of typical equipment and ancillaries used for a 6-camera array:
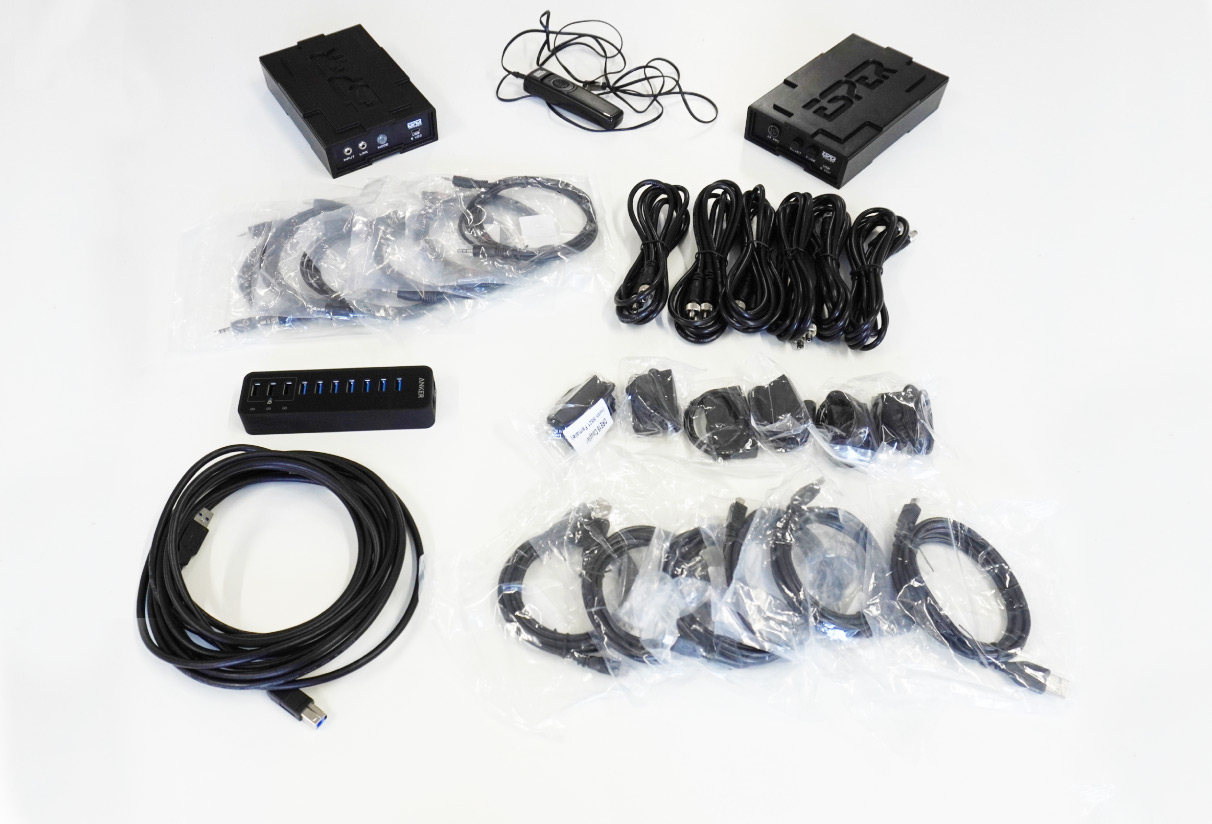
- TriggerBox – used for triggering cameras – one box per 6 cameras
- Trigger cables – used to connect a camera to a TriggerBox – one cable per camera
- USB hub – used for controlling cameras from a PC – one hub per 6 cameras and one PC
- Remote trigger – used for remote triggering the camera array – one per array
- PowerBox – used for powering cameras – one box per 6 cameras
- DC coupler – a dummy battery used to provide a stable and clean power supply from the PowerBox – one cable per camera
- Power extension cables – an extension cable to extend the reach of the DC coupler – one cable per camera
- USB cables – used to transfer the images from your camera to your computer – one cable per camera
Step 3: Setting-up Your Bullet Time Array
Now that you have an understanding of what’s needed for a bullet time setup, it’s time to start putting things together.
In this section, you’ll learn how to position your equipment, connect and power everything and get ready for action.
Let’s do this!
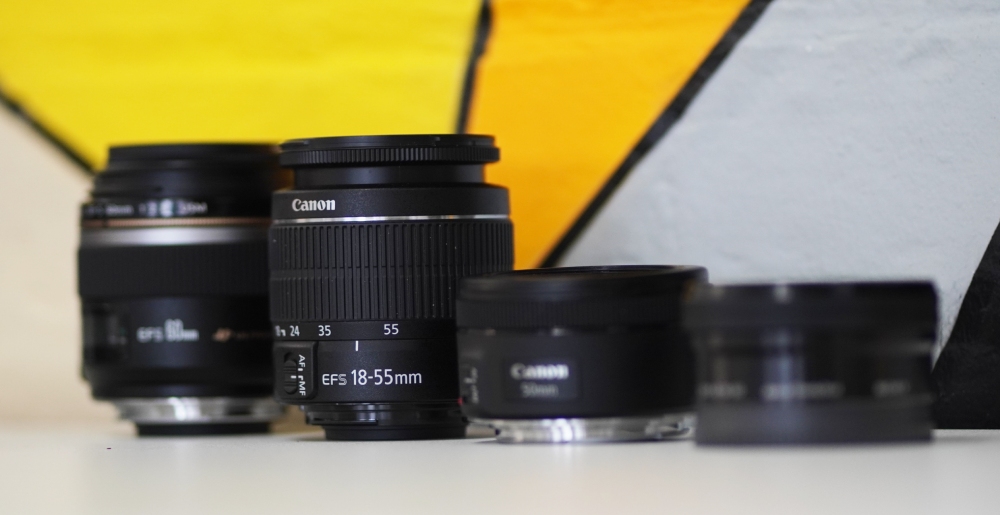
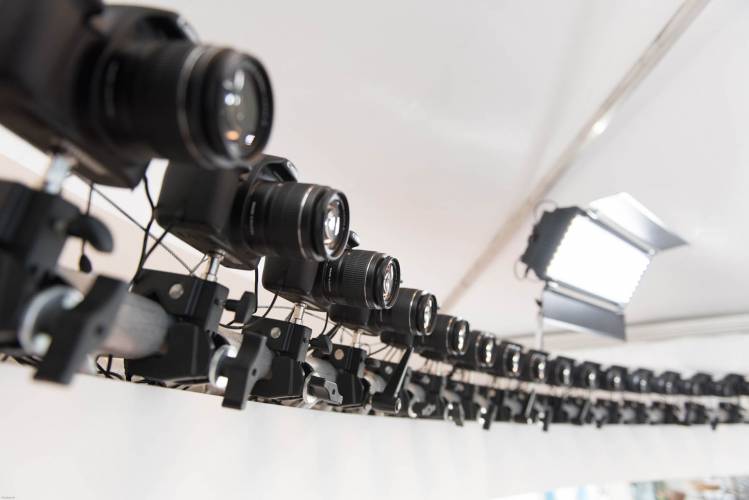
Array Structure
Source: Fotodoos
The first step is getting your structure right to get the desired results
There are premade solution camera array shells which allow you to mount the cameras in place and hide all of the hardware and cables so that they are not visible to the guests and keep your setup tidy.
If you’re planning on a DIY solution, the height of a typical array that will capture the action including people jumping into the air should be around 1.5m.
Cameras should be spaced evenly 15-20cm apart and the array should be positioned 2-3m away from the guests to leave them with plenty of space.
Having an arc shape structure will also improve the final result. It’s possible to use a straight structure but you’ll want to have your cameras rotated internally.
Once you have everything positioned, start adding the cameras to your structure. Mount them using ball heads or clamps on the structure and point them in the rough direction of the area where the subject(s) will be located.
Don’t worry about the alignment just yet, we’ll cover that later.
Light Set-Up
Now for the light.
Your subject needs to be lit from the right angle and distance so that no shadows are created on the backdrop.
You may want to consider using two lights: a key light to shape your subject in the image and a fill light placed on the opposite side of the key light used to fill the shadows created by the first light.
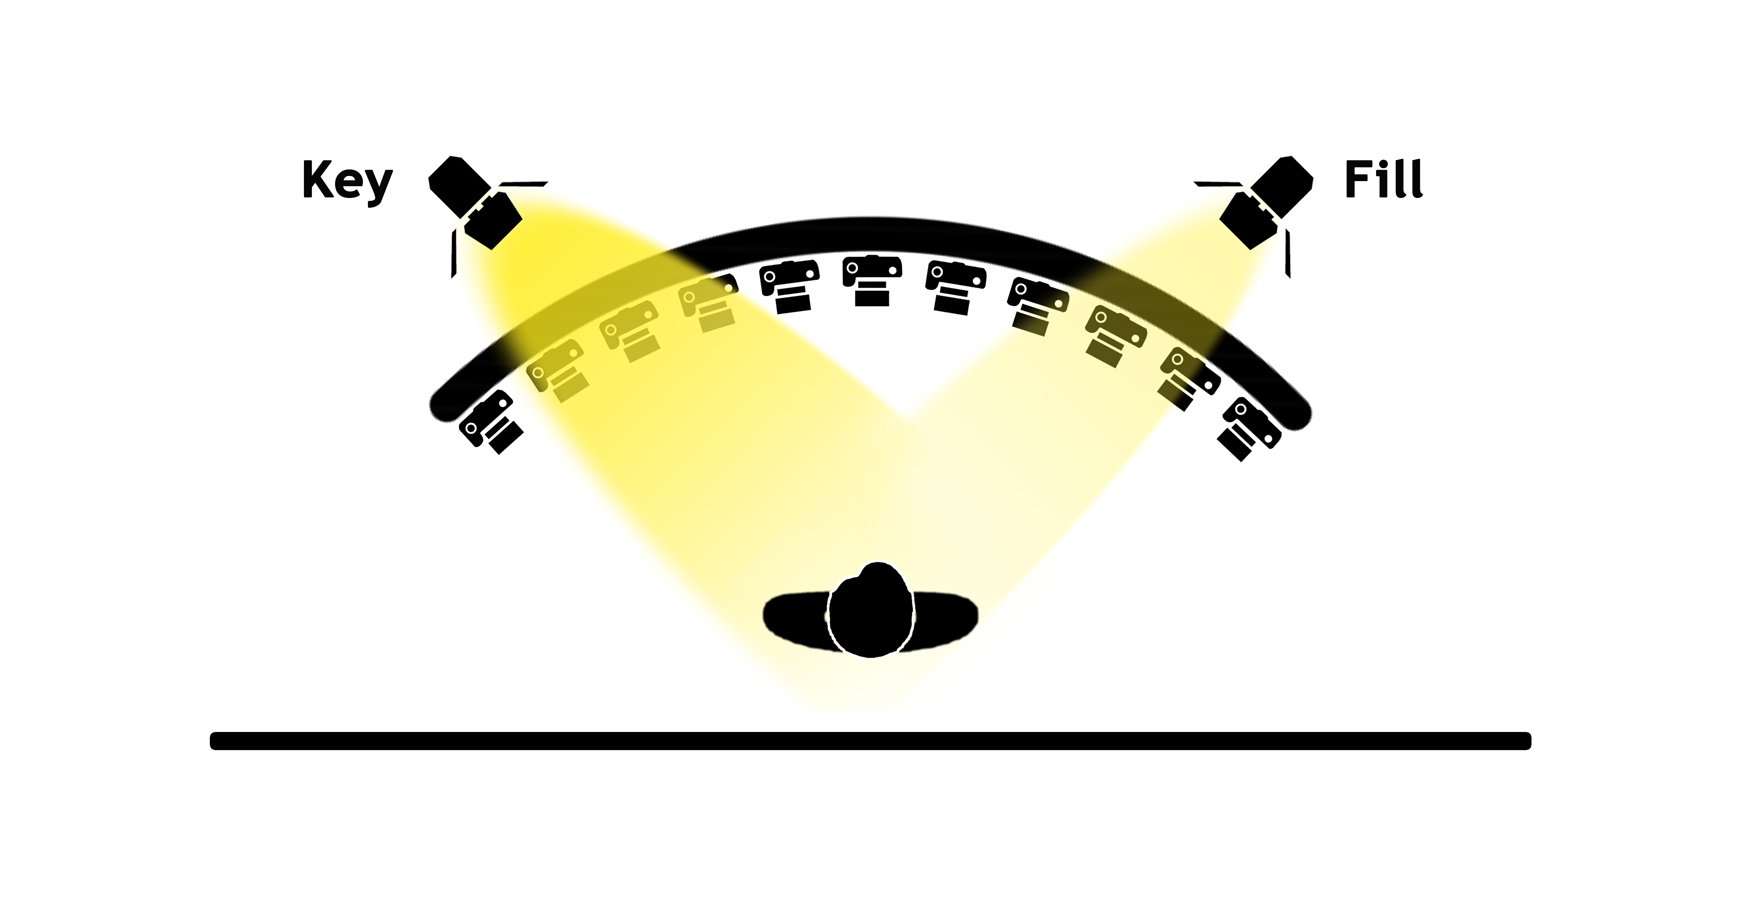
The light needs to be placed beside the camera at an approximately 45-degree angle to the subject in order to light it/them and break any shadows.
This will create a balanced light and make sure the area is well-lit. The right amount of ambient light will make your videos look brighter as there will be light on both the subject and backdrop.
Powering Cameras
Let’s get everything powered up.
The order which you connect triggering cables or power cables doesn’t really matter. However it might be best to start with the power cables as they are a bit bulkier.
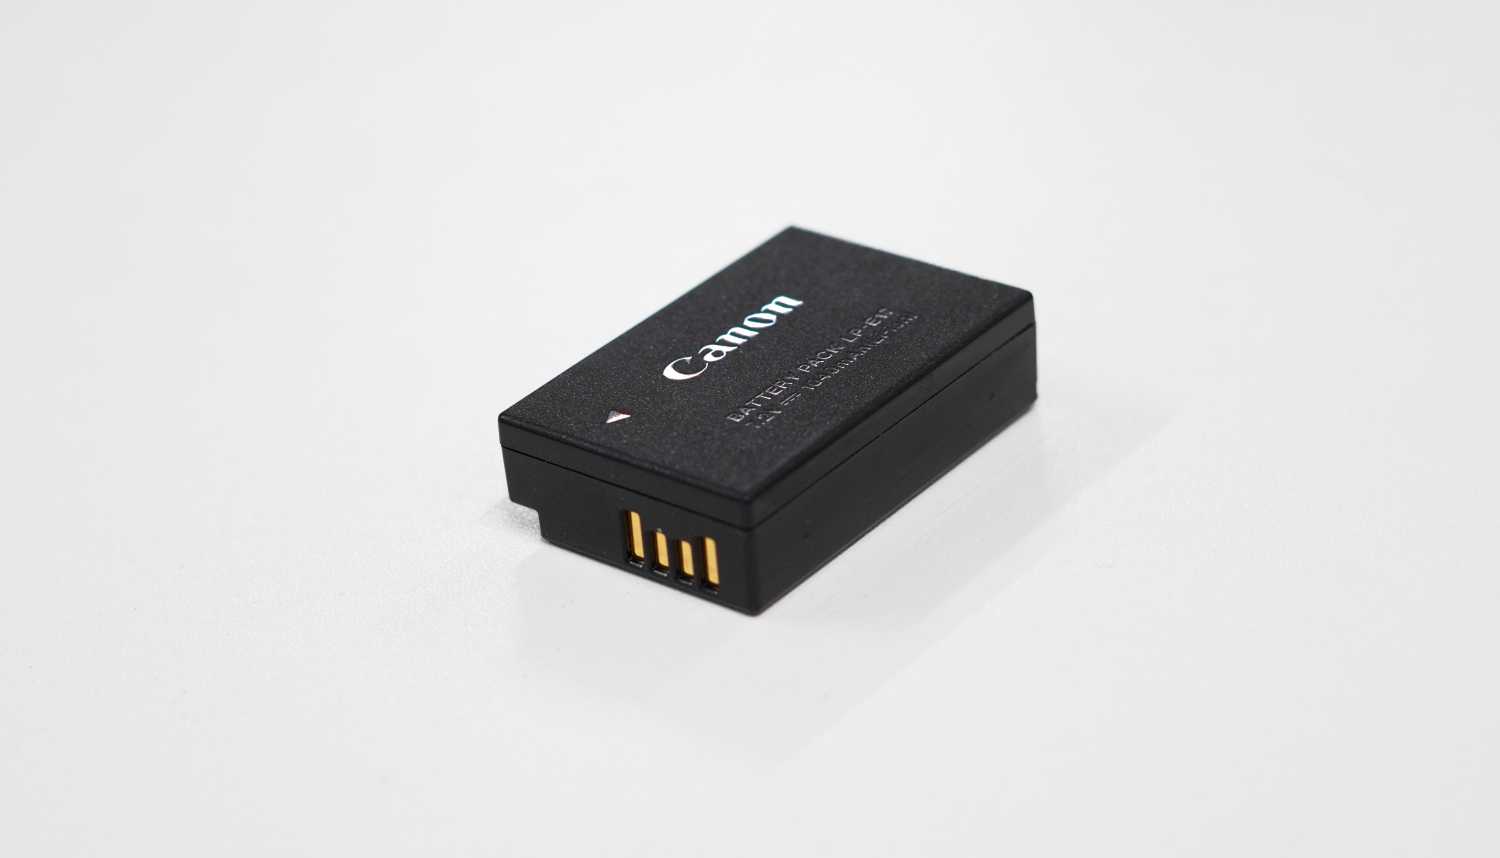
Start by replacing the camera batteries with DC couplers.
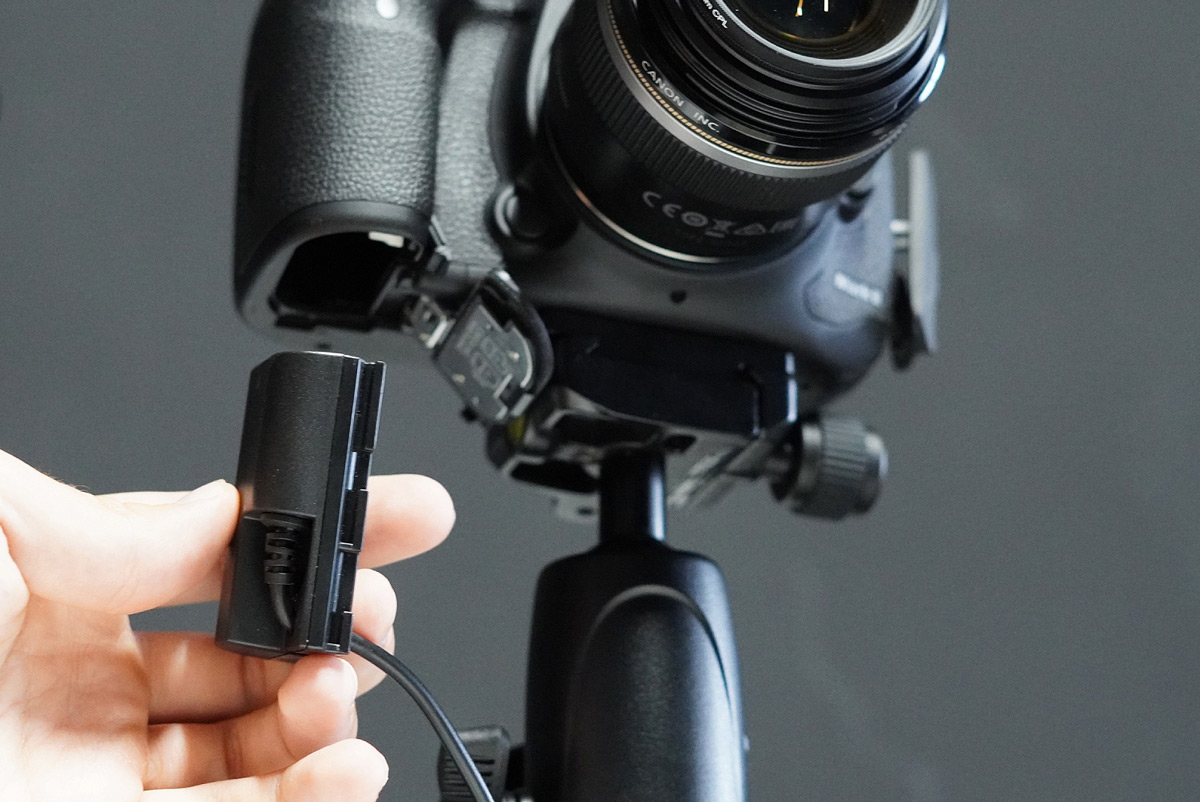
Make sure the door of the camera battery compartment is fully closed otherwise the camera may not power up. If the door won’t close then it could be because the cable is hindering it so you should take the coupler out and fix the cable to the correct position.
Connect the DC coupler to the power extension cable and then to the PowerBox for better cable management and reach.
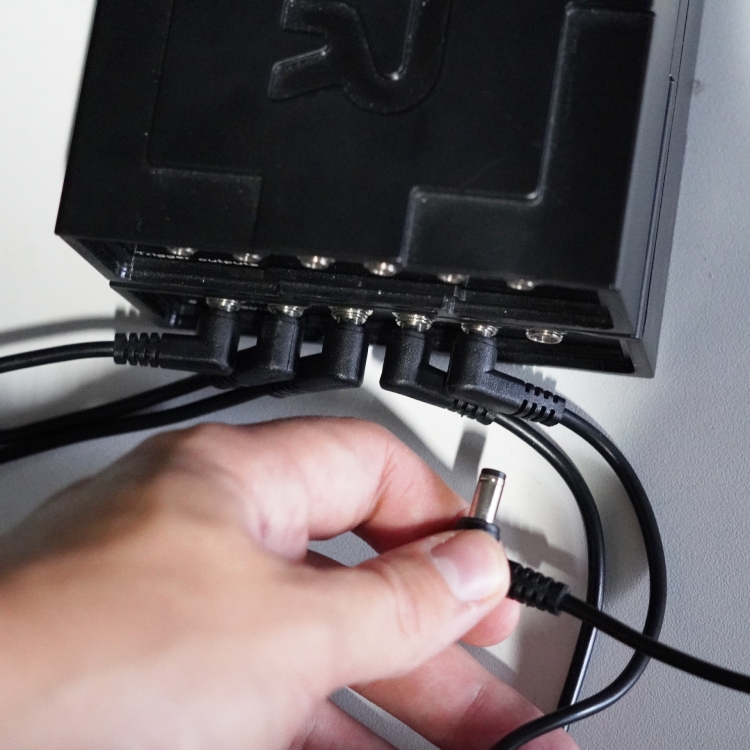
Next connect the flat top power cable to the PowerBox and then connect it to the power outlet.
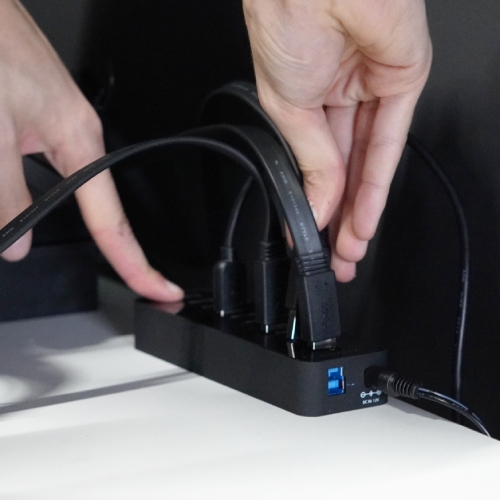
Grab a USB hub, plug it into the wall power outlet and then connect it to your PC.
Stack the TriggerBox on top of the PowerBox, using a USB C to C cable connect it to the USB hub (but not in the hub charging slot). TriggerBox can also be powered using a PC or PowerBox.
Flick the switches!
The camera, TriggerBox, PowerBox and USB hub should light up.
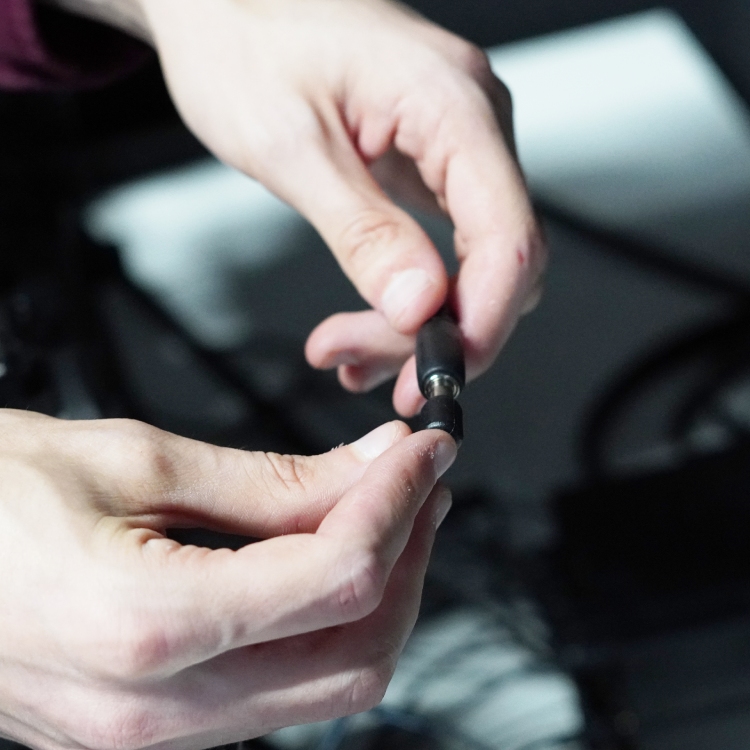
Connecting Cameras
Now you need to connect all of the equipment.
Start with the cameras. Open the flap and locate the port then connect the shutter cable sideways. Note that there are different cable types for specific ports in different camera makes:
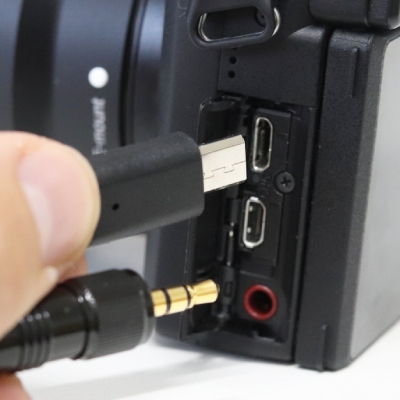

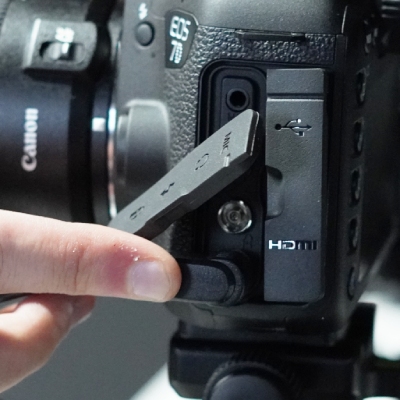
Grab a USB cable, open the flap, locate the port, plug the cable into the camera’s USB port and connect it with the USB hub. Repeat for each camera.

Next take the trigger cables and connect one cable per camera before plugging them into the TriggerBox.
Lastly, connect the remote trigger to the TriggerBox’s INPUT port on its rear. If you’re using multiple TriggerBoxes, you can daisy-chain them using 3.5mm to 3.5mm link cables and LINK ports.
Step 4: Using Multi-Camera Software
Now that everything is connected and powered up you can start using the multi-camera software.
In this section we’re going to touch on the multi-camera software and how to set it up and use it for calibration. We’ll also look at using the correct settings for bullet time shooting and getting everything ready for mastering your first bullet time experience!
We’ve been provided with access to two popular bullet time software packages to show you how to to use them both: Breeze DSLR Pro Multi-Camera and Xangle Camera Server.
Running The Software For The First Time

Once downloaded and installed you’ll need to activate the software. Follow the steps until you see the dashboard.
Here’s how to connect your camera array to specific software:
If you’re using Breeze:
- Turn the cameras on before launching the software.
- The software should automatically connect to the cameras to assign each camera with an order number.
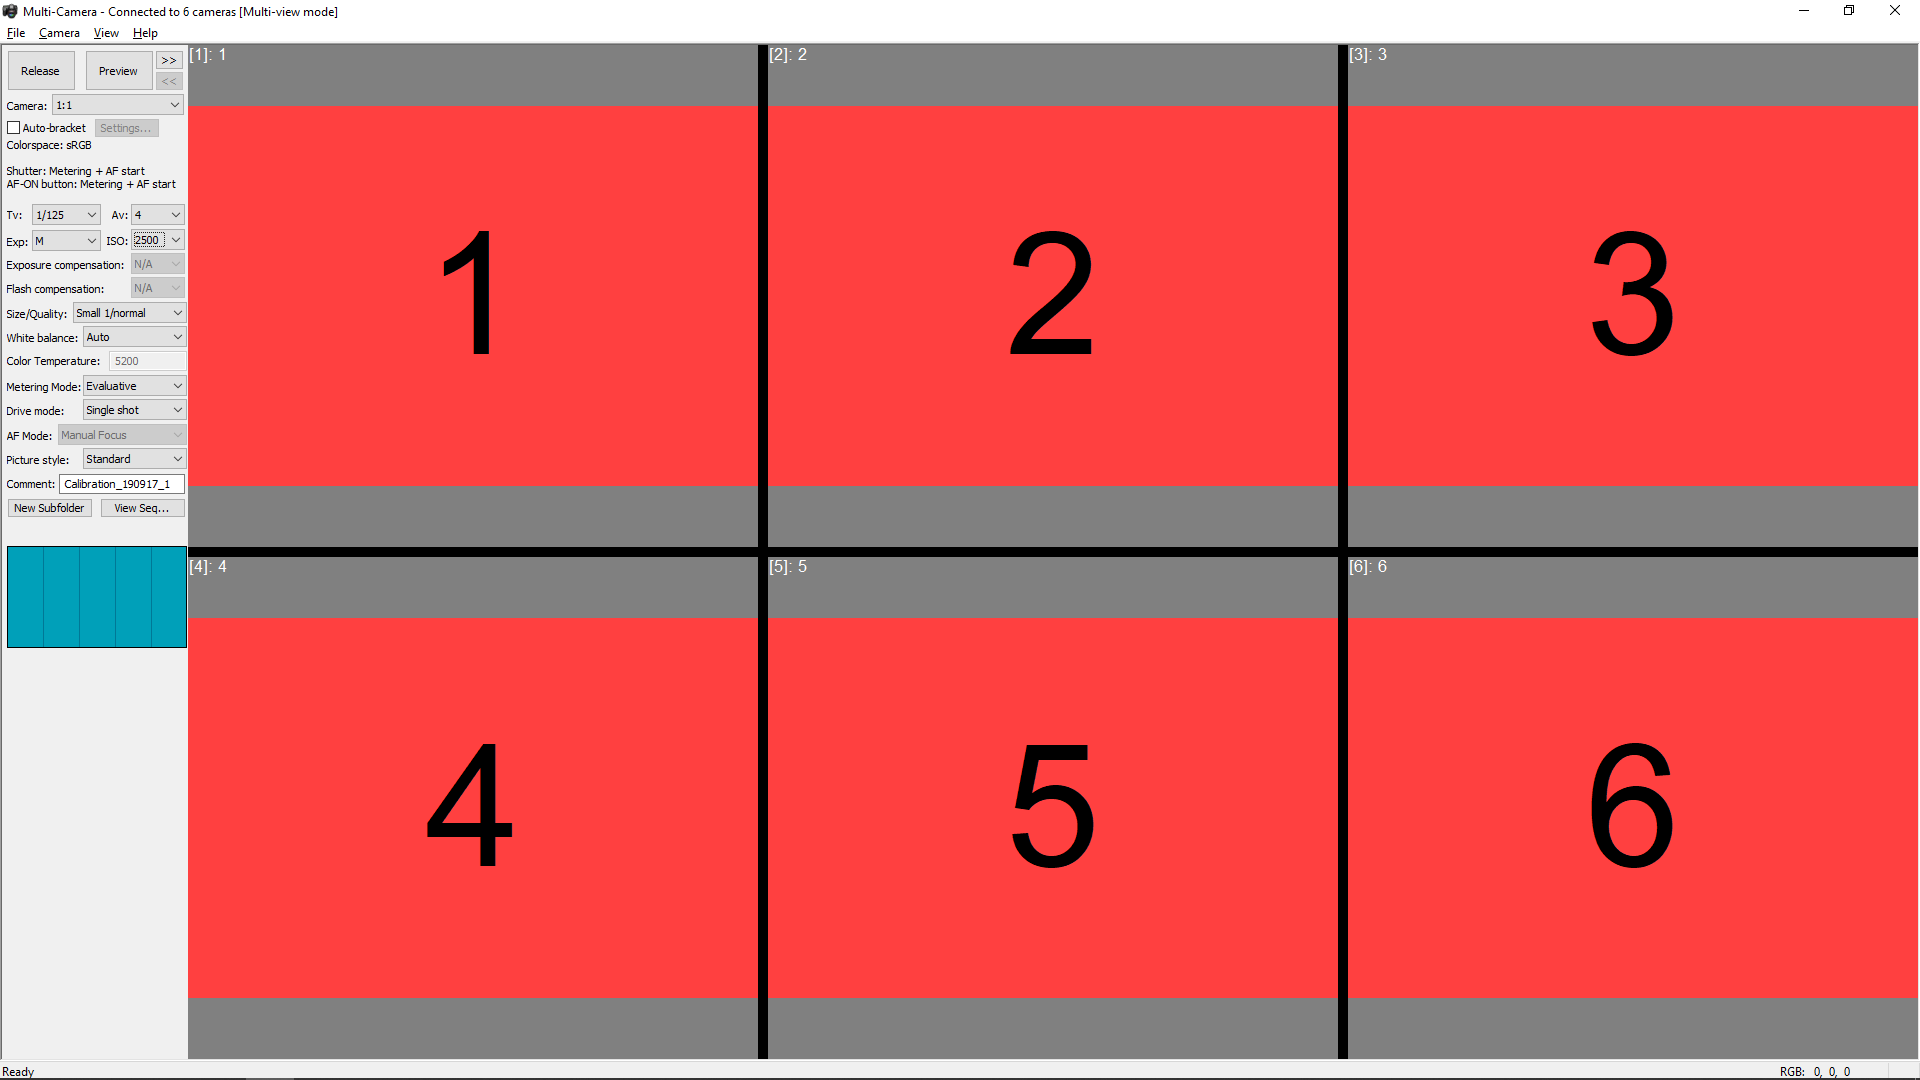
- Name each camera by selecting them from the drop-down list and following these steps: “Camera” > “Edit Camera ID…”. The software will remember your camera sequence the next time you run it.
- Change the trigger mode thus: “File” > “Select Trigger” and then connect to TriggerBox and press OK.
- Go to “Camera” > “Multi Live View” to ensure each camera is correctly labelled.
- Trigger cameras by going to: “File” > “Trigger Setup…” Press the “Connect” button and then “Trigger Cameras” to make sure all the cameras are properly connected and firing.
If you’re using Xangle:
- Make sure all of the cameras are turned off before launching the software.
- Set the number of default cameras.
- Turn the cameras on one by one in order starting with the first to the last. The green colour count in the dashboard will notify you when all cameras are connected.
- Then click on “Automatically Assign Camera Numbers” to save the camera sequence.
- Change the “CONTROL MODE” to TriggerBox.
- Press “Trigger” to activate the cameras and make sure they are all firing.
Multi-Camera Settings
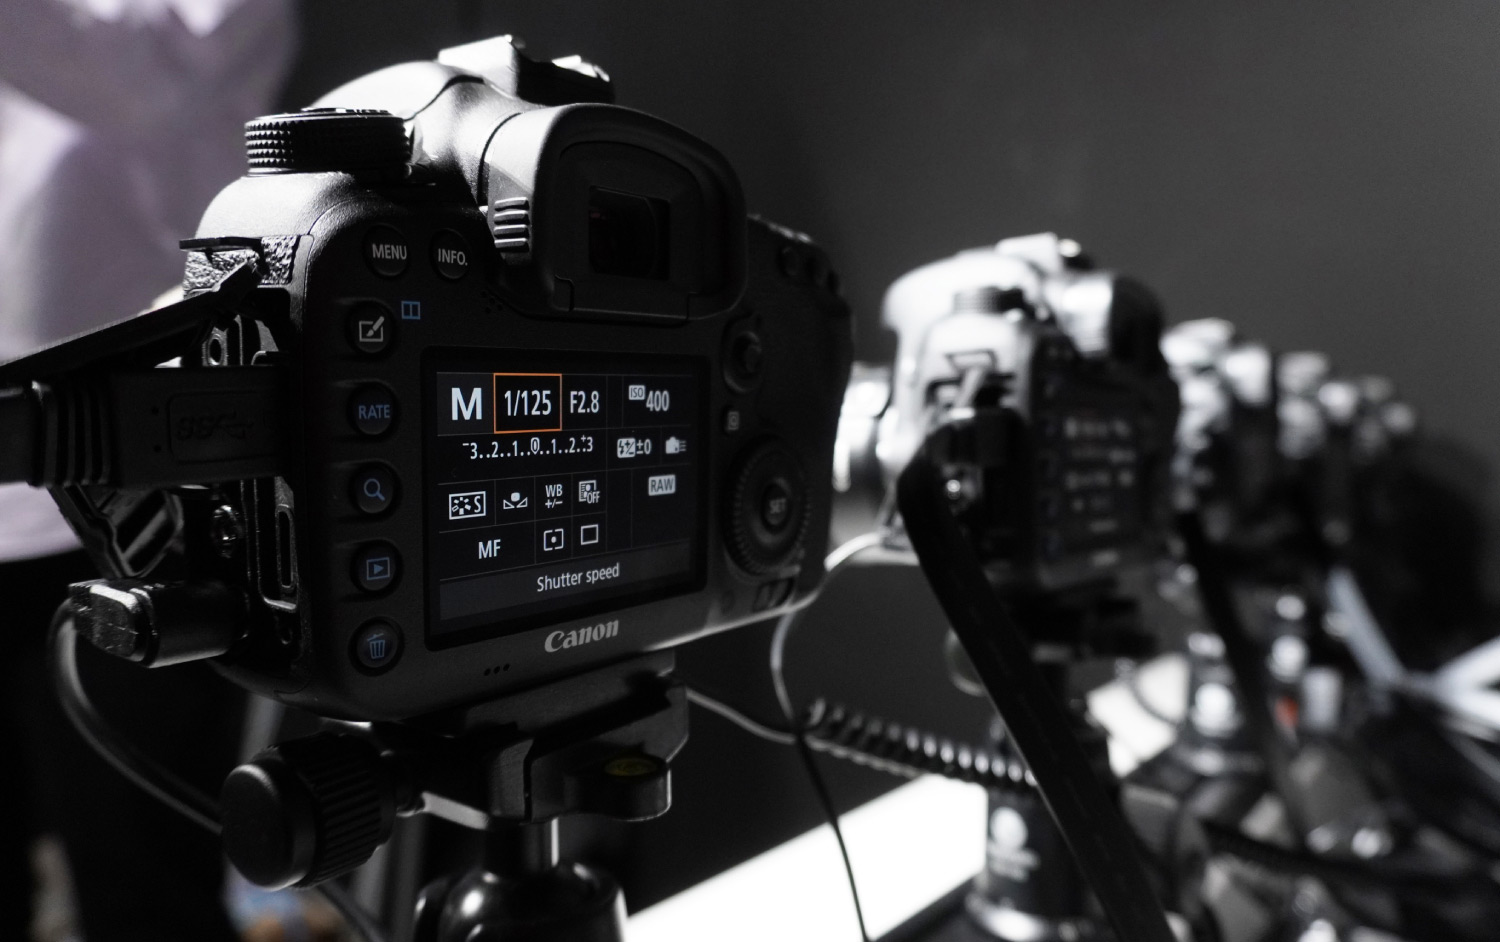
All cameras must be using the same settings so that all the photos are consistent.
You can easily change the camera settings from the software dashboard.
Before you do so, make sure to complete the following things:
- Set all the cameras to Manual Mode.
- Change all the lenses to Manual Focus. You don’t want to use Auto Focus as all the cameras must be focused on the same point and covering all subjects. This also eliminates variable delays created by AF.
- Set the single-shot mode.
- Switch off the auto power-off function to make sure the cameras don’t automatically turn off.
The setting for the multi-camera array will also depend on the environment you are shooting and the flash. All cameras need to have the same exposure and depth of field as this will ensure everything is in focus and set at the right shutter speed to prevent blurriness.
An example of sample camera settings: 1/125, f/14, ISO1600.
Here’s how to apply the settings to all cameras:
Breeze:
Change the settings on the left-hand side of the dashboard.
Xangle:

You can change the setting from the top of the dashboard.
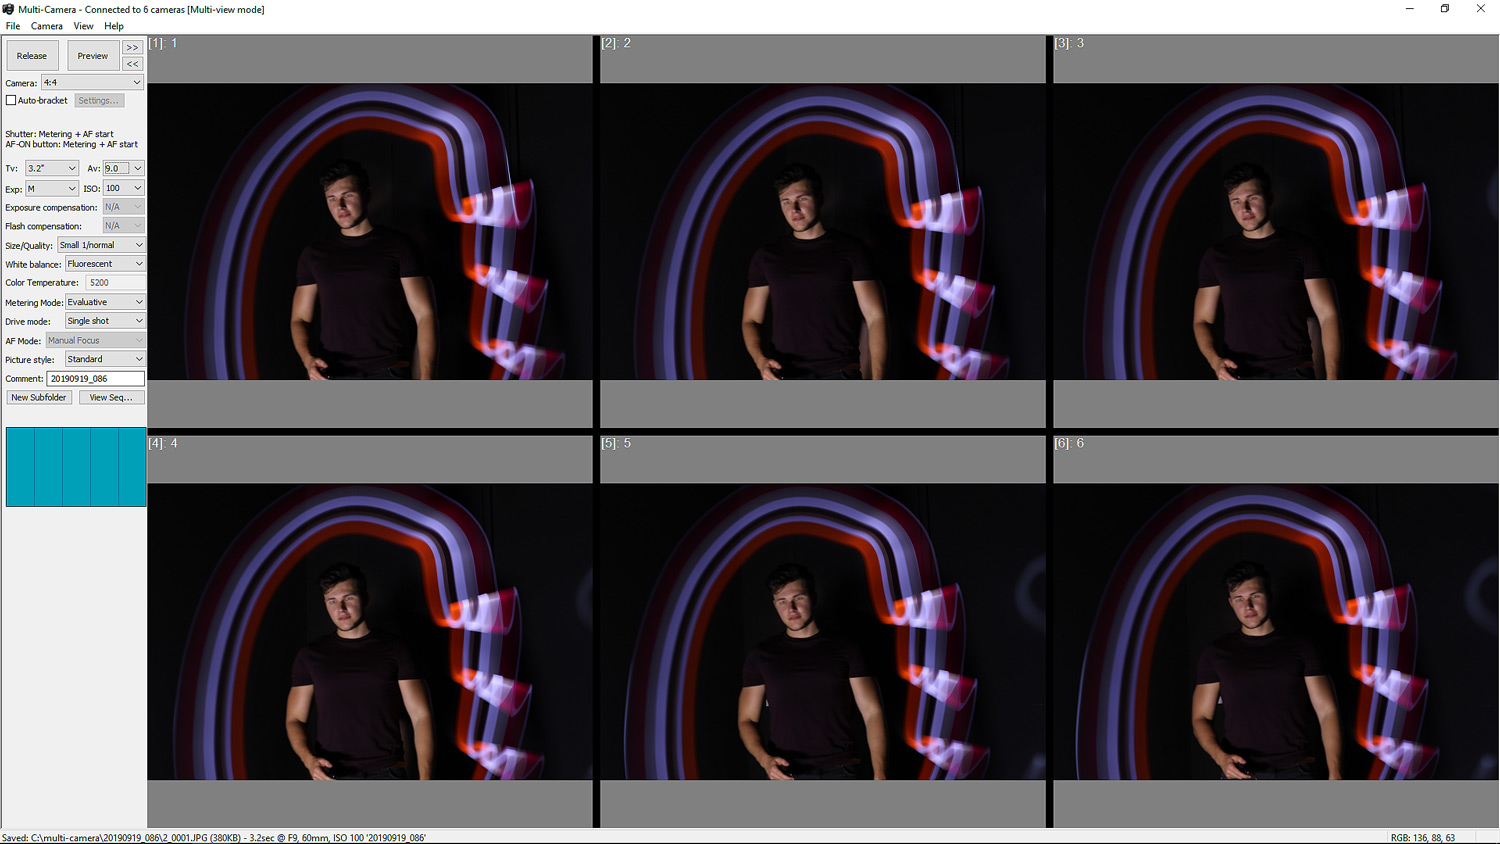
Calibration and Alignment
Proper calibration and alignment will ensure your final results are smooth and look outstanding.
Lack of calibration will create jumpy images.
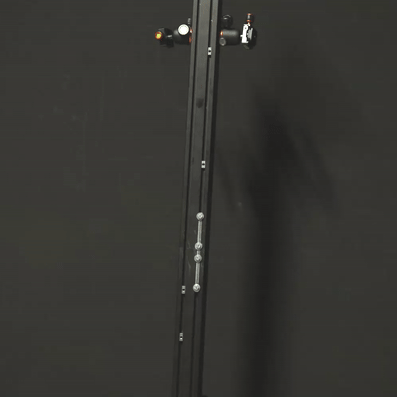
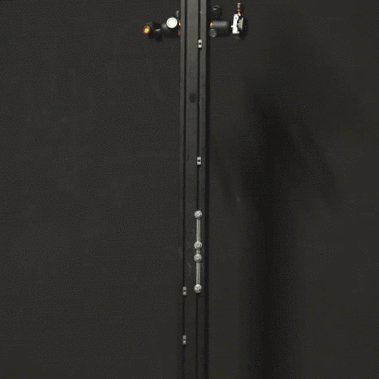
To start, take a calibration bar, a pole or something similar that can be placed in the middle of the space where your subjects will be standing. You’ll also need to fix a target circle or sticky notes on the pole to be used as reference points for alignment and for focusing the cameras.
Breeze Alignment:
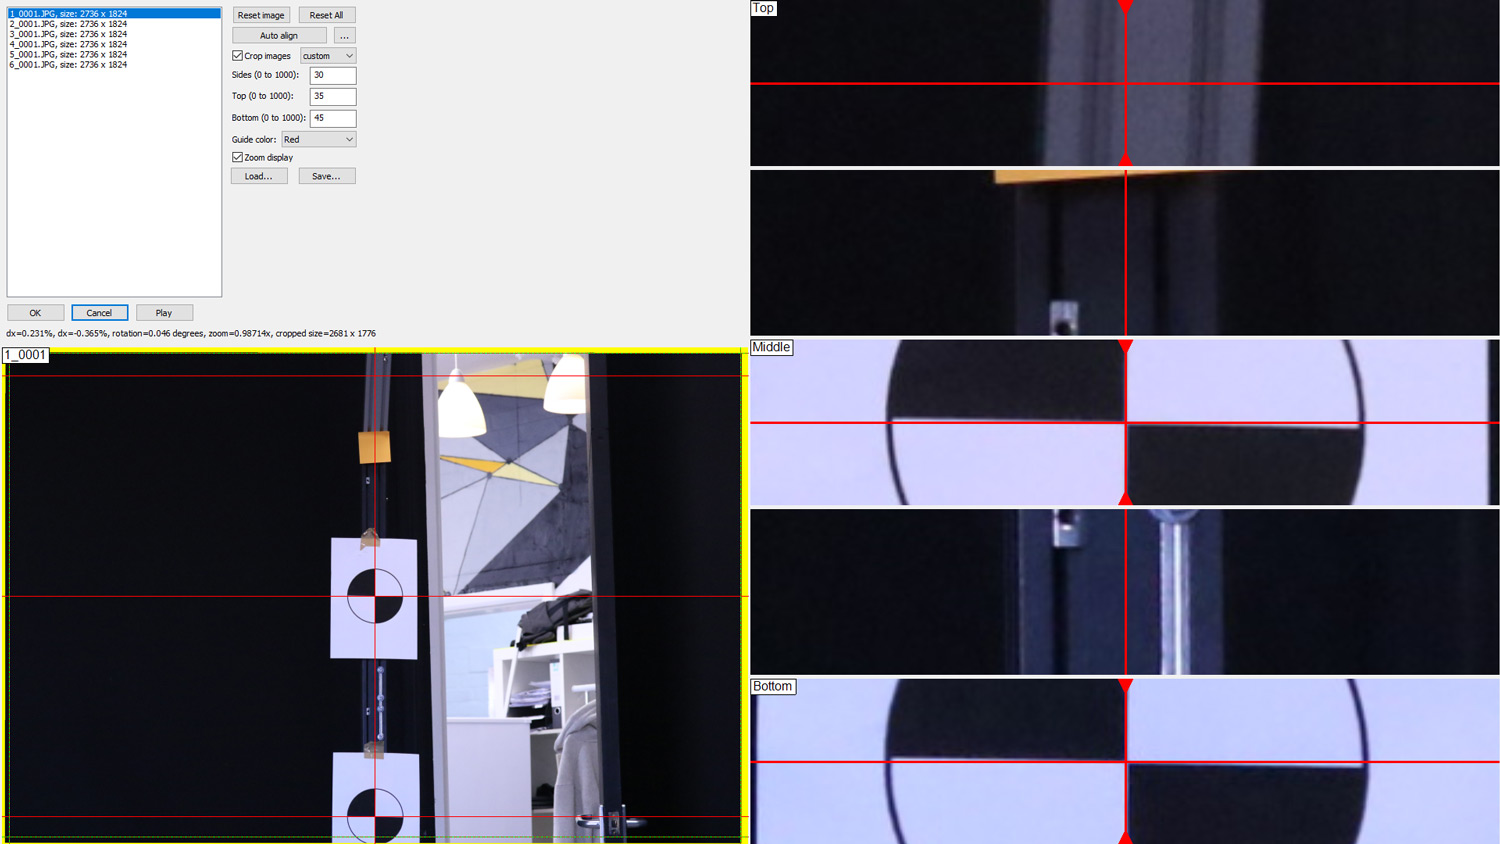
- Stick two reference targets on the top/bottom and middle section of the pole.
- “View” > “Grid Settings”. Set the number of horizontal and vertical divisions to 2 and 2.
- Go to “Camera” > “Live View”.
- Adjust each camera by manually turning the ring on the lens to focus. Tweak the alignment by adjusting the ball head. Don’t worry about getting the best alignment as this will be compensated later via the software, however the more accurate you are, the less crop during calibration.
- Press “>>” in the dashboard to go to the next camera and repeat.
- When you’ve finished go to “File” > “Run the Multi-Camera Animator” and click “Calibration Folder”.
- Trigger all cameras.
- In Animator click “Calibrate…” and open the calibration folder with the saved images to open the software.
- Ensure “Zoom Display” is selected. Start by clicking on the “Middle” section to adjust the position by left-clicking the centre of the target. Then click on the centre of the top/bottom mark to rotate and scale the image.
- To fine tune it, hold down the “Shift” key (Position) or “Ctrl” key (Rotation and Scale) and the “Arrows” on your keyboard.
- The less aligned cameras are during manual alignment, the more the software has to calibrate the image, which will create empty areas. To remove them change the “Sides”, “Top” and “Bottom” fields to crop the image.
- Repeat steps 9, 10 and 11 for each image. When finished, press the “Play” button to preview the result and “Save…” to save the calibration loadout.
If you have access to LED lights check out the Auto Camera Alignment guide to speed up the process.
Xangle Alignment:
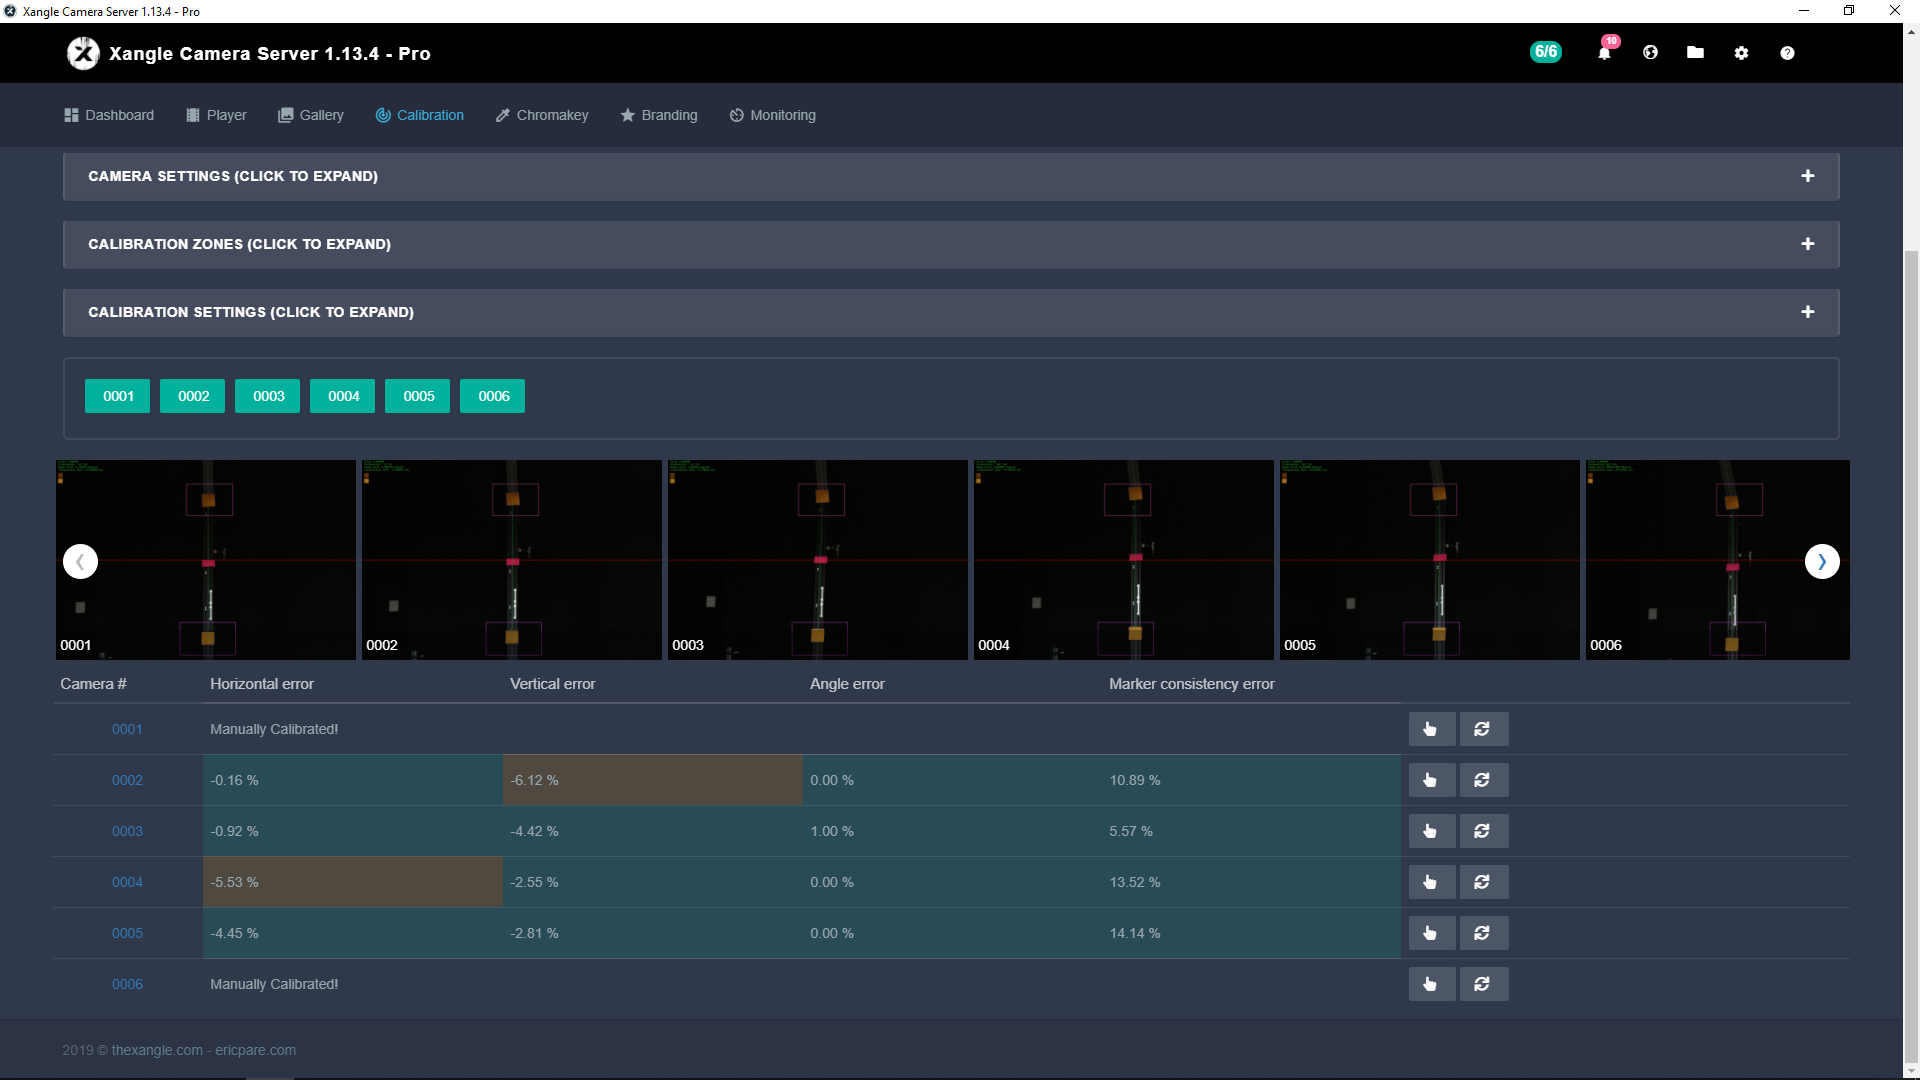
- Stick two coloured circles on the top/bottom of the pole, and one on the middle section.
- Go to “Live View” and aim each camera at the middle target on the pole (the more accurate you are the less crop during calibration) and adjust the focus.
- Go to the “Calibration” tab and change the camera settings so that there is only enough contrast between the markers and background e.g. 400 ISO, f/5,2 and 1/125 s.
- Trigger the cameras.
- Click on the “CALIBRATION ZONES” to expand the section. Adjust the highlighted boxes with a red outline so that they cover each marker as closely as possible.
- Click on the “CALIBRATION SETTINGS” to expand the section. Click on the “Top” colour box and use the colour picker on the top marker on the image, then repeat for the “Bottom” marker.
- Scroll up and press the “Recalibrate” button to launch a new calibration using the adjustments.
- Scroll all the way down to the table with the calibration errors. Manually calibrate each camera with red or amber highlights in any column by pressing the point icon.
- When the “Manual Calibration” window opens, click on the top marker on one of the top corners and then click again on the top marker’s bottom corner. Repeat for the bottom marker in order to draw a straight vertical line. Save by pressing the “Recalibrate” button.
- Repeat steps 9 and 10 for each camera.
Step 5: Bullet Time Techniques
Now that your array is ready you can start exploring different bullet time techniques.
In this section you will learn how to shoot five techniques: bullet time/time freeze, interval mode, jump and freeze, light painting bullet time and interval light painting effects.
We’ll start with the easier techniques moving on to the more advanced effects. Before starting, make sure you’ve set the correct camera settings.
Bullet Time / Time Freeze Effect


Let’s start with the most popular bullet time effect used by photo booth companies to “freeze” their guests.
Breeze Multi-Camera:
- Go to “File” > “Select Trigger…” > “ESPER Design TriggerBox”
- “File” > “Run Multi-Camera Animator” > press “Run”
- Make sure the TriggerBox is in Green Mode
- Trigger the cameras
Xangle Camera Server:
- From the dashboard, change the “CONTROL MODE” to “TriggerBox”
- Set the “TRIGGER MODE” to “Normal”
- Make sure the TriggerBox is in Green Mode
- Trigger the cameras
Interval Mode


The Interval Mode adds movement to the bullet time effect and is similar to the previous technique.
It is recommended to use more cameras to make the final results even more exciting. Feel free to experiment with the settings to find the right delay for your setup.
Breeze Multi-Camera:
- Go to “File” > “Trigger Setup…”
- Enter the following delays in the channels: Channel 1: 0, Channel 2: 50, Channel 3: 100, Channel 4: 150, Channel 5: 200 and Channel 6: 250
- Make sure the TriggerBox is in Blue Mode
- Trigger all cameras
Xangle Camera Server:
- Change the “TRIGGER MODE” to “Interval”
- Open the ESPER Controller Software from your desktop, press “CONNECT” and then the “FAN MODE” button
- Enter e.g. 250ms into the “Fan Duration:” in “FAN SETTINGS” and press “APPLY”. This will split the delay equally among the cameras.
- Make sure the TriggerBox is in Blue Mode
- Trigger all cameras
Jump and Freeze


Similar to the previous effects, the jump and freeze technique introduces movement and then freezes the subject at the set sequence.
Again, we recommend using more cameras to achieve truly amazing results.
Breeze Multi-Camera:
- Go to “File” > “Trigger Setup…”
- Enter the following delays in the channels: Channel 1: 32, Channel 2: 64, Channel 3: 96, Channel 4: 128, Channel 5: 128 and Channel 6: 128
- Make sure the TriggerBox is in Blue Mode
- Trigger all cameras
Xangle Camera Server:
- Change the “TRIGGER MODE” to “Interval”
- Open the ESPER Controller Software from your desktop, press “CONNECT” and then the “DELAY MODE” button
- Enter e.g. 32ms, 64ms, 96ms, 128ms, 128ms and 128ms into the “DELAY” in “OUTPUTS”
- Make sure the TriggerBox is in Blue Mode
- Trigger all cameras
Light Painting


Light painting photography is rewarding, unique and adds a creative spin to the bullet time effect that makes it even more impressive.
You have two options for implementing light painting into your photo booth.
Either let your guests get creative by providing them with light painting tools during the shoot, or assign one of your staff to paint while the guests stand still for a brief moment.
Regardless of which method you choose, to create this effect you will need to use the correct camera settings. A strobe is also recommended as you’ll need to freeze the subject at the start of the exposure to make it sharp. Lastly, you’ll need some light painting props such as torches, light tubes, fibre brush, LED batons or even smartphones; the choices are endless.
Light painting camera settings:
- 16/f or higher
- Shutter speed of 1-3 seconds. The longer the exposure, the more likely it is the subject will move during the shoot, which could create blurriness
- ISO – 100
Breeze Multi-Camera:
- Change the camera settings from the dashboard
- Go to “File” > “Trigger Setup…” and reset the delays in between the cameras
- Make sure the TriggerBox is in Blue Mode
- Trigger the cameras and paint with light
Xangle camera server:
- Change the camera settings from the dashboard
- Change the “TRIGGER MODE” to “Normal”
- Make sure the TriggerBox is in Blue Mode
- Trigger the cameras and paint with light
Light Painting + Interval Mode


The final effect uses the previous techniques to create something even more stunning.
Again, you’ll need to play around with the camera settings and the delays to achieve the best results whilst also having enough movement in the video.
Breeze Multi-Camera:
- Adjust the camera settings
- Go to “File” > “Trigger Setup…” and change the delays to 200, 400, 600, 800, 1000, 1200ms
- Enter the following delays in the channels: Channel 1: 200, Channel 2: 400, Channel 3: 600, Channel 4: 800, Channel 5: 1000 and Channel 6: 1200
- Make sure the TriggerBox is in Blue Mode
- Trigger the cameras and paint with light
Xangle camera server:
- Adjust the camera settings
- Change the “TRIGGER MODE” to “Interval”
- Open the ESPER Controller Software, press “CONNECT” then the “FAN MODE” button
- Enter e.g. 1200ms into the “Fan Duration:” in “FAN SETTINGS” and press “APPLY”. This will split the delay equally among the cameras.
- Make sure the TriggerBox is in Blue Mode
- Trigger the cameras and paint with light
Step 6: Improving Bullet Time Results
We often get asked how to improve bullet time results by making them smoother and therefore more impressive at events.
You have to understand that besides getting the fundamentals right it’s not the hardware or software you are using but the number of cameras in your setup.
Of course there are other things that can improve your outcome, such as props, video overlays, backdrops, better lighting etc. However, the more cameras you are using the more possibilities and better results you can achieve with your setup.


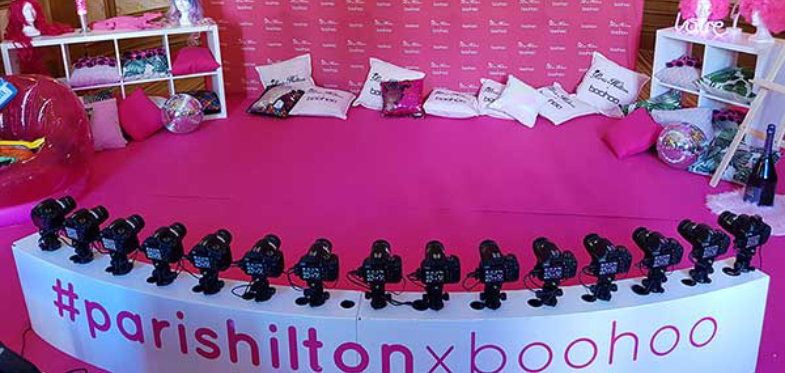
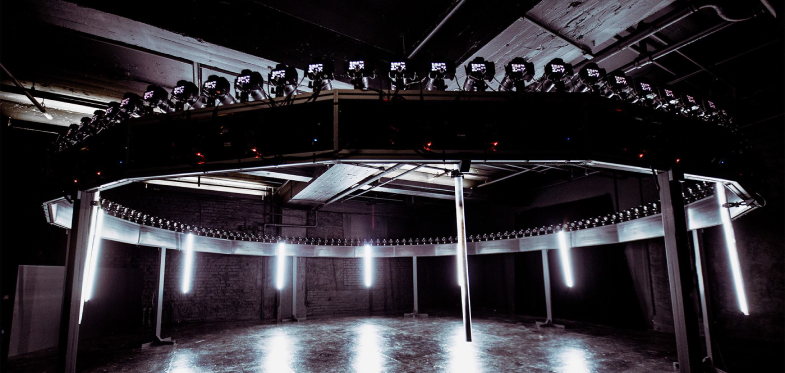
To start using bullet time you should have at least five cameras at your disposal. However as you increase the number of cameras you can then begin to create effects that look even more impressive – such as a full 360 effect which, for example, requires at least 36 cameras but looks really stunning with over 100 cameras,
Of course there are benefits to having smaller arrays in your offering as they are more compact and a lot more convenient to travel with and set up for an event.
You will need more cameras to create more spectacular work and win bigger clients who are interested in high-quality work. (Rental cost for 12 camera bullet time array starts at $10,000 running to $35,000 for 48 cameras.) This is why our customers often upgrade their setups by adding more cameras.
Common Camera Array and Bullet Time Issues
We’ve put together some of the more common questions in case you come across any issues while setting-up your camera arrays or shooting bullet time:
Issue: GIFs look choppy. How do I make them smooth?
Solution: Your cameras need to be realigned and calibrated again as one or more cameras isn’t pointing towards the same area as the rest. You can also change the FPS for the GIF/video output in the multi-camera software settings.
Issue: My GIF looks very cropped after calibration.
Solution: Your cameras aren’t aligned properly and so the software has to compensate for this error by cropping the images to make them look the same. Manually adjust the cameras again and zoom in on a point to make sure they all are positioned at the same level. Then recalibrate in the software.
Issue: Image lighting of each camera is not consistent.
Solution: Make sure that all the cameras are set to Manual Mode and are using the same settings to ensure consistency. The environment could also affect the exposure of some cameras as any ambient light passing though could also have an impact on the final outcome.
Issue: There is a movement in the GIF.
Solution: Your cameras didn’t fire at the same time. To troubleshoot the problem, fire all cameras from the TriggerBox Controller Software. Then use the remote instead of the software and the other way around to see if the problem persists. Make sure that the cameras are in the Manual Mode.
Issue: One or more cameras failed to fire at the same time.
Solution: Make sure you are half-pressing the remote before taking a shot. This will activate the cameras’ auto-focus, readying them for when you fully press the shutter to take a picture. Also ensure that the camera settings are the same and you are in the Manual Mode.
Issue: Moving objects or subject is blurry.
Solution: Increase the shutter speed to prevent motion being captured by the cameras. Also make sure that the flash settings are correct. We recommend trying a 119.5ms delay for the flash to sync it with your cameras and see what happens. Read this guide on how to sync flashes with multiple cameras.
Want To Learn More?
Make sure to check out and join some of the following groups of experienced photo booth owners and multi-camera users to learn more and find answers to any other questions you might have.
A Facebook group in which bullet time array users share their experiences and help others improve event photo experiences.
A group for Breeze software users and photo booth owners to share ideas and help each other.
Facebook group discussing bullet time photography either for studio work or for a photo booth, as well as other software solutions by the Xangle team.

A place to share ideas, ask questions and learn about building a photo booth.
Other useful sites to visit:
- Breeze Multi-Camera Support & Help and Blog.
- Xangle Camera Server Support and Tips and Tricks site.
- ESPER Support Centre and Forum.
Here’s What’s Next…
Congratulations on getting this far! Now you should be equipped with all the essential knowledge to begin your bullet time experience.
We hope this guide on how to set up a bullet time camera array will help you get the results you desire…
Now it’s over to you!
Are you planning on creating a bullet time booth? Or perhaps you’ve been using a multi-camera array and have something interesting to share?
Either way, let us know by leaving a comment.